Enhance Your Network with Pi-hole: Ad Blocking and Privacy Solutions
Internet advertisements have become very obtrusive and more apparent over the last several years. Users conducting research from various sources on the web are often met with a vexatious experience full of distractions. Children watching YouTube videos that have inappropriate advertisement content embedded in the videos are also becoming a concern for many parents. Normally users will install ad-blocking software and extensions on their operating systems and web browsers. Most of the software installed for ad-blocking purposes ends up not being updated and extensions for web browsers often stop working when the web browser itself has been updated.
A more efficient solution is now available thanks to single board computing. The Raspberry Pi being the most readily available single board computer. For a mere $16 anyone can have a multi-platform, network-wide ad blocker on their local network. This software plays very nice in both office and home networks. Pi-hole offers a wonderful dashboard with real time analytics if you’re someone who loves numbers.
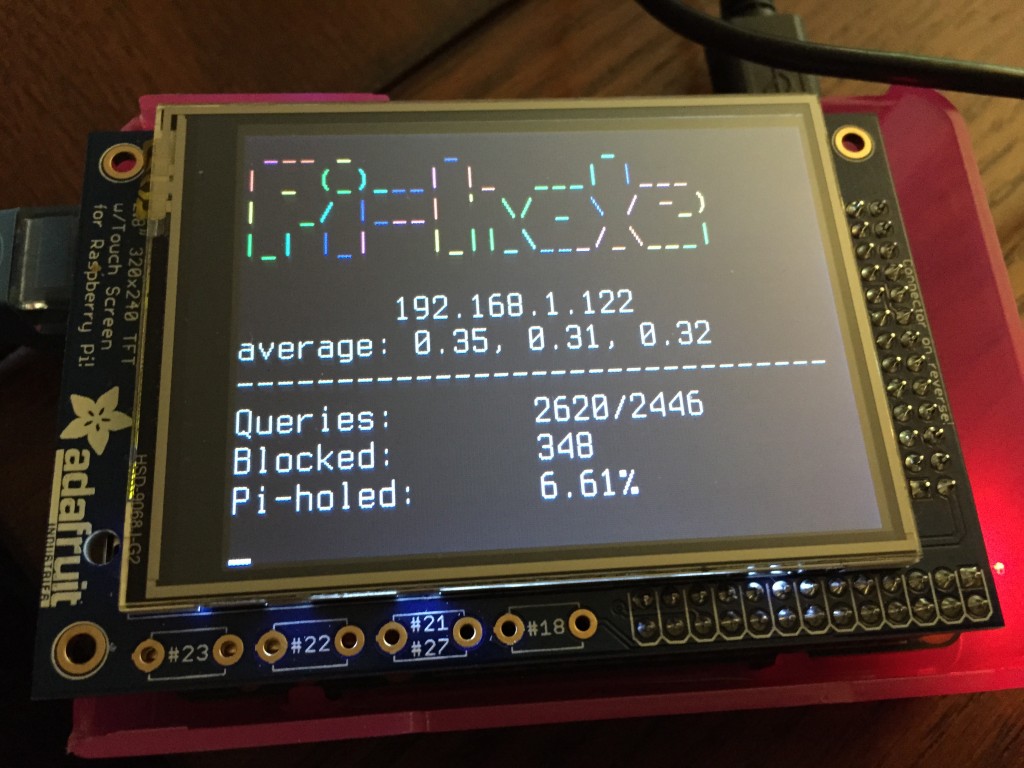
Below is an example of a Raspberry Pi, with Pi-hole installed showing real time stats via an LCD installed on the Raspberry Pi:
So what is needed to get this project going?
- Raspberry Pi Kit – $16
- Ethernet Cable (Optional) – $6
- Screen for Raspberry Pi (Optional) -$20
After you have purchased these components it’s very simple to install Pi-hole.
You can install an Operating System image on your Raspberry Pi. Step-by-step directions are provided and the entire process takes less than 10 minutes to complete.
Installing Pi-hole:
- Install Pi-hole on the Raspberry Pi. The program can be downloaded here or via the install “curl -sSL https://install.pi-hole.net | bash|”” command.
- Configure your router DHCP settings to force clients in using your PI-hole as their DNS server. You can also manually configure each device but that takes much more time than blocking ads on the whole network at once. This step sounds more difficult than it actually is. The only thing that you have to change are some ports and DNS settings on your router. Most routers have this setting displaying on the main page and it can be changed within a matter of a few seconds. A straightforward guide is provided on Pi-Holes official site.
- Completion! Your Pi-hole blocks all advertisements at a DNS level. This means your whole network is protected and any device connected will automatically block online commercials even inside Apps and programs. You have freed your laptop, iPhone, Nexus tablet and desktop PC from all online commercials! Enjoy faster loading times on all your favorite websites and apps.
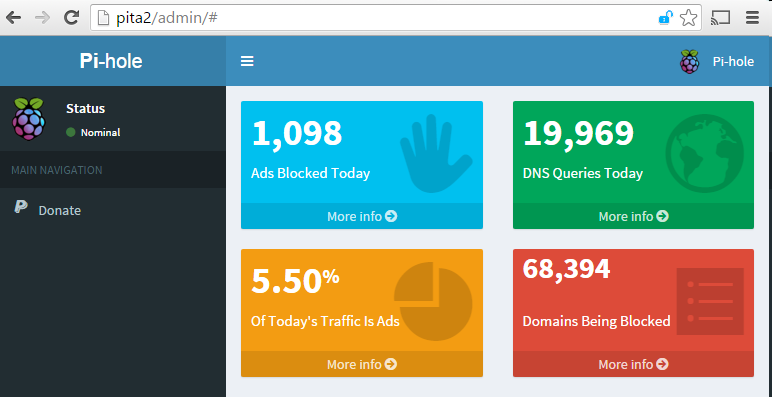
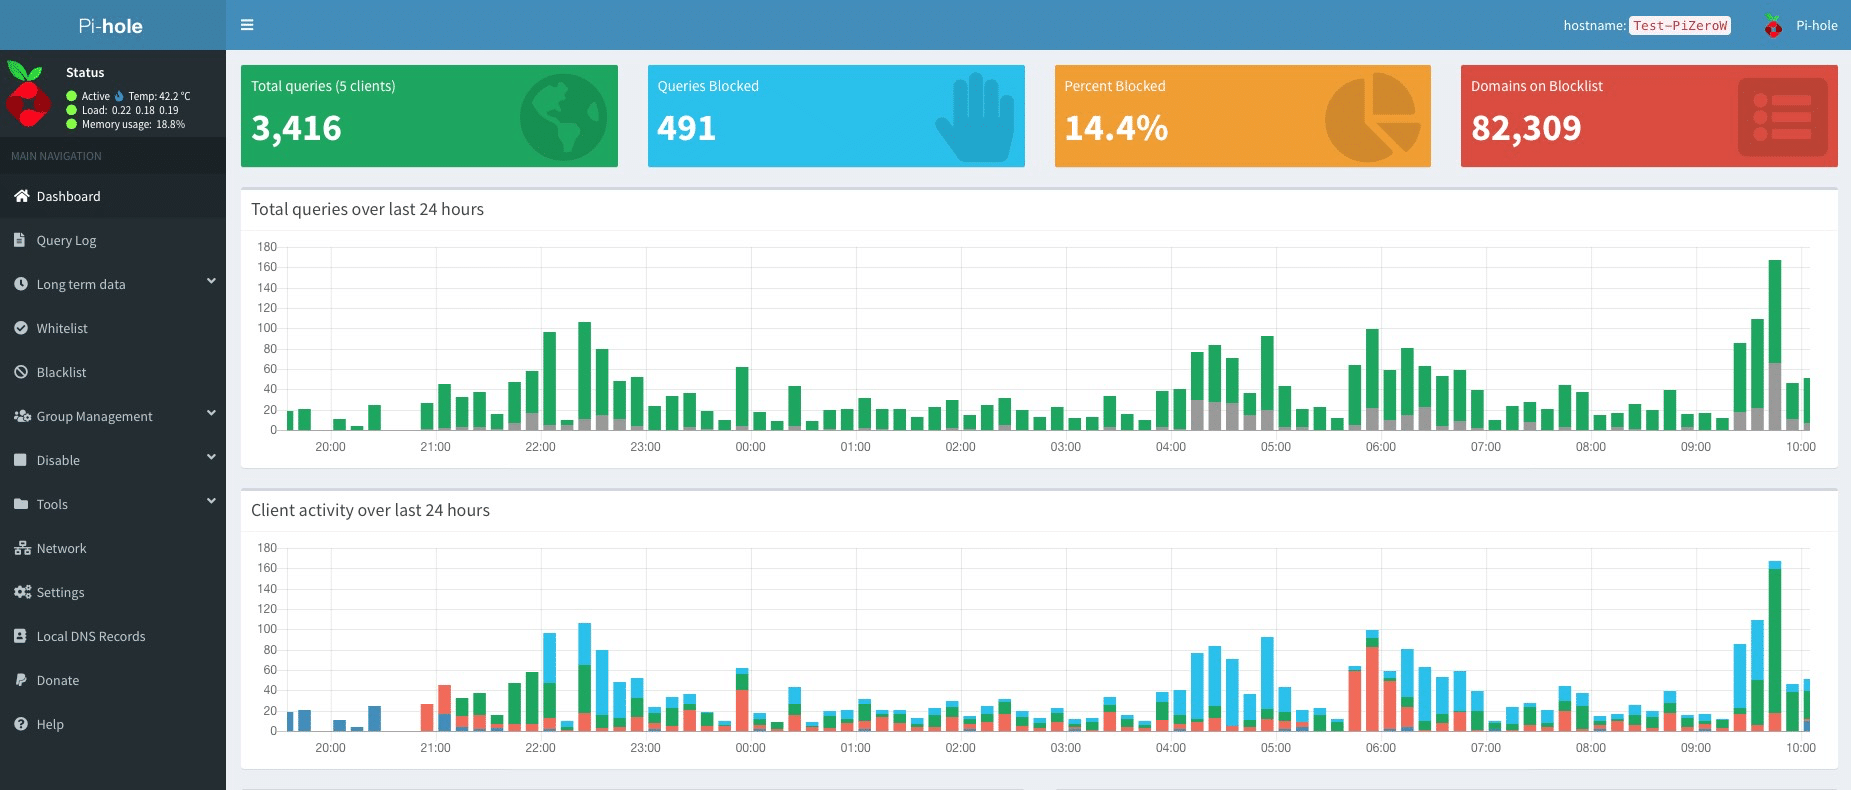
If you’d like to pull up Pi-holes nifty dashboard and see how many advertisements were blocked from your entire network you’ll see a clean interface exactly like the one below :
 Fun Facts About Pi-hole :
– The code is completely open, and you are able to modify it in any way you’d like. (Yay for open-source!)
– Pi-hole is very lightweight as it only handles DNS queries and returns a blank HTML file so it doesn’t need much processing power. (Yay for efficiency!)
– Pi-hole will run on most Debian-based distros and is the preferred platform for it.(Yay for compatibility!) source
Block Internet ads at home with Pi-hole
LETS DIVE DEEPER….
Internet advertising can often be a nuisance. It takes up valuable bandwidth. It weighs your browser down with trackers. It reports your data back to untrustworthy third parties.
On some devices, like laptops and phones, you can use ad blockers to protect yourself (and your sanity). But on many smart devices, like TVs, refrigerators, toasters, and toilets, you can’t install an ad blocker.
Pi-hole simplifies ad blocking by operating at the network level, instead of on individual devices. That way, you aren’t restricted by which devices can install an ad-blocker; instead, you can protect devices on your network from ever accessing ads in the first place.
How does Pi-hole work?

Pi-hole blocks ads by acting as a DNS sinkhole.
To understand what a DNS sinkhole is, you need to understand what DNS is. Here are a few key terms:
104.22.23.160)DNS: Domain Name System, associates domain names with IP addresses
DNS server: a server that translates domain names into IP addresses
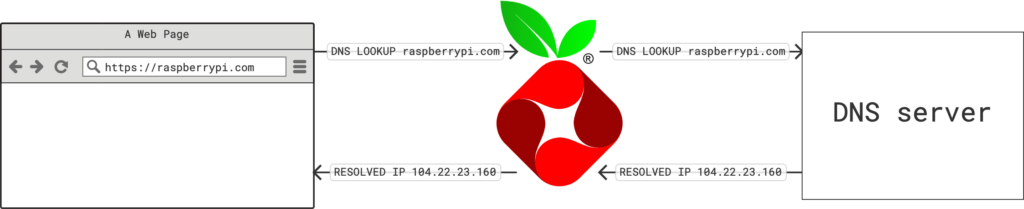
raspberrypi.com)When you type
www.raspberrypi.com into your browser, your computer asks a DNS server where to find that domain. The DNS server responds with an IP address (e.g. 104.22.23.160). Then your computer queries that IP address for the resource you’re looking for.We use domain names because IP addresses aren’t very human-readable; it’s a lot easier to read and write “raspberrypi.com” than four bytes’ worth of numbers.Usually, your computer queries a DNS server hosted somewhere on the internet. It might be hosted by your internet provider, a website hosting company, or any company that runs a lot of servers. Your machine submits a domain, and the DNS server returns the IP address corresponding to that domain. The DNS server doesn’t care if the domain provides something you want (like the article you’re trying to read) or an ad. It just resolves domains into IP addresses.
Here’s where Pi-hole comes in. Pi-hole stands between your network and a DNS server. Consider a client device, like your smart toilet, performing a DNS lookup for a domain. The Pi-hole in your network acts like a DNS server; DNS lookups from all client devices, whether that’s your smart toilet or your phone, go to the Pi-hole.
But Pi-hole doesn’t store a perfect up-to-date mapping of all domain names to all IP addresses. Instead, Pi-hole queries a real DNS server outside of your network. However, before it queries that real DNS server, Pi-hole checks a blocklist. If the domain passes this filter, Pi-hole requests the IP address from the DNS server, and returns it to the client device on your network. If the domain doesn’t pass the filter — if it’s included on the blocklist — Pi-hole returns a non-routable address such as 0.0.0.0.
The following diagram shows a lookup via a Pi-hole for the unblocked domain raspberrypi.com:
The following diagram shows a lookup via a Pi-hole for the blocked domain raspberryads.com:

TL;DR: Pi-hole blocks requests made to ad domains from your network, before the requests ever leave your network. Your client devices can’t connect to domains that host ads, but can connect to domains that host useful content.
Overview
To install a Pi-hole in your network, you’ll need to do the following things:
- Configure a Raspberry Pi running Raspberry Pi OS.
- Set up Pi-hole software on your Raspberry Pi.
- Direct DNS queries on your network to your Raspberry Pi.
Supplies
- Raspberry Pi
- suitable power supply (see the documentation for details)
- microSD card (see the documentation for details)
- adapter to connect your microSD card with your usual computer
- USB cable (check your 3D printer for details)
For the initial SD card setup, you will need:
- Another computer connected to your network. We’ll refer to this as your usual computer to distinguish it from the Raspberry Pi computer you are setting up.
Choose a Raspberry Pi
You can use any Raspberry Pi model for this. We recommend Zero 2 W if you can’t decide which model to use.
Configure your Raspberry Pi
To begin, follow the Getting Started documentation to set up your Raspberry Pi. For your operating system, choose Raspberry Pi OS Lite (32-bit) to run headless (without a mouse and keyboard).
During the OS customisation stage, edit settings as follows:
- Enter a hostname of your choice (we suggest
pi-holefor this tutorial) - Enter a username and password; you’ll need these later to authenticate
- Check the box next to Configure wireless LAN so your Pi can automatically connect to Wi-Fi
- Enter your network SSID (name) and password; you can find these in your Wi-Fi settings or on a sticker on your router
- Check the box next to Enable SSH so we can connect to the Pi without a mouse and keyboard
Connect via SSH
Open a terminal on your computer. If you use a Windows computer, you may need to install a terminal; we suggest PuTTY. Enter the following command to connect to your Raspberry Pi, replacing the <username> placeholder with your own username that you chose in Imager:
$ ssh <username>@pi-hole.localIf ssh asks you if you’re sure you want to continue connecting, reply yes. Enter the password you chose during advanced configuration when prompted.
You’ll know you’ve connected successfully when you see the following prompt with your configured username and hostname:
<username>@<hostname>:~ $Now that you’ve connected to your Raspberry Pi, run two commands to make sure that all of your packages are up to date:
$ sudo apt update
$ sudo apt full-upgrade
Once the package update commands finish running, reboot your Raspberry Pi to allow all changes to take effect:
$ sudo rebootRunning this command will disconnect you from the Raspberry Pi SSH session. Wait a few seconds for your Raspberry Pi to reboot, and enter the ssh connection command again to reconnect to your device.
tip
Install Pi-hole
Run the following single-line command to run the Pi-hole setup script:
$ curl -sSL https://install.pi-hole.net | bashThe setup script is relatively self-explanatory, but follow these tips if you aren’t sure how to proceed:
- When warned about needing a static IP address, click Continue to proceed; we’ll deal with this later
- When prompted to select an interface, select
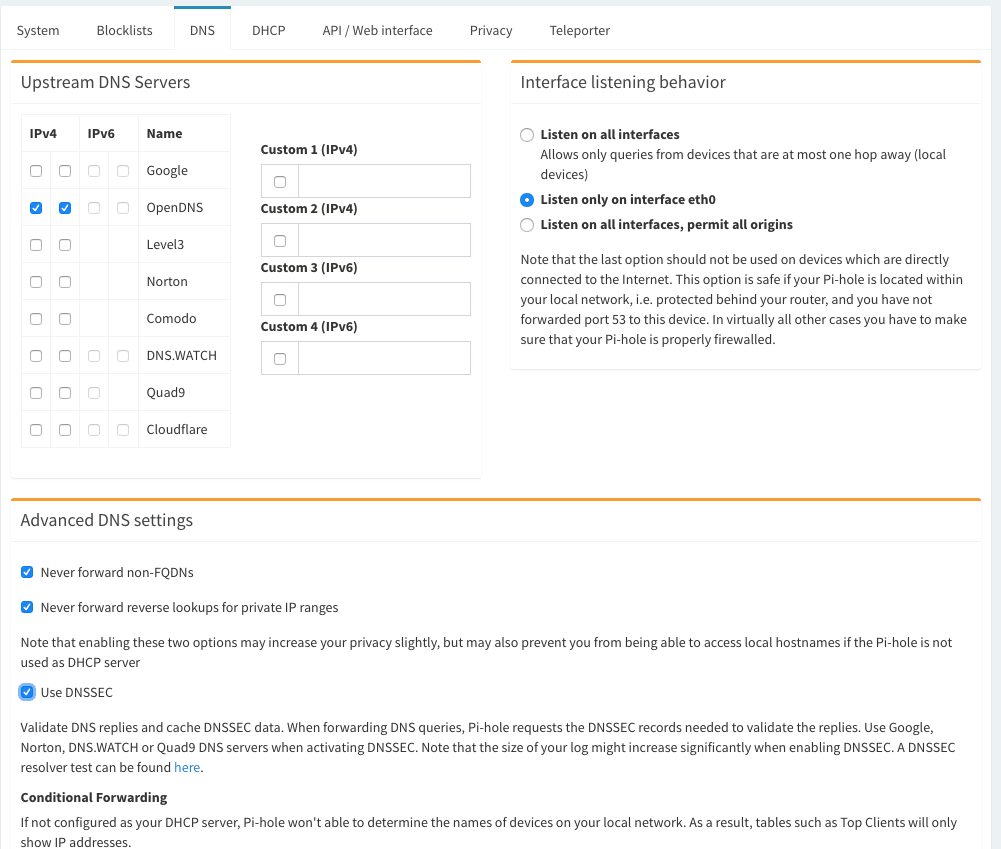
wlan0to use your Raspberry Pi’s Wi-Fi connection - When prompted to choose an upstream DNS provider, choose OpenDNS
- Include StevenBlack’s Unified Hosts List
- Install the Admin Web Interface
- Install
lighttpdand the required PHP modules to run the Admin Web Interface - Enable query logging
- When prompted to choose a privacy level, choose Anonymous mode
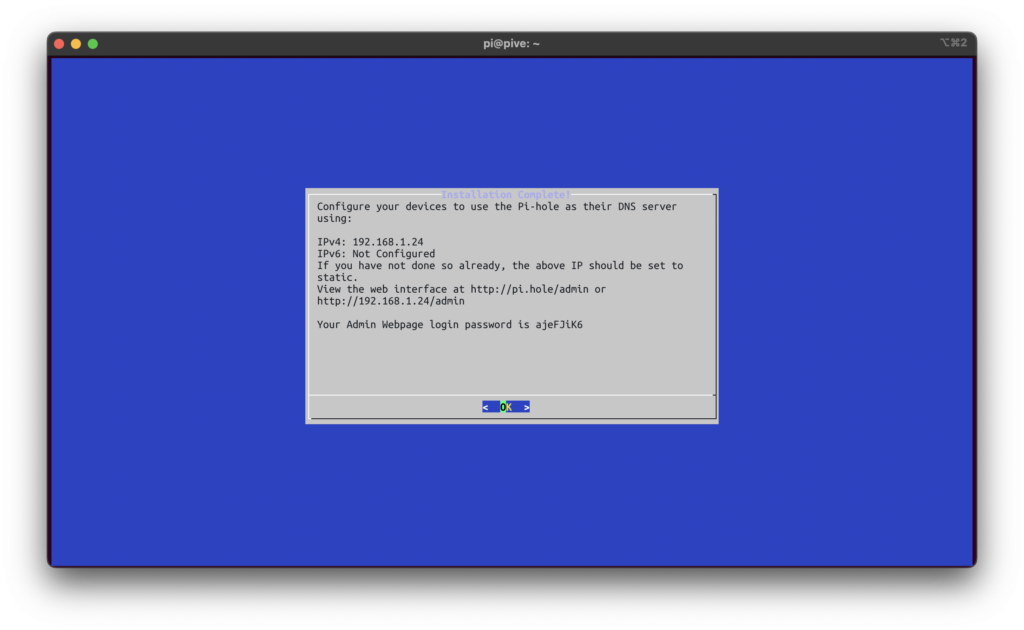
When you see “Installation complete!”, the setup is complete. This screen shows the IP address of your Pi-hole, a link to the admin interface, and your administrator password.
- Save this password somewhere safe, like a password manager — you’ll need it to work with your Pi-hole in the future
- Save the IP address — you’ll need it to configure a static IP address shortly
Pi-hole only provides a single administrator account, so there’s no username. Press the Control key (Command on macOS) and click the link to the admin interface that uses an IP address. It’ll look something like http://192.168.1.24/admin. Don’t use the pi.hole domain link yet; until we configure the Pi-hole as our DNS provider, it won’t work. The link should open in your browser. You can also copy and paste the link into a browser if control + click doesn’t work in your terminal. Use the admin password from the setup script output to authenticate. You can now see your Pi-hole admin console! We recommend bookmarking this console for future maintenance.
Configure your network to use your Pi-hole
warning
The tasks below require you to change global settings in your wireless network. You might break your internet connection (for a little while). Proceed with caution!
To complete these tasks, visit the admin interface for your router. You can usually access the admin interface through your router’s IP address. Here are a couple of common ways to find that interface:
- Run the following command on your Raspberry Pi to output your router’s IP address:
$ nmcli -f IP4.GATEWAY device show wlan0 - Check for a sticker on your router — look for a value called “admin URL” or similar
Once you’ve found the IP address, log in to your router’s admin interface by typing the address (sometimes with the suffix /admin) into your browser. Enter your username and password (if you don’t know these, you may be able to find them on a sticker on your router). Now that you’ve got your Pi-hole configured, you have three choices to use it to block ads. All of them involve getting Pi-hole between your network and the internet:
- configure Pi-hole as the DNS server for your network
- configure Pi-hole as the DHCP provider for your network
- manually point devices at Pi-hole for DNS
It’s easiest to use your Pi-hole as a DNS server. However, some routers don’t provide a setting to control the default DNS server. If you can’t set a DNS server, try configuring Pi-hole as your DHCP provider. And if you can’t do that either, you can always manually point devices at the Pi-hole for DNS — it’s not as good as full-network ad blocking, but it’s a lot better than nothing.
Configure Pi-hole as your network’s DNS server
This is the most common way of configuring a Pi-hole. For this method, you’ll first assign your Raspberry Pi a static IP address from your router’s interface, then point your router’s DNS server settings to the Pi-hole’s static IP address. With this setup, your router controls IP reservations across your network, but devices on the network send DNS queries to your Pi-hole instead of to a DNS server on the internet.
Assign your Raspberry Pi a static IP address
IP addresses are unique numeric codes that allow you to directly interact with devices on your network. For instance, many routers automatically assign themselves the first address in the IP block they are using, such as 192.168.1.1. Most networks use Dynamic Host Configuration Protocol (DHCP) to assign IP addresses to devices automatically. These IP addresses are known as dynamic IP addresses, because they can change at any time.
To run a Pi-hole on your network, we recommend assigning your Pi-hole a static IP address. A static IP address never changes. This allows devices on your network always to find the Pi-hole at the same address.
To start, run the following command on your Raspberry Pi:
$ hostname -IYou should see output similar to the following:
$ 192.168.1.24This value is the current (dynamic) IP address of your Raspberry Pi on the network.
To assign a static IP address, you also need the MAC address of your Raspberry Pi. A device’s MAC address is a hardware identifier that your router uses to uniquely identify it. Run the following command to find the MAC address of your Raspberry Pi:
$ nmcli -f GENERAL.HWADDR device show wlan0You should see output similar to the following:
GENERAL.HWADDR: A8:42:EA:58:E0:1CThe value on the right is the MAC address of your Raspberry Pi. Now that we know your Raspberry Pi’s MAC address and IP address, we can configure your router so it always associates the Raspberry Pi’s MAC address with its current IP address. Effectively, we’re turning the current dynamic address into a static one using the MAC address. In your router’s admin interface, configure a static IP address for your Raspberry Pi. There are several ways to accomplish this, depending on your router:
- You might be able to find this setting in the “Advanced” section of the router admin interface. Look for a list called “DHCP Reservations”, and enter your Raspberry Pi’s IP address and MAC address.
- Look for a list of connected devices and find your Raspberry Pi’s IP address or MAC address. Select the option to “Always use this IP address” to make the IP address reservation static.
- Check the documentation for your router model for specific instructions.
Set Pi-hole as your network’s default DNS server
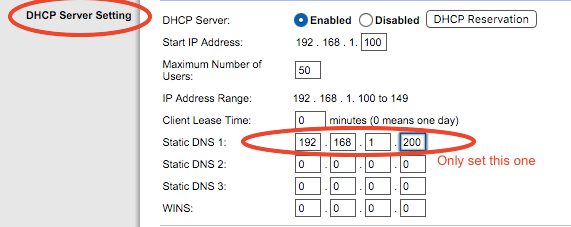
Once you’ve assigned your Raspberry Pi a static IP address, you can configure individual devices to use Pi-hole as a DNS server in their network settings. But this process is tedious, and some devices don’t provide an easily accessible DNS server setting. However, there is an easier way: most routers automatically suggest a DNS server for devices connected to your network. All you have to do is change the suggested server in your router’s settings, and your entire network should start using your Pi-hole for DNS.
Look for a setting called DNS in your router’s admin interface. You may be able to find the setting in a section called “Internet”, “DHCP”, “Internet Connection”, or “DDNS”.
Enter your Pi-hole’s IP address in the DNS (or similarly named) field.
If your router provides multiple custom DNS fields, add your Pi-hole address in each field.
important
Whatever you do, don’t add any separate DNS entries after the Pi-hole entries — this can break Pi-hole’s ad blocking functionality. When your Pi-hole blocks a domain, it returns a non-routable address such as 0.0.0.0, and some devices will query the secondary DNS server when the first server returns such a non-routable address. If your secondary DNS server isn’t a Pi-hole, every single request blocked by Pi-hole will succeed on the secondary server, and ads will load as if you weren’t running an ad blocker at all.
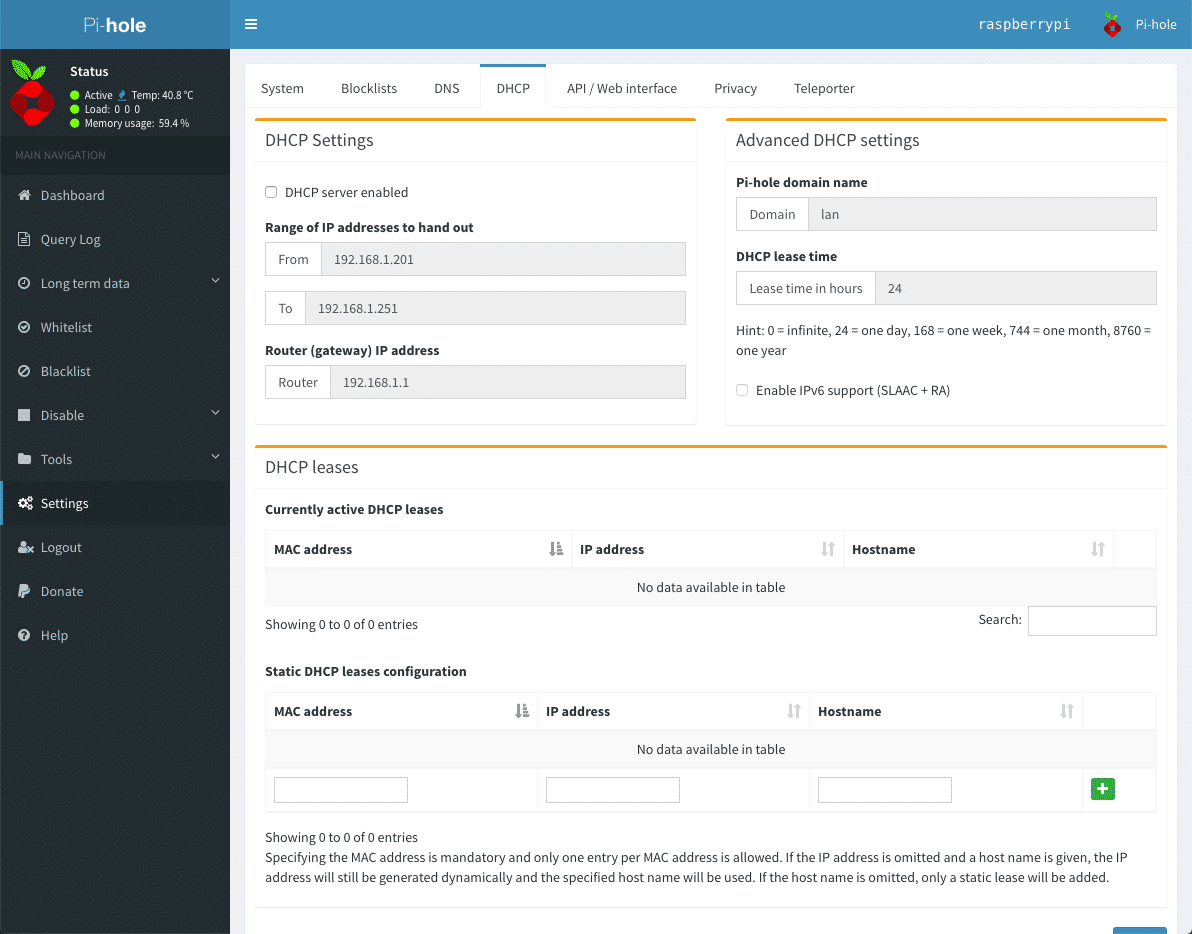
Configure Pi-hole as your network’s DHCP provider
If your router doesn’t support configuration for static IP addresses or DNS servers, you may still be able to use your Pi-hole automatically across your network. First, check whether you can change the network DHCP server in your router settings. If you can, you can use your Pi-hole both as a DNS server and as the DHCP server that handles IP address reservations across your network.
First, navigate to the Pi-hole admin console. If you type your Raspberry Pi’s IP address into your browser, it should redirect you there.
In the left side menu, select the “Settings” page.
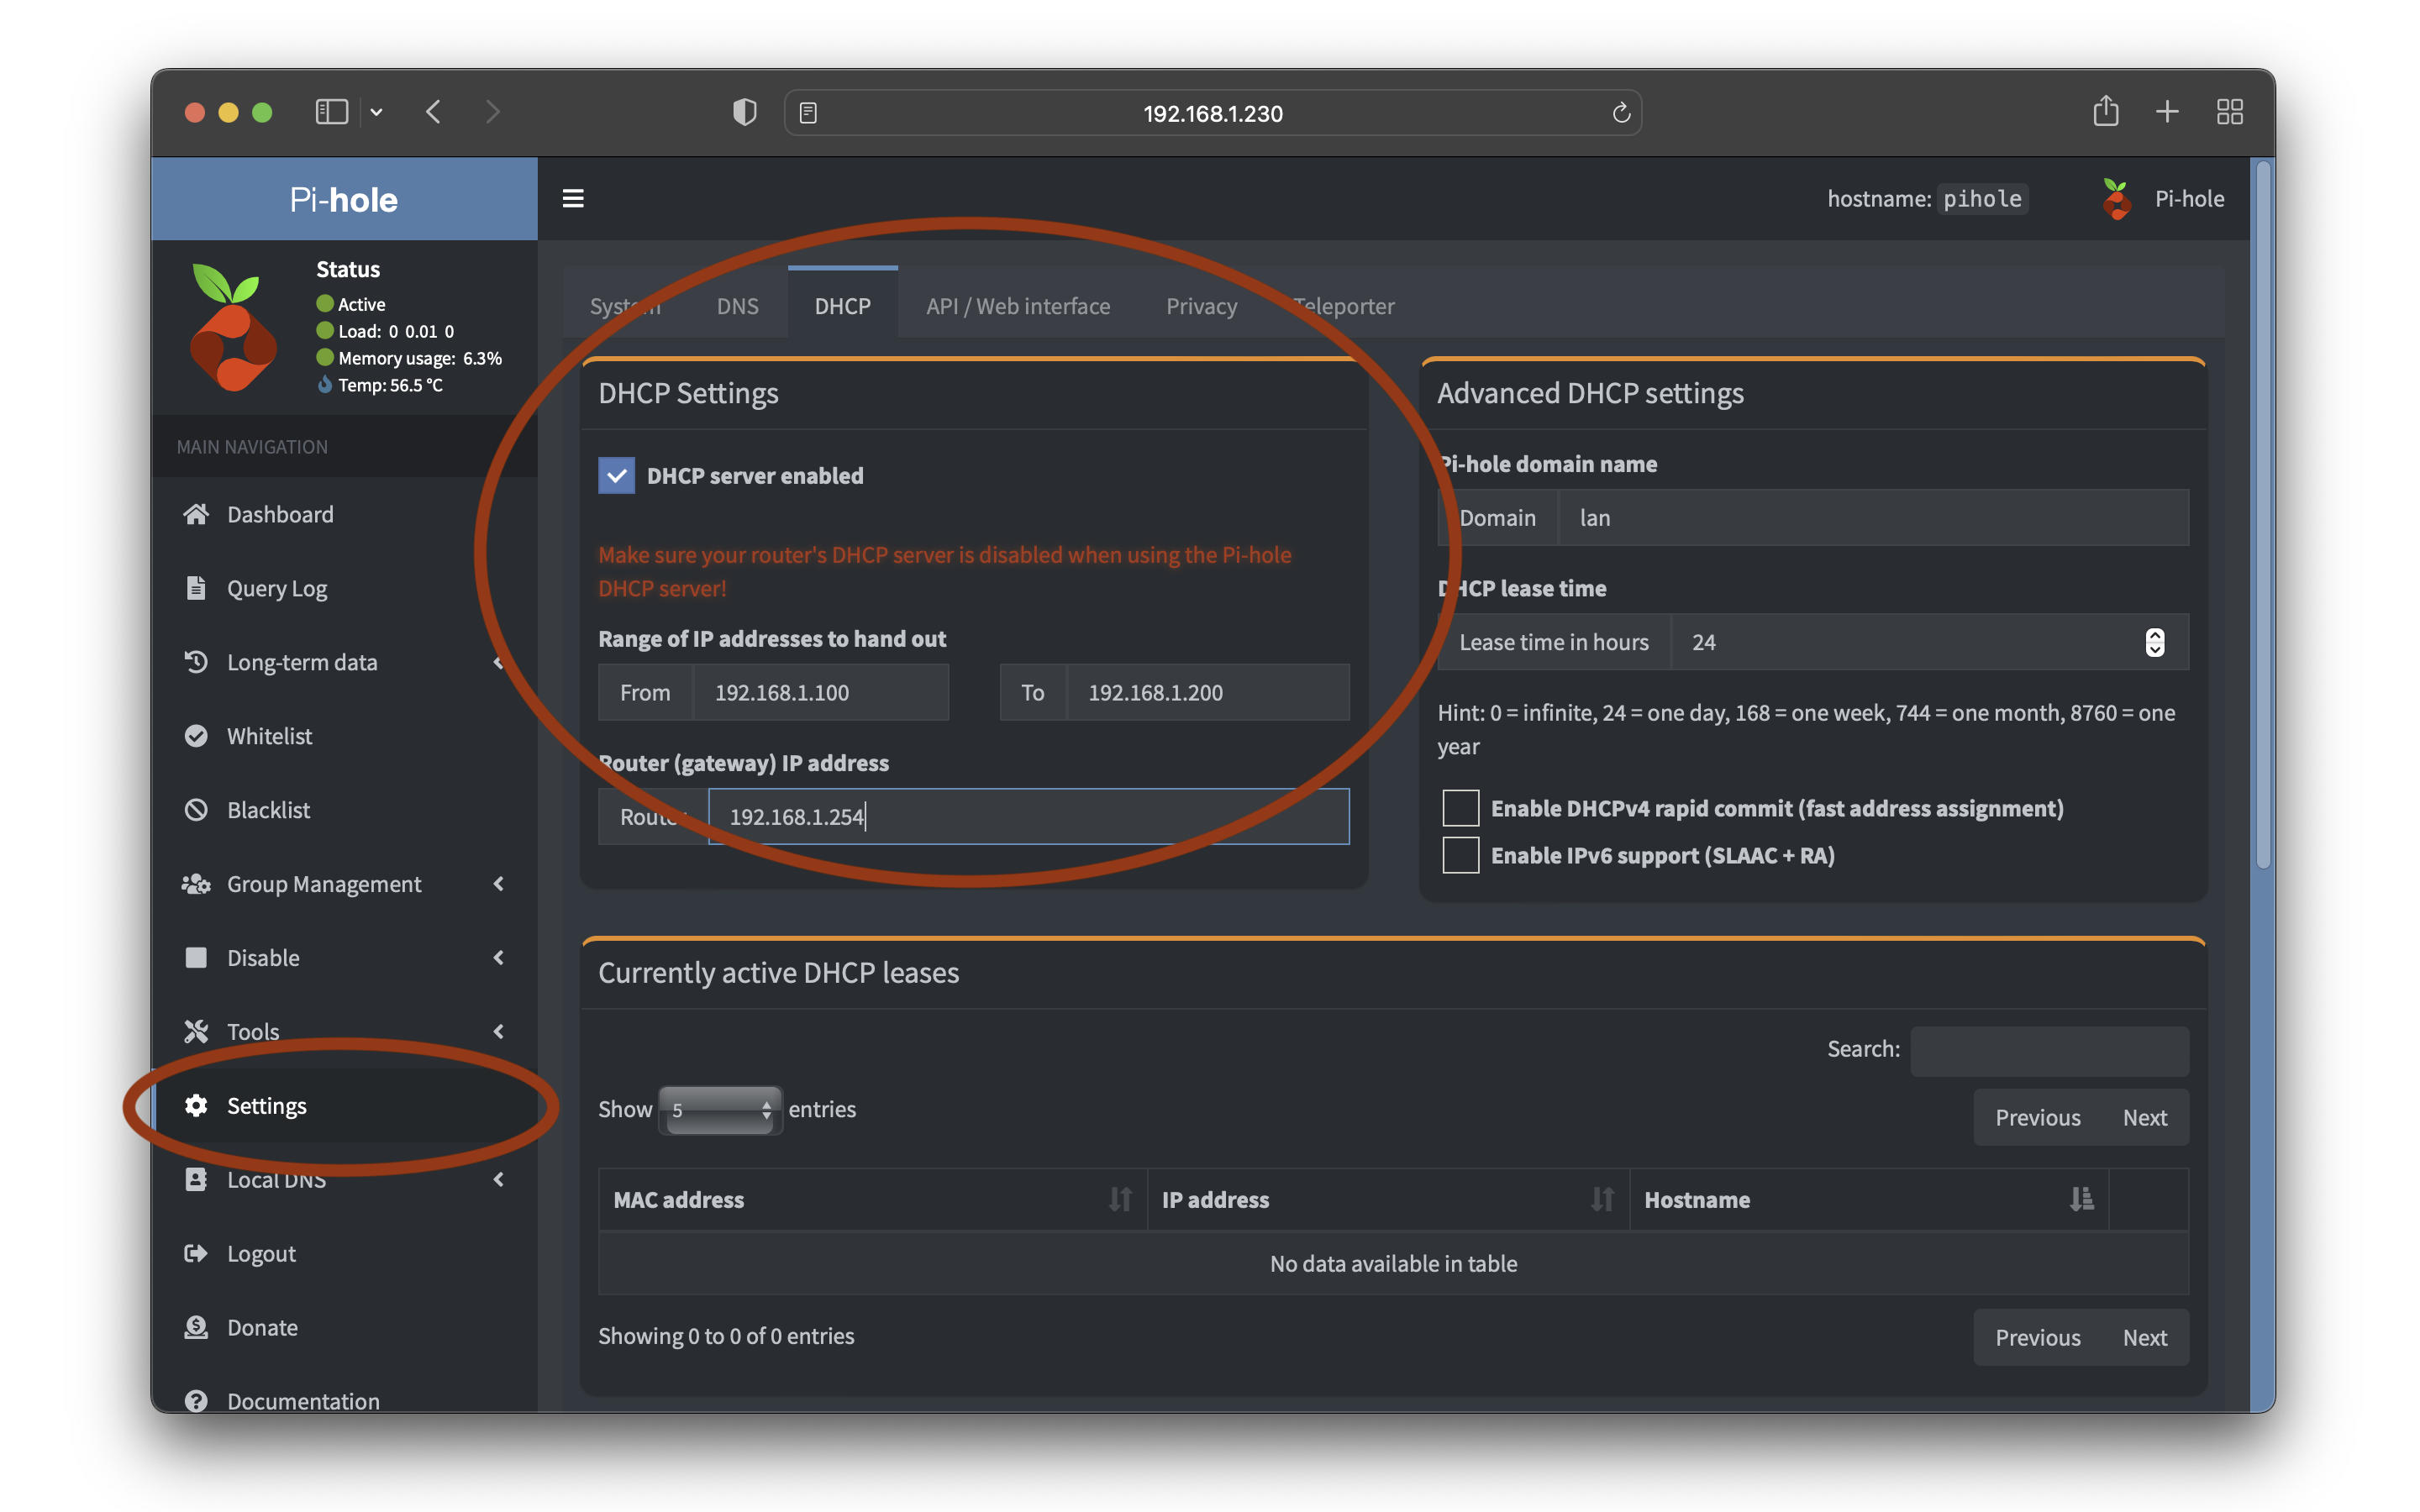
In the DHCP tab, in the “DHCP Settings” block, check the “DHCP server enabled” box.
Pi-hole should pre-populate the IP address range with the IP block that your router currently uses, and the router IP address with the router’s current IP address. You can leave these values as they are. Click the Save button in the bottom left to start hosting a DHCP server from Pi-hole.
Finally, visit your router’s admin interface, and set your Pi-hole’s IP address as the DHCP provider for your network. When your Pi-hole is functioning as the DHCP provider, your router delegates all IP-related tasks to it. This includes DNS server configuration, so your Pi-hole can suggest itself as the default DNS server for all devices on your network. Check the documentation for your router model for specific instructions.
Manually point devices at Pi-hole for DNS
On many devices, you can configure DNS settings in Wi-Fi preferences. Look in the “Advanced” section of your Wi-Fi or wired connection preferences for a DNS server setting. Put your Raspberry Pi’s IP address in this field. Your device should immediately start issuing DNS queries to the Pi-hole.
Unless you’ve configured a static IP address for your Raspberry Pi, this IP address can change at any time without warning. Follow the instructions under “Assign your Raspberry Pi a static IP address” in the DNS section above to configure a static IP address — this will prevent your device from losing its connection to the Pi-hole (and most of the internet!) when your Pi-hole’s dynamic IP address changes.
Is my Pi-hole working?
With a Pi-hole acting as the DNS server for your network, many pages will load without ads at all. Most privacy-invading trackers won’t work either. You’ll still see cookie and app install banners, because those can’t be blocked at the DNS level. To check to see if your Pi-hole is working correctly:
- Check out Adblock Tester. Without Pi-hole, many browsers score near 0; with Pi-hole, you should see a score at or near 100.
- Try visiting http://pi.hole/admin/login.php. Pi-hole always routes the
pi.holedomain to your Raspberry Pi when you use Pi-hole as your DNS server. - Visit any site where you normally see ads and visually confirm that ads are no longer there.
- Check the proportion of “queries blocked” on the Pi-hole dashboard. Many networks see between 10% and 50% of queries blocked!
- Check the DNS server used by other computers in your network. You should be able to find this information in “Details” or “Advanced” Wi-Fi settings. If you see your Raspberry Pi’s IP address, your configuration worked!
If you’ve completed all of the setup steps but you’re still seeing ads (or, worse, DNS queries don’t resolve), try the trusty solution of turning your router off and on again. This should disconnect all devices from your network and renew all DHCP leases, putting your new settings into effect for every device. Congratulations! Your home network is now protected from ads. Put a slice of bread in your smart toaster, watch a movie on your smart TV, and flush your smart toilet in the comfort of privacy and security. source
1. Install a supported operating system
You can run Pi-hole in a container, or deploy it directly to a supported operating system via our automated installer.

2. Install Pi-hole
Our intelligent, automated installer asks you a few questions and then sets everything up for you. Once complete, move onto step 3.
3. Use Pi-hole as your DNS server
Configure your router’s DHCP options to force clients to use Pi-hole as their DNS server, or manually configure each device to use the Pi-hole as their DNS server.
4. Block ads everywhere, even on the go
By pairing your Pi-hole with a VPN, you can have ad blocking on your cellular devices, helping with limited bandwidth data plans.

Web Interface
In addition to blocking advertisements, Pi-hole has an informative Web interface that shows stats on all the domains being queried on your network.
Built-in DHCP Server
Pi-hole works fine with an existing DHCP server, but you can use Pi-hole’s to keep your network management in one place.
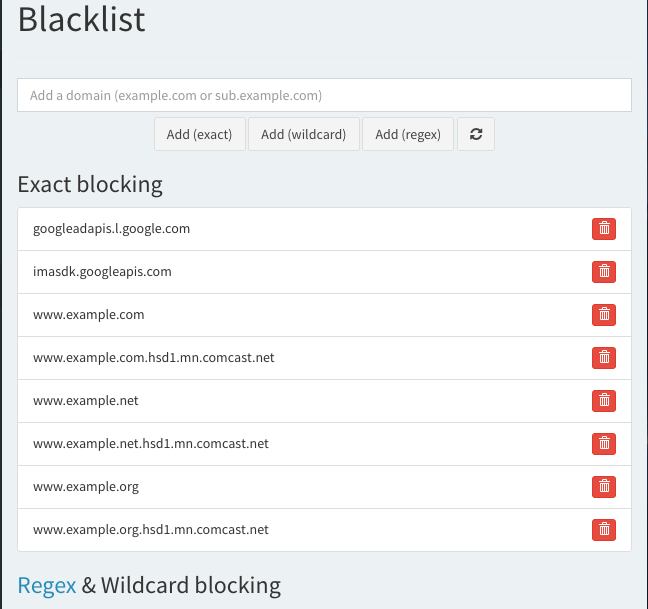
Manage White And Black Lists
Fine-tune your experience by blacklisting or whitelisting domains. Extend this capability with powerful regex statements.
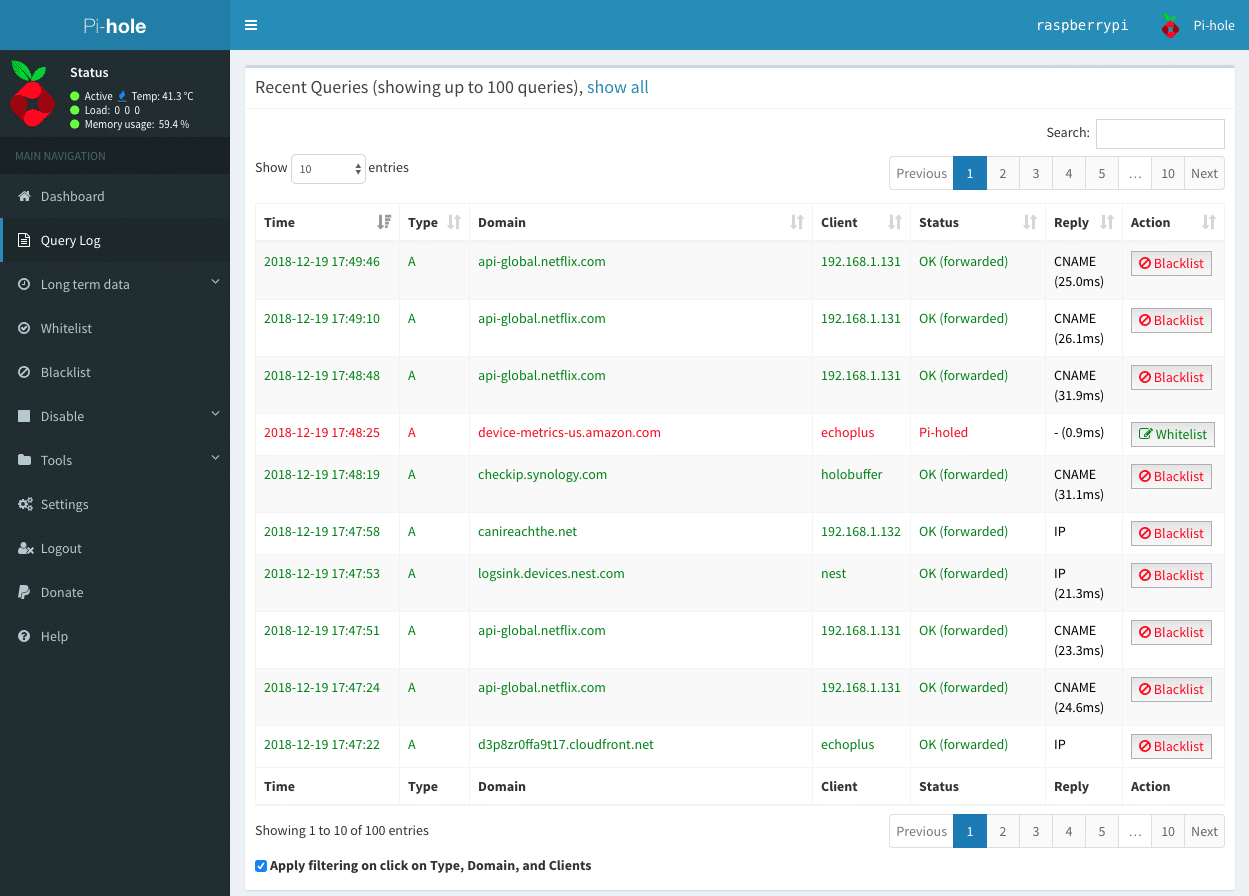
Query Log
See all the domains being queried on your network, where they originated, and more.
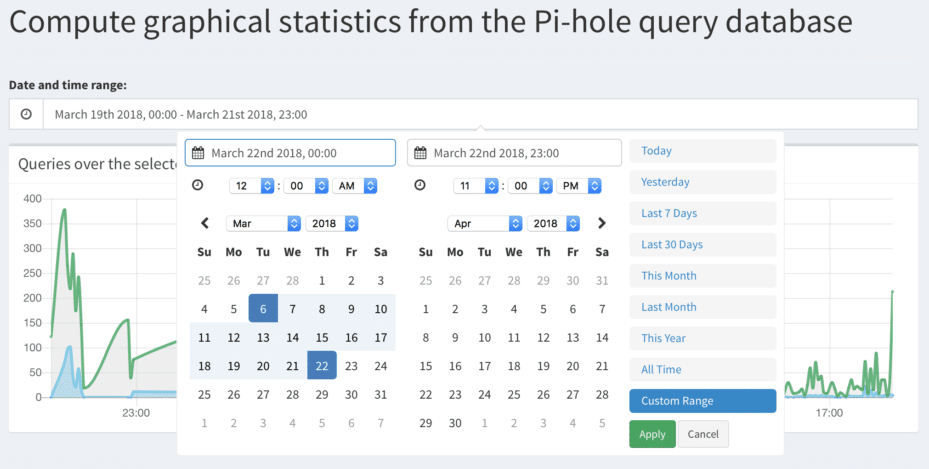
Long Term Statistics
Queries are stored in a database and can be queried at any time. Learn about what’s happening on your network over time.
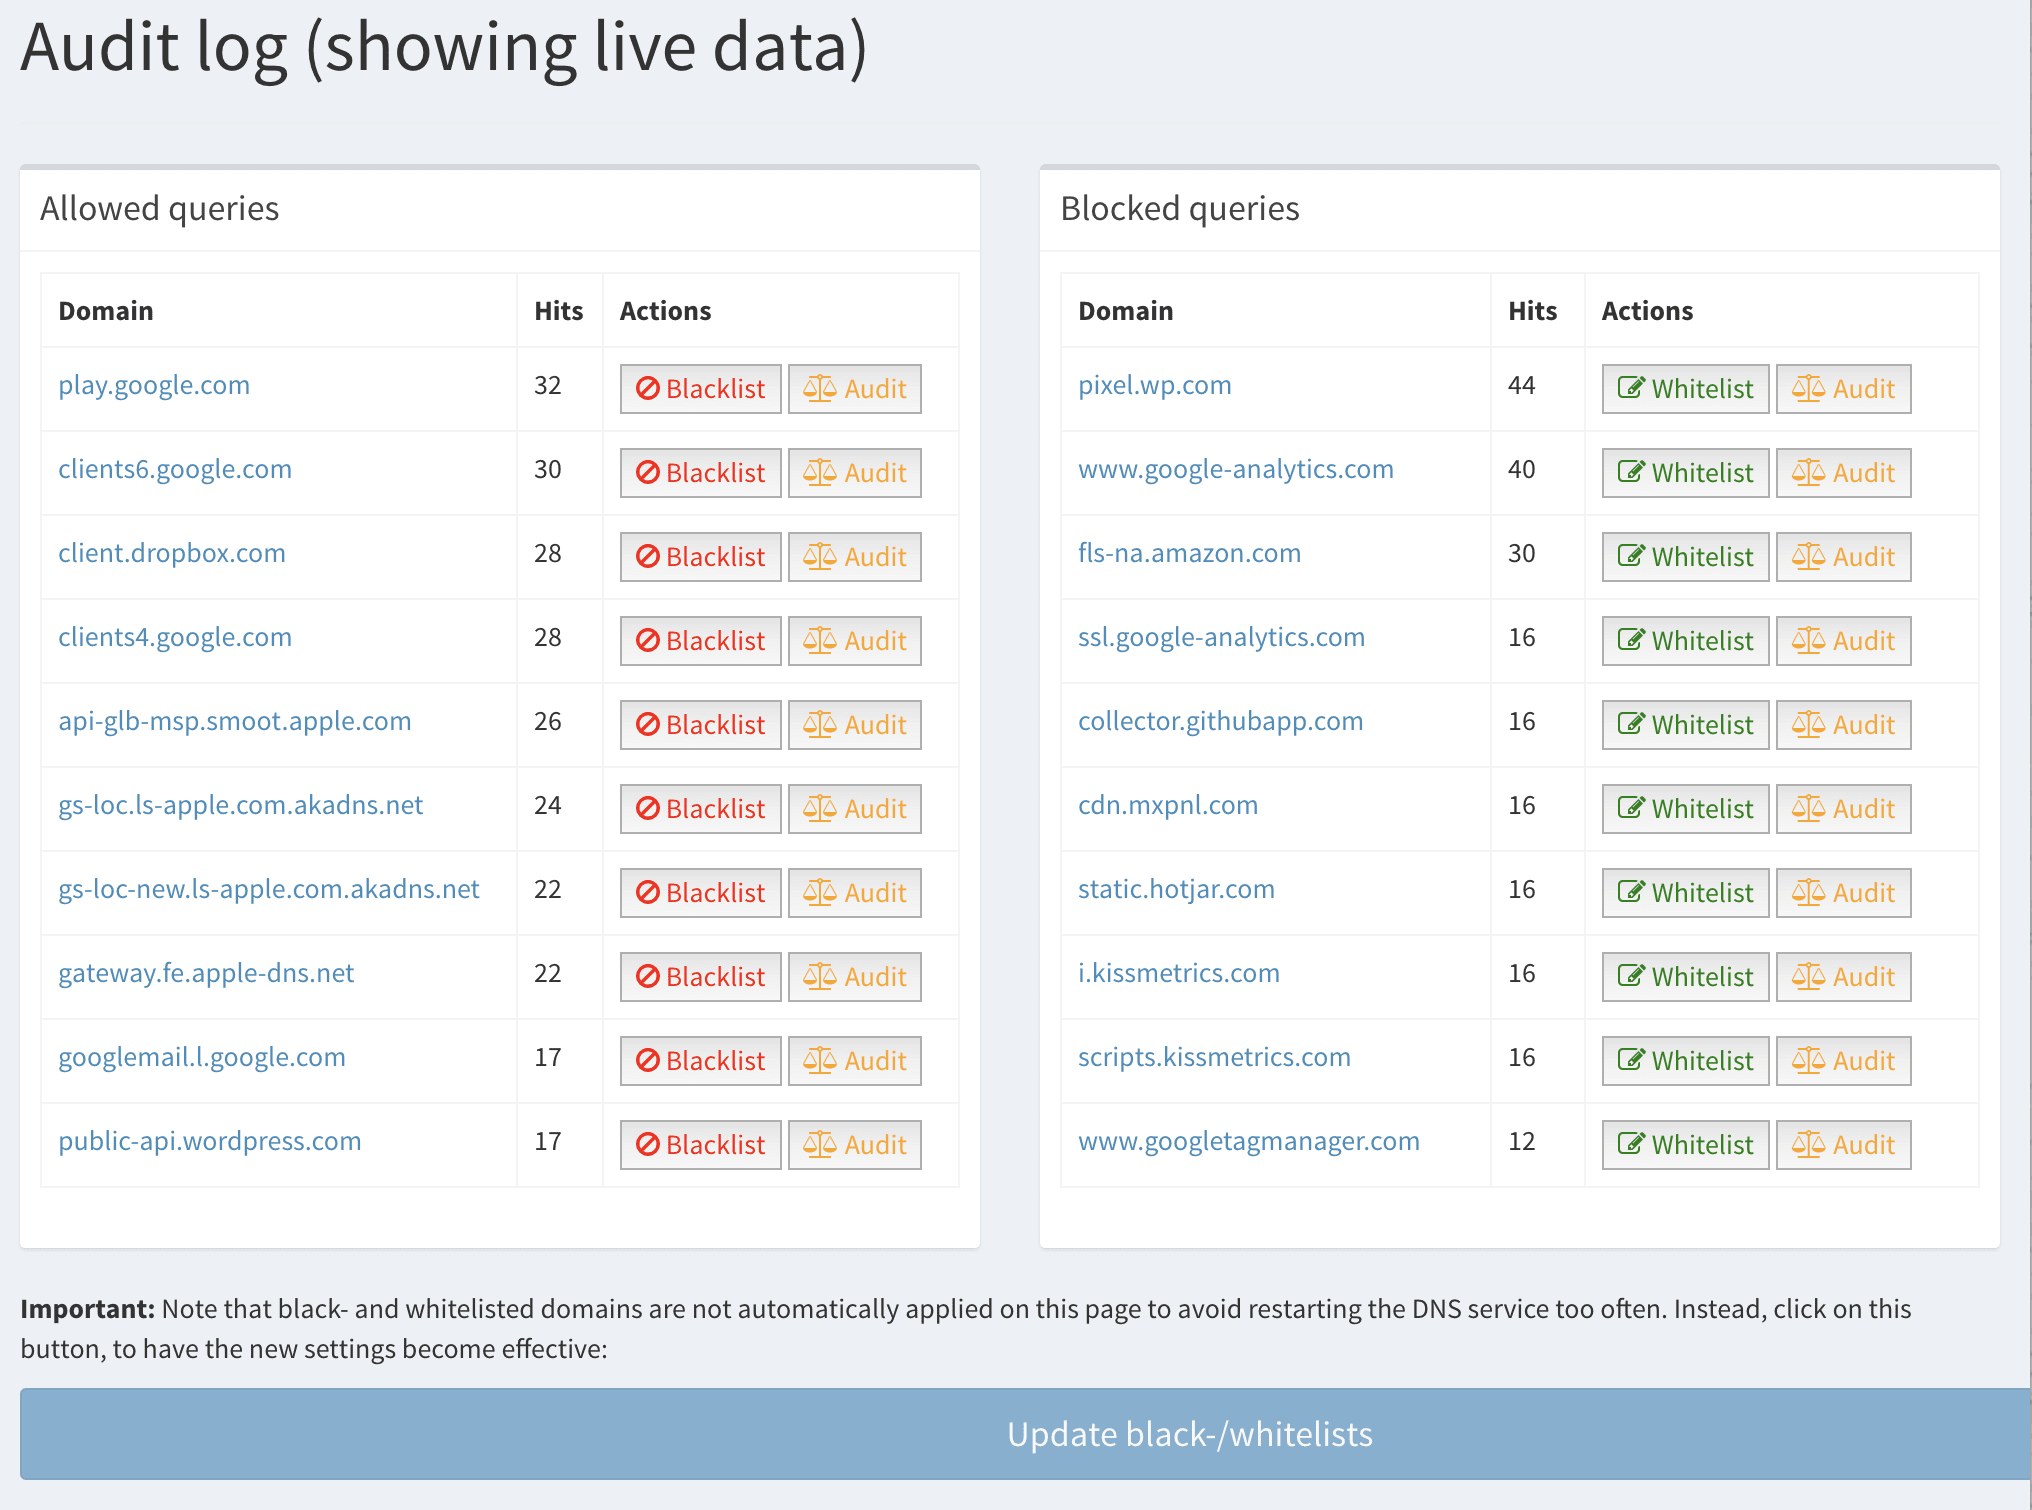
Audit Log
Keep track of the most queried domains and add them to a white or blacklist from a central page.
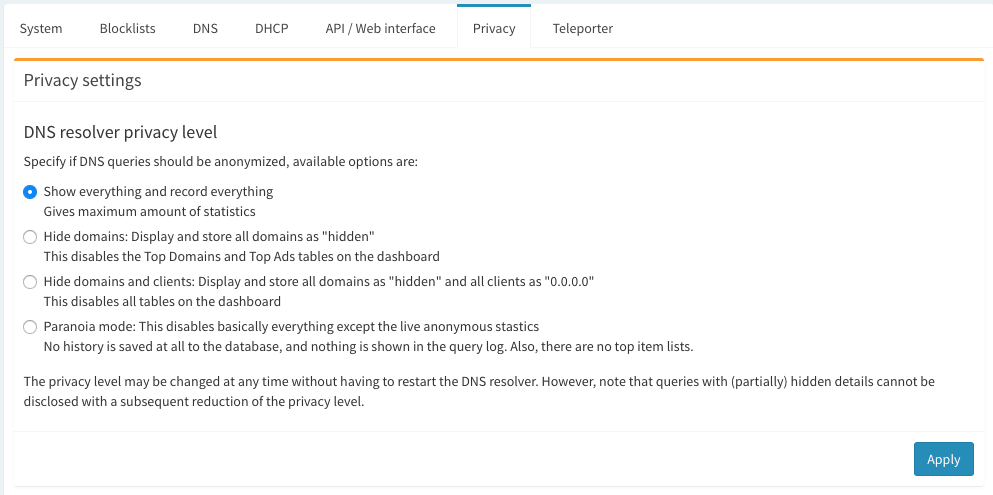
Privacy Modes
Choose from four different privacy modes that works for your environment.
Other Settings
Control and configure other settings from the Web interface.