YOLO v8: The Most Powerful Object Detection Algorithm
YOLO — You only look once, real time object detection explained
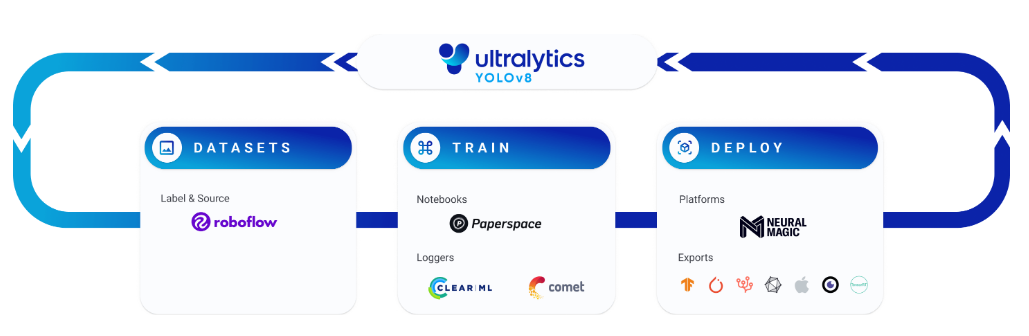
Introducing Ultralytics YOLOv8, the latest version of the acclaimed real-time object detection and image segmentation model. YOLOv8 is built on cutting-edge advancements in deep learning and computer vision, offering unparalleled performance in terms of speed and accuracy. Its streamlined design makes it suitable for various applications and easily adaptable to different hardware platforms, from edge devices to cloud APIs.
Explore the YOLOv8 Docs, a comprehensive resource designed to help you understand and utilize its features and capabilities. Whether you are a seasoned machine learning practitioner or new to the field, this hub aims to maximize YOLOv8’s potential in your projects.
Where to Start
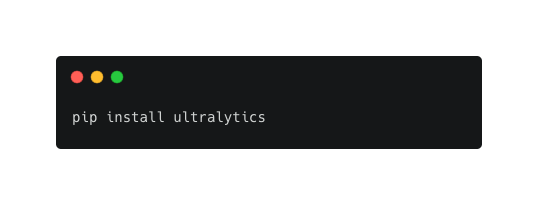
- Install
ultralyticswith pip and get up and running in minute - Predict new images and videos with YOLOv8
- Train a new YOLOv8 model on your own custom dataset
YOLO: A Brief History
YOLO (You Only Look Once), a popular object detection and image segmentation model, was developed by Joseph Redmon and Ali Farhadi at the University of Washington. Launched in 2015, YOLO quickly gained popularity for its high speed and accuracy.
- YOLOv2, released in 2016, improved the original model by incorporating batch normalization, anchor boxes, and dimension clusters.
- YOLOv3, launched in 2018, further enhanced the model’s performance using a more efficient backbone network, multiple anchors and spatial pyramid pooling.
- YOLOv4 was released in 2020, introducing innovations like Mosaic data augmentation, a new anchor-free detection head, and a new loss function.
- YOLOv5 further improved the model’s performance and added new features such as hyperparameter optimization, integrated experiment tracking and automatic export to popular export formats.
- YOLOv6 was open-sourced by Meituan in 2022 and is in use in many of the company’s autonomous delivery robots.
- YOLOv7 added additional tasks such as pose estimation on the COCO keypoints dataset.
- YOLOv8 is the latest version of YOLO by Ultralytics. As a cutting-edge, state-of-the-art (SOTA) model, YOLOv8 builds on the success of previous versions, introducing new features and improvements for enhanced performance, flexibility, and efficiency. YOLOv8 supports a full range of vision AI tasks, including detection, segmentation, pose estimation, tracking, and classification. This versatility allows users to leverage YOLOv8’s capabilities across diverse applications and domains.
YOLO Licenses: How is Ultralytics YOLO licensed?
Ultralytics offers two licensing options to accommodate diverse use cases:
- AGPL-3.0 License: This OSI-approved open-source license is ideal for students and enthusiasts, promoting open collaboration and knowledge sharing. See the LICENSE file for more details.
- Enterprise License: Designed for commercial use, this license permits seamless integration of Ultralytics software and AI models into commercial goods and services, bypassing the open-source requirements of AGPL-3.0. If your scenario involves embedding our solutions into a commercial offering, reach out through Ultralytics Licensing.
Our licensing strategy is designed to ensure that any improvements to our open-source projects are returned to the community. We hold the principles of open source close to our hearts ❤️, and our mission is to guarantee that our contributions can be utilized and expanded upon in ways that are beneficial to all.
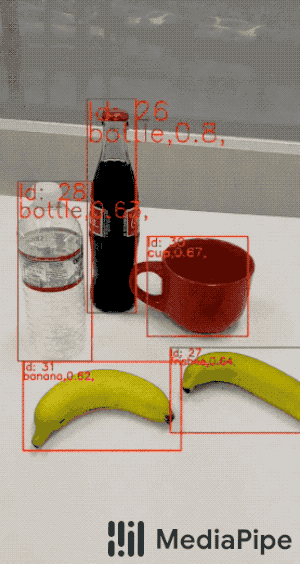
Experiment with a YOLOv8 model trained on the Microsoft COCO dataset.
Upload or Webcam
What is YOLOv8?
YOLOv8 is a new state-of-the-art computer vision model built by Ultralytics, the creators of YOLOv5. The YOLOv8 model contains out-of-the-box support for object detection, classification, and segmentation tasks, accessible through a Python package as well as a command line interface.
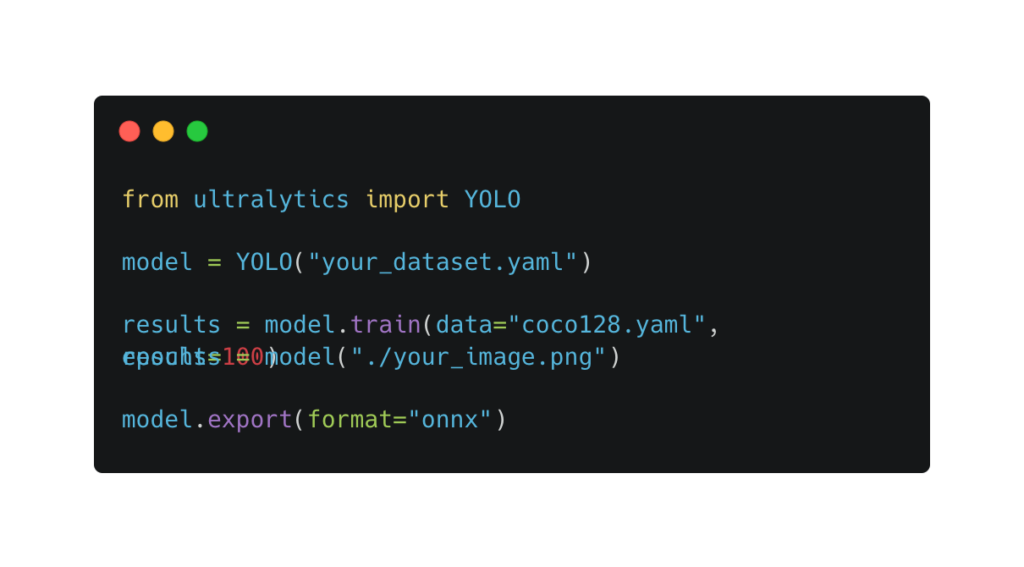
How do you install YOLOv8?
To install YOLOv8, run the following command:

This command will install the latest version of the YOLOv8 library. You can then use the model with the “yolo” command line program or by importing the model into your script using the following python code.
How do you use YOLOv8?
You can use the YOLOv8 model in your Python code or via the model CLI.
Use the CLI
To train a model with the YOLOv8 CLI, use this command:
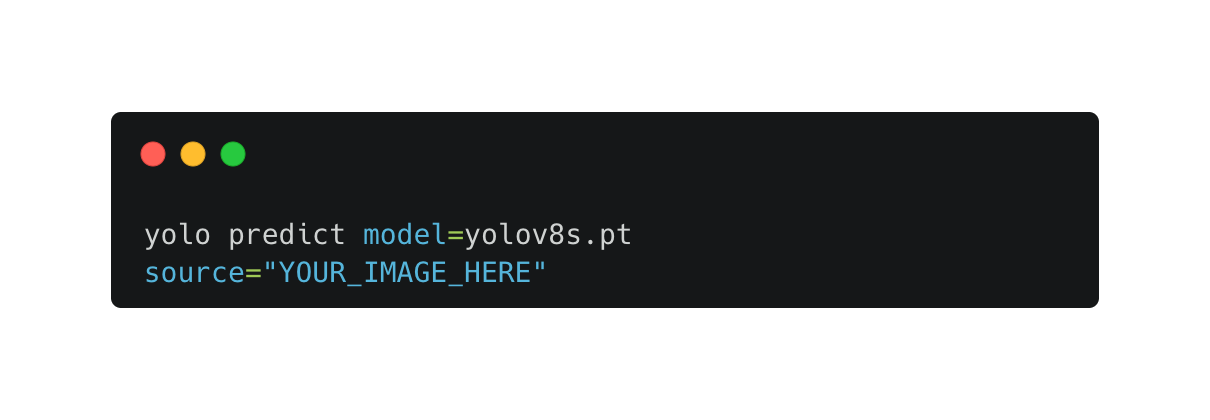

Add the source to the image on which you want to run inference. This will use the default YOLOv8s model weights to make a prediction. To learn more about training a custom model on YOLOv8, keep reading!
Use the Python Package
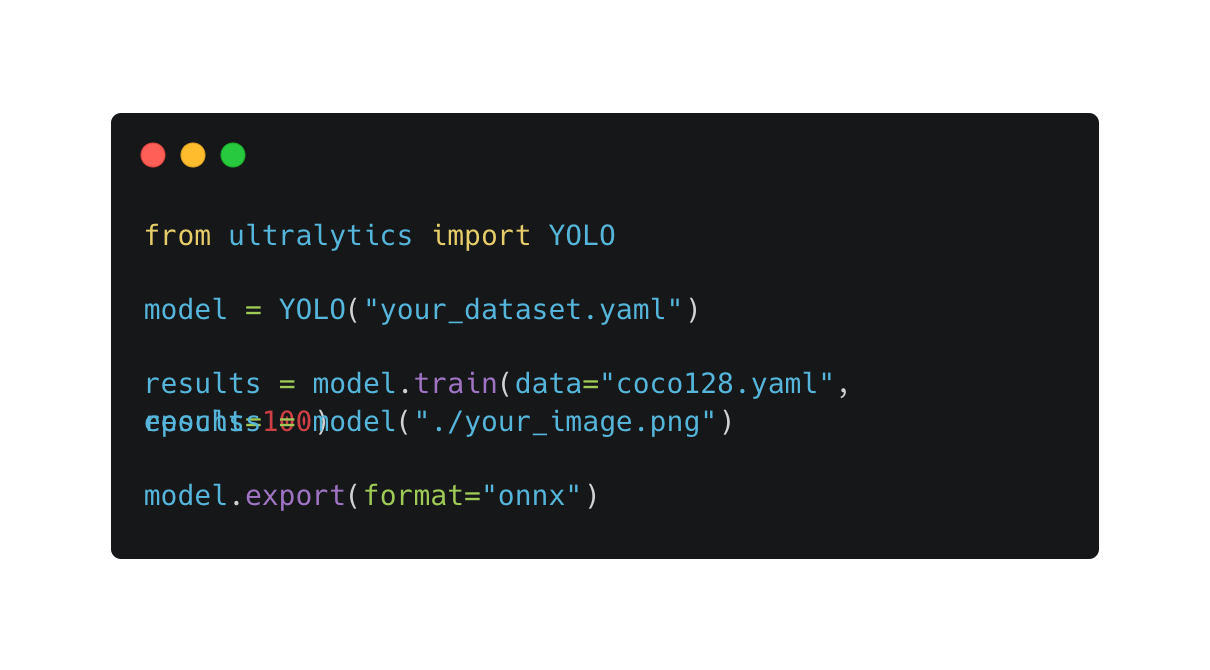
To use the Python CLI, first import the “ultralytics” package into your code. Then, you can use the package to load, train, and use a model.
Load a Custom Model
To load a custom model into your project, use the following code:


This code loads the default YOLOv8n model weights and trains a model using the COCO dataset for 100 epochs. You may want to run this code in a Google Colab so that you can keep your trained model in memory for experimentation.
You can replace the “yolov8n” text with the name of the model you want to use. You can learn more about the different model sizes available in the Ultralytics YOLOv8 GitHub repository.
Create a New Model (Advanced)
While loading a model using the default YOLOv8n weights is recommended, you can train a new model from scratch using the Python package too. To do so, provide a YOLOv5 PyTorch TXT file that contains information about the dataset on which you want to train your model:
What are the main features in YOLOv8?
YOLOv8 comes with both architectural and developer experience improvements.
Compared to YOLOv8’s predecessor, YOLOv5, YOLOv8 comes with:
1. A new anchor-free detection system.
2. Changes to the convolutional blocks used in the model.
3. Mosaic augmentation applied during training, turned off before the last 10 epochs.
Furthermore, YOLOv8 comes with changes to improve developer experience with the model. First, the model now comes packaged as a library you can install in your Python code. A quick “pip install ultralytics” will give you the
Who created YOLOv8?
YOLOv8 was built by Ultralytics. The code for YOLOv8 is open source and licensed under a GPL license.
Object Detection in 2023: The Definitive Guide
-
What object detection is and how it has evolved over the past 20 years
-
Types of computer vision object detection methods
-
We list examples, use cases, and object detection applications
-
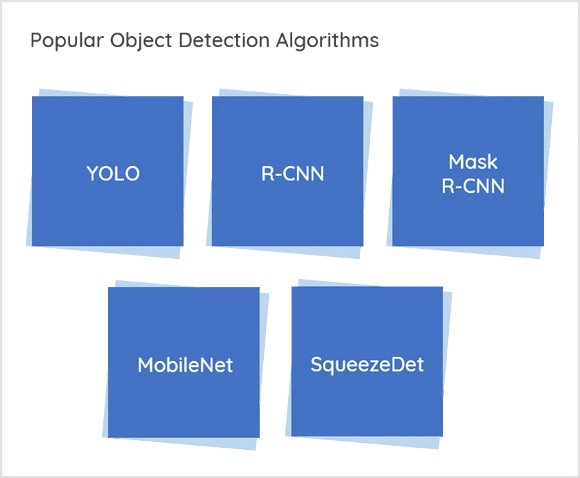
The most popular object detection algorithms today
-
New object recognition algorithms

-
Image processing techniques generally don’t require historical data for training and are unsupervised in nature. OpenCV is a popular tool for image processing tasks.
-
Pro’s: Hence, those tasks do not require annotated images, where humans labeled data manually (for supervised training).
-
Con’s: These techniques are restricted to multiple factors, such as complex scenarios (without unicolor background), occlusion (partially hidden objects), illumination and shadows, and clutter effect.
-
-
Deep Learning methods generally depend on supervised or unsupervised learning, with supervised methods being the standard in computer vision tasks. The performance is limited by the computation power of GPUs, which is rapidly increasing year by year.
-
Pro’s: Deep learning object detection is significantly more robust to occlusion, complex scenes, and challenging illumination.
-
Con’s: A huge amount of training data is required; the process of image annotation is labor-intensive and expensive. For example, labeling 500’000 images to train a custom DL object detection algorithm is considered a small dataset. However, many benchmark datasets (MS COCO, Caltech, KITTI, PASCAL VOC, V5) provide the availability of labeled data.
-
-
Viola-Jones Detector (2001), the pioneering work that started the development of traditional object detection methods
-
HOG Detector (2006), a popular feature descriptor for object detection in computer vision and image processing
-
DPM (2008) with the first introduction of bounding box regression
-
RCNN and SPPNet (2014)
-
Fast RCNN and Faster RCNN (2015)
-
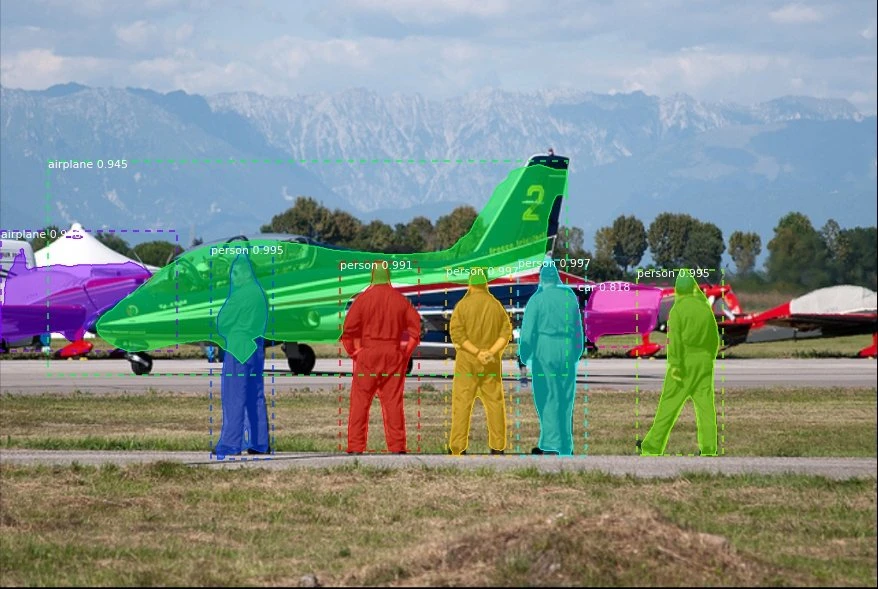
Mask R-CNN (2017)
-
Pyramid Networks/FPN (2017)
-
G-RCNN (2021)

-
Task #1: Find an arbitrary number of objects (possibly even zero), and
-
Task #2: Classify every single object and estimate its size with a bounding box.
-
The two-stage architecture involves (1) object region proposal with conventional Computer Vision methods or deep networks, followed by (2) object classification based on features extracted from the proposed region with bounding-box regression.
-
Two-stage methods achieve the highest detection accuracy but are typically slower. Because of the many inference steps per image, the performance (frames per second) is not as good as one-stage detectors.
-
Various two-stage detectors include region convolutional neural network (RCNN), with evolutions Faster R-CNN or Mask R-CNN. The latest evolution is the granulated RCNN (G-RCNN).
-
Two-stage object detectors first find a region of interest and use this cropped region for classification. However, such multi-stage detectors are usually not end-to-end trainable because cropping is a non-differentiable operation.
-
One-stage object detectors prioritize inference speed and are super fast but not as good at recognizing irregularly shaped objects or a group of small objects.
-
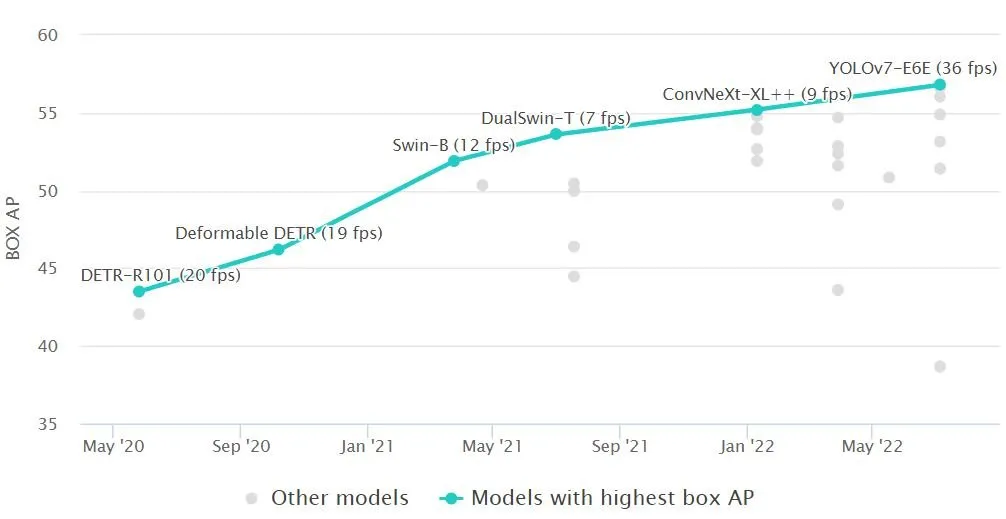
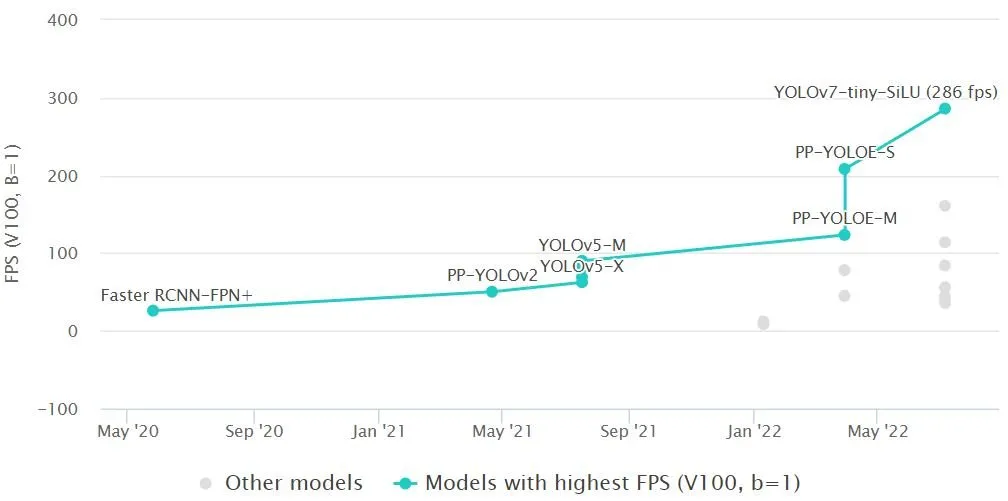
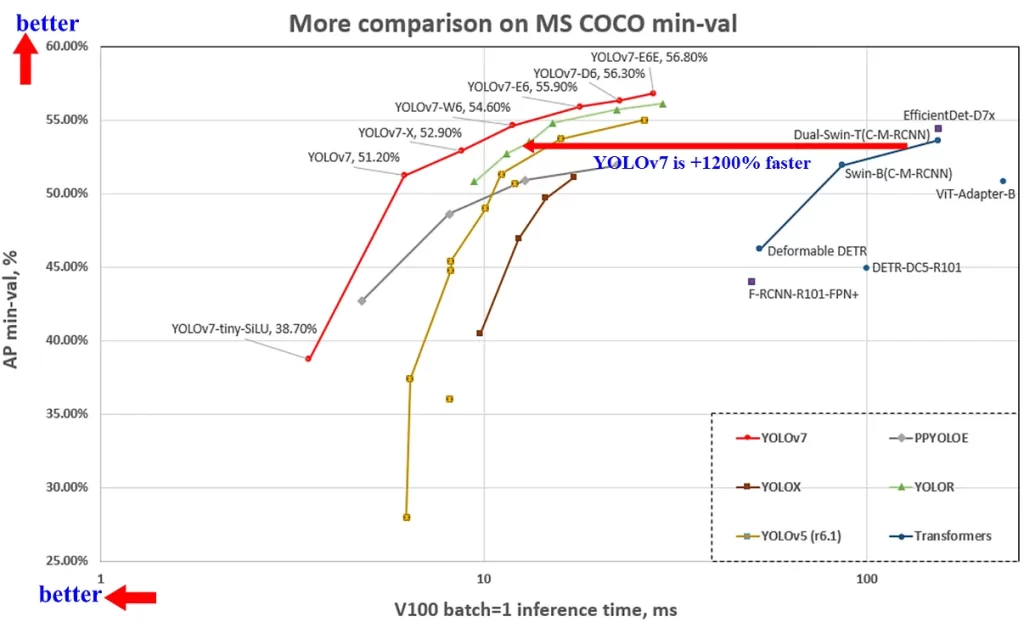
The most popular one-stage detectors include the YOLO, SSD, and RetinaNet. The latest real-time detectors are YOLOv7 (2022), YOLOR (2021) and YOLOv4-Scaled (2020). View the benchmark comparisons below.
-
The main advantages of object detection with single-stage algorithms include a generally faster detection speed and greater structural simplicity and efficiency compared to multi-stage detectors.
-
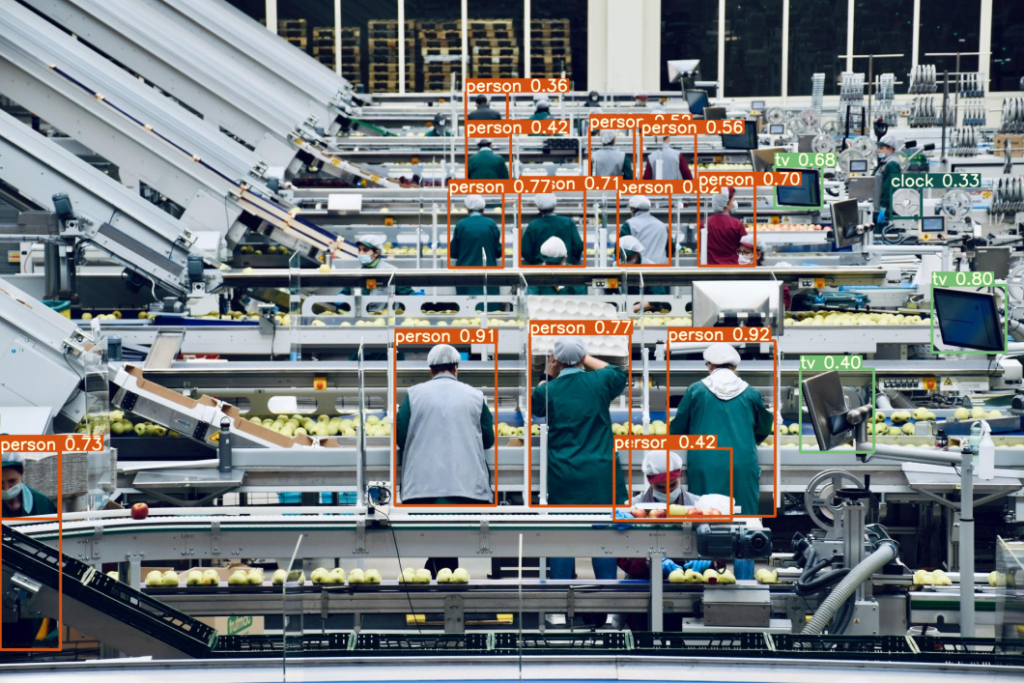
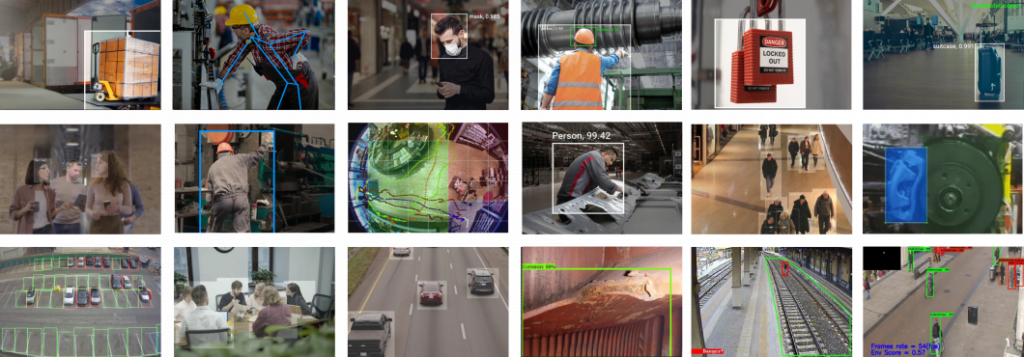
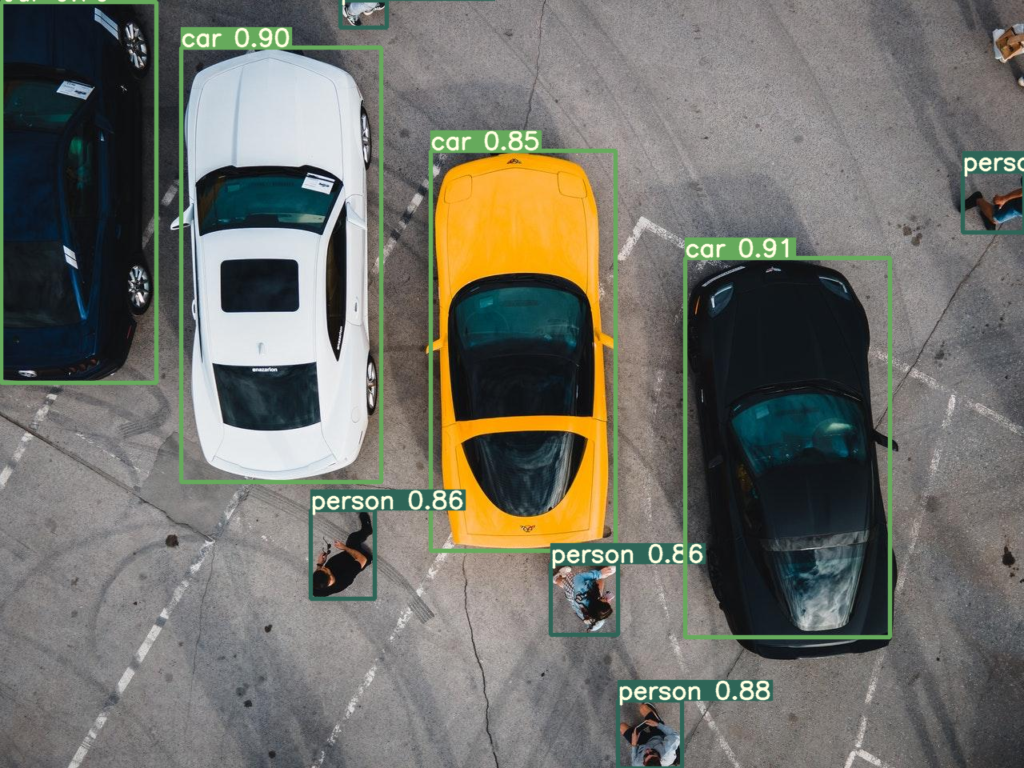
Object detection in Retail. Strategically placed people counting systems throughout multiple retail stores are used to gather information about how customers spend their time and customer footfall. AI-based customer analysis to detect and track customers with cameras helps to gain an understanding of customer interaction and customer experience, optimize the store layout, and make operations more efficient. A popular use case is the detection of queues to reduce waiting time in retail stores.
-
Autonomous Driving. Self-driving cars depend on object detection to recognize pedestrians, traffic signs, other vehicles, and more. For example, Tesla’s Autopilot AI heavily utilizes object detection to perceive environmental and surrounding threats, such as oncoming vehicles or obstacles.
-
Animal detection in Agriculture. Object detection is used in agriculture for tasks such as counting, animal monitoring, and evaluation of the quality of agricultural products. Damaged produce can be detected while it is in processing using machine learning algorithms.
-
People detection in Security. A wide range of security applications in video surveillance are based on object detection, for example, to detect people in restricted or dangerous areas, suicide prevention, or automating inspection tasks in remote locations with computer vision.
-
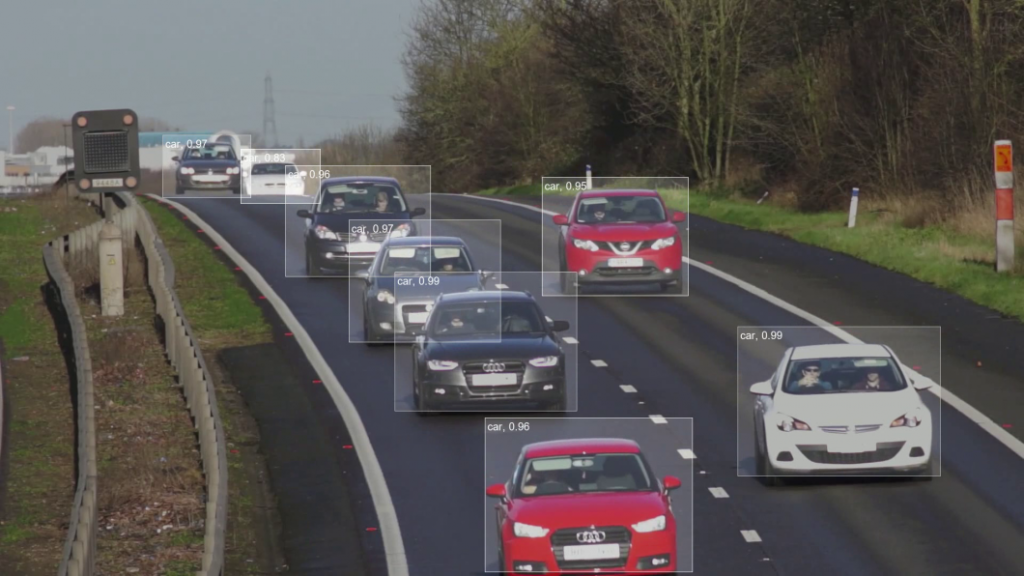
Vehicle detection with AI in Transportation. Object recognition is used to detect and count vehicles for traffic analysis or to detect cars that stop in dangerous areas, for example, on crossroads or highways.
-
Medical feature detection in Healthcare. Object detection has allowed for many breakthroughs in the medical community. Because medical diagnostics rely heavily on the study of images, scans, and photographs, object detection involving CT and MRI scans has become extremely useful for diagnosing diseases, for example, with ML algorithms for tumor detection.
![]()

YOLO v8! The real state-of-the-art
My experience & experiment related to YOLO v8
Joseph Redmon, Santosh Divvala, Ross Girshick, and Ali Farhadi introduced YOLO (You Only Look Once) a family of computer vision models that are seeking the attention and fanfare of many AI enthusiasts. On January 10th, 2023, the latest version of YOLO which is YOLO8 launched claiming advancements in structure and architectural changes with better results.
Introduction :
I experimented with the brand-new, cutting-edge, state-of-the-art YOLO v8 from Ultralytics. YOLO versions 6 and 7 were released to the public over a period of 1–2 months. Both are PyTorch-based models.
Even its predecessor YOLO v5 also has one PyTorch-based model. A few days ago [or we can say a few hours ago] YOLO v8 launched. I thought what if I try to check it on the same parameters? Last time I used the coco dataset but this time, I have used a license plate detection problem.
Dataset :
The dataset had almost 800 images for training,226 for validation, and 113 images for testing. All images we use were pure and not augmented.

Epochs:
We purposefully kept epochs to 100 to see its performance in warm-up iterations.
Models:
Pytorch-based YOLO v5, YOLO v6, YOLO v7 & YOLO v8
As docs say, YOLOv8 is a cutting-edge, state-of-the-art (SOTA) model that builds upon the success of previous YOLO versions and introduces new features and improvements to further boost performance and flexibility.

It uses anchor-free detection and new convolutional layers to make predictions more accurate.

Results:
The results that YOLO 8 got on RF100 were improved from other versions.

Results on the custom dataset:
Now let’s see if this YOLO v8 really works or not on custom datasets. Below are the results of YOLO v8 on the Licence plate detection problem.

After training for predefined epochs, I calculated the mean average precision for all.

The above figures show us how v8 is outperforming. It is giving us maximum map value at the expense of reduced time for training. Anchor-free detections are faster and more accurate than the previous version.
The working and performance of any model are completely data-dependent & problem statement dependant thing but new additions make things better. This time we didn’t work on latency but those results can be useful for further analysis.

If you want to peer into the code yourself, check out the YOLOv8 repository and view this code differential to see how some of the research was done.
Improvement:
The extensibility of YOLOv8 is an important characteristic. It is created as a framework that works with all prior YOLO iterations, making it simple to switch between them and assess their performance. Because of this, YOLOv8 is the best option for those who wish to benefit from the most recent YOLO technology while keeping their current YOLO models functional.
Observations:
- As we can see training time was a big concern if we consider the exponential growth from v5 to v7 but v8 is taking almost 60% time to train while producing outcomes with higher mean average precision. Here, the issue of prolonged training is somewhat addressed.
2. The trade-off between training time and precision is achieved more in v8.
3. New backbone network, a new anchor-free detection head, and a new loss function making things much faster
Want more on YOLO v8? use the below links.
- YOLOv8 repository — V8
- code differential — V8
- Understanding YOLOs
- Understanding V8
- Docs V8
- Understanding V8- Video
YOLO Object Detection Explained
Object detection is a technique used in computer vision for the identification and localization of objects within an image or a video.
Image Localization is the process of identifying the correct location of one or multiple objects using bounding boxes, which correspond to rectangular shapes around the objects.
This process is sometimes confused with image classification or image recognition, which aims to predict the class of an image or an object within an image into one of the categories or classes.
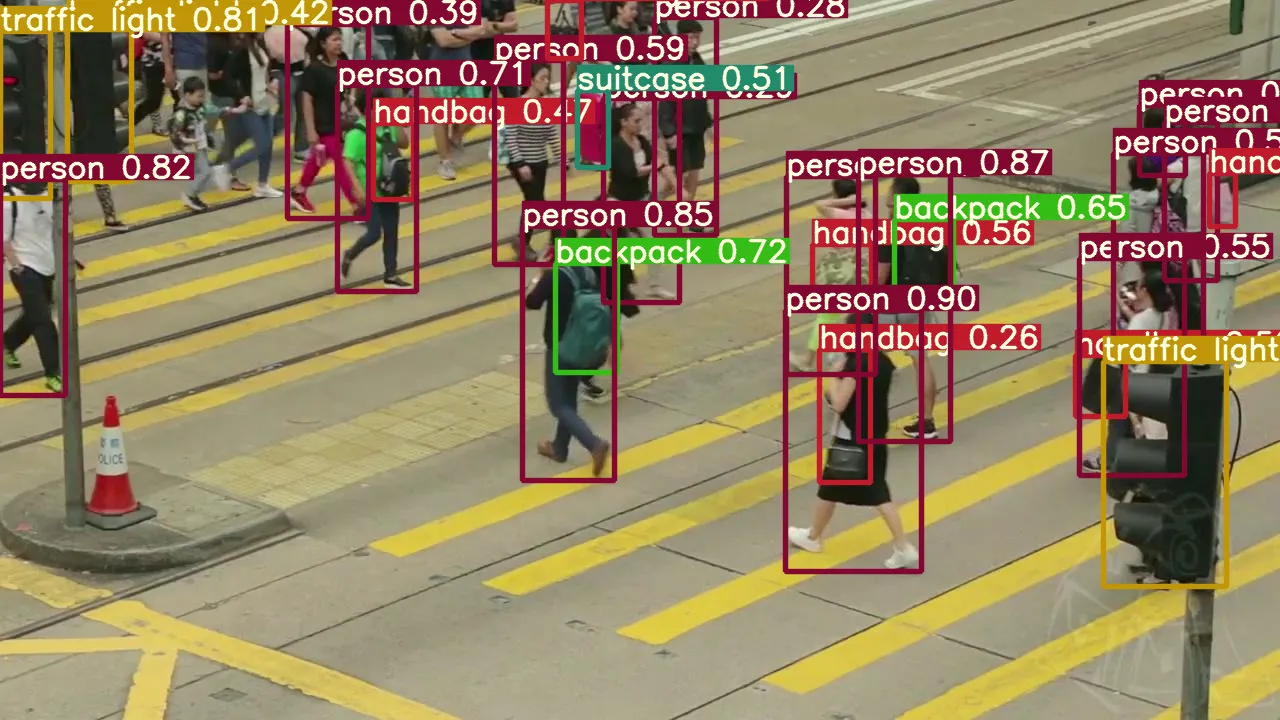
The illustration below corresponds to the visual representation of the previous explanation. The object detected within the image is “Person.”
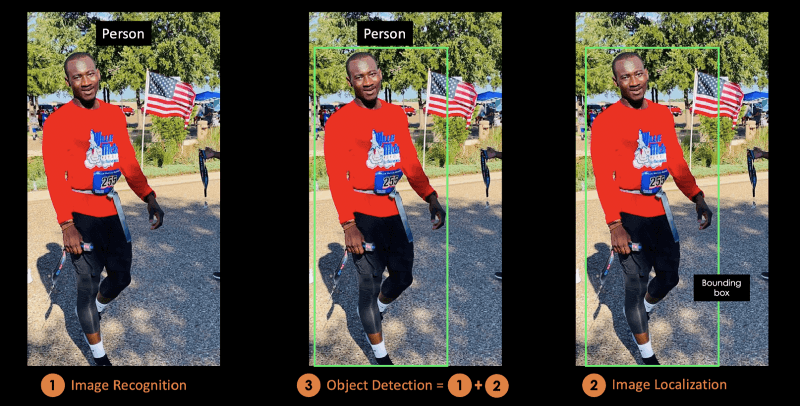
Image by Author
In this conceptual blog, you will first understand the benefits of object detection, before introducing YOLO, the state-of-the-art object detection algorithm.
In the second part, we will focus more on the YOLO algorithm and how it works. After that, we will provide some real-life applications using YOLO.
The last section will explain how YOLO evolved from 2015 to 2020 before concluding on the next steps.
What is YOLO?
You Only Look Once (YOLO) is a state-of-the-art, real-time object detection algorithm introduced in 2015 by Joseph Redmon, Santosh Divvala, Ross Girshick, and Ali Farhadi in their famous research paper “You Only Look Once: Unified, Real-Time Object Detection”.
The authors frame the object detection problem as a regression problem instead of a classification task by spatially separating bounding boxes and associating probabilities to each of the detected images using a single convolutional neural network (CNN).
By taking the Image Processing with Keras in Python course, you will be able to build Keras based deep neural networks for image classification tasks.
If you are more interested in Pytorch, Deep Learning with Pytorch will teach you about convolutional neural networks and how to use them to build much more powerful models.
What Makes YOLO Popular for Object Detection?
Some of the reasons why YOLO is leading the competition include its:
- Speed
- Detection accuracy
- Good generalization
- Open-source
1- Speed
YOLO is extremely fast because it does not deal with complex pipelines. It can process images at 45 Frames Per Second (FPS). In addition, YOLO reaches more than twice the mean Average Precision (mAP) compared to other real-time systems, which makes it a great candidate for real-time processing.
From the graphic below, we observe that YOLO is far beyond the other object detectors with 91 FPS.
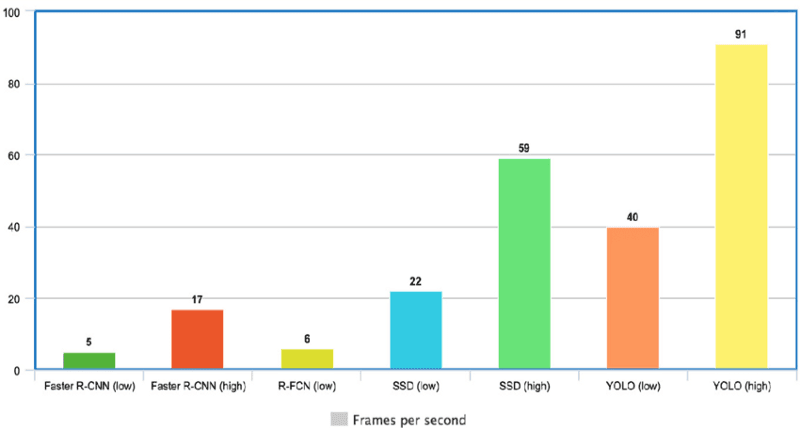
YOLO Speed compared to other state-of-the-art object detectors (source)
2- High detection accuracy
YOLO is far beyond other state-of-the-art models in accuracy with very few background errors.
3- Better generalization
This is especially true for the new versions of YOLO, which will be discussed later in the article. With those advancements, YOLO pushed a little further by providing a better generalization for new domains, which makes it great for applications relying on fast and robust object detection.
For instance the Automatic Detection of Melanoma with Yolo Deep Convolutional Neural Networks paper shows that the first version YOLOv1 has the lowest mean average precision for the automatic detection of melanoma disease, compared to YOLOv2 and YOLOv3.
4- Open source
Making YOLO open-source led the community to constantly improve the model. This is one of the reasons why YOLO has made so many improvements in such a limited time.
YOLO Architecture
YOLO architecture is similar to GoogleNet. As illustrated below, it has overall 24 convolutional layers, four max-pooling layers, and two fully connected layers.
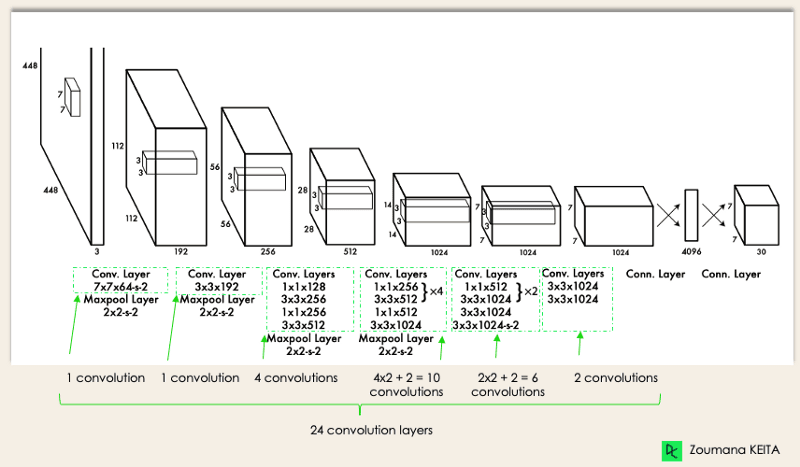
YOLO Architecture from the original paper (Modified by Author)
The architecture works as follows:
- Resizes the input image into 448×448 before going through the convolutional network.
- A 1×1 convolution is first applied to reduce the number of channels, which is then followed by a 3×3 convolution to generate a cuboidal output.
- The activation function under the hood is ReLU, except for the final layer, which uses a linear activation function.
- Some additional techniques, such as batch normalization and dropout, respectively regularize the model and prevent it from overfitting.
By completing the Deep Learning in Python course, you will be ready to use Keras to train and test complex, multi-output networks and dive deeper into deep learning.
How Does YOLO Object Detection Work?
Now that you understand the architecture, let’s have a high-level overview of how the YOLO algorithm performs object detection using a simple use case.
“Imagine you built a YOLO application that detects players and soccer balls from a given image.
But how can you explain this process to someone, especially non-initiated people?
→ That is the whole point of this section. You will understand the whole process of how YOLO performs object detection; how to get image (B) from image (A)”
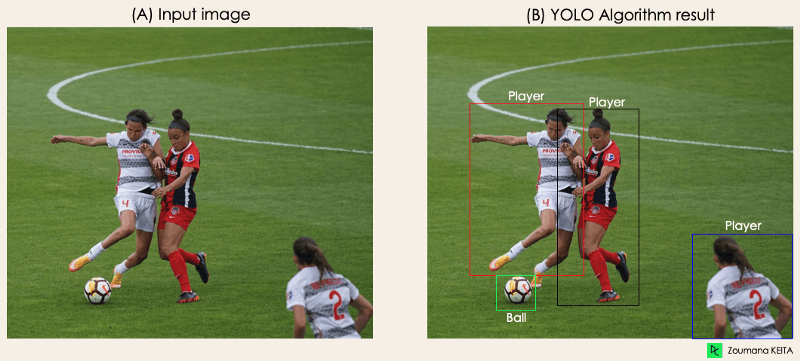 Image by Author
The algorithm works based on the following four approaches:
- Residual blocks
- Bounding box regression
- Intersection Over Unions or IOU for short
- Non-Maximum Suppression.
Let’s have a closer look at each one of them.
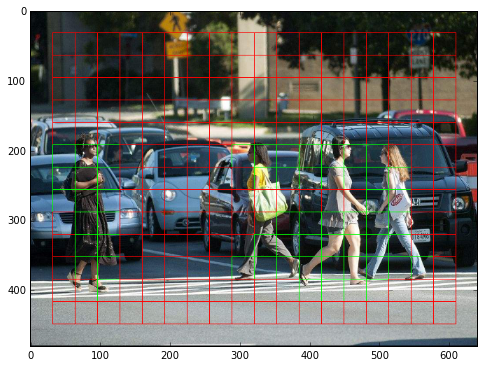
1- Residual blocks
This first step starts by dividing the original image (A) into NxN grid cells of equal shape, where N in our case is 4 shown on the image on the right. Each cell in the grid is responsible for localizing and predicting the class of the object that it covers, along with the probability/confidence value.
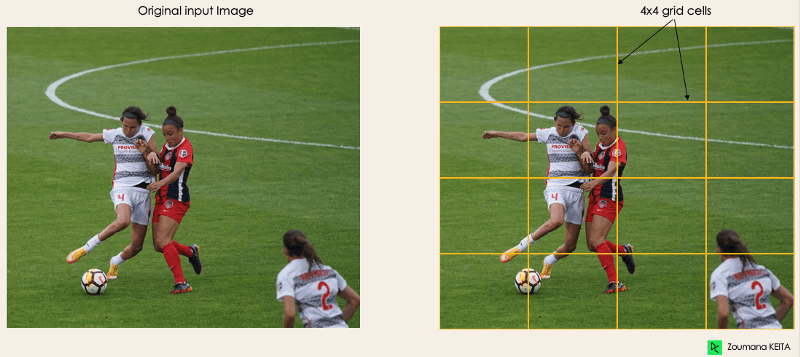
Image by Author
2- Bounding box regression
The next step is to determine the bounding boxes which correspond to rectangles highlighting all the objects in the image. We can have as many bounding boxes as there are objects within a given image.
YOLO determines the attributes of these bounding boxes using a single regression module in the following format, where Y is the final vector representation for each bounding box.
Y = [pc, bx, by, bh, bw, c1, c2]
This is especially important during the training phase of the model.
- pc corresponds to the probability score of the grid containing an object. For instance, all the grids in red will have a probability score higher than zero. The image on the right is the simplified version since the probability of each yellow cell is zero (insignificant).
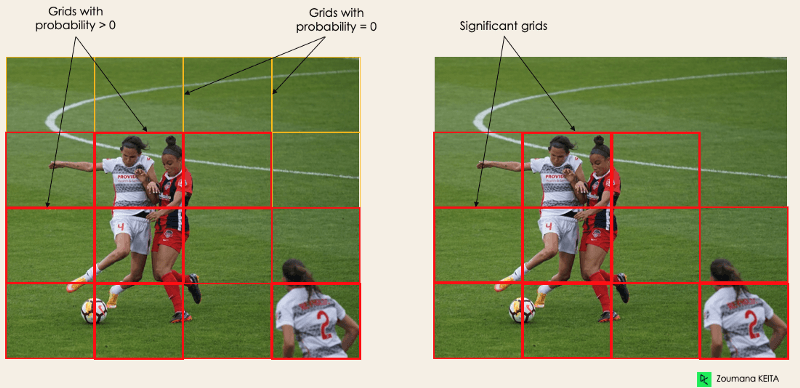
Image by Author
- bx, by are the x and y coordinates of the center of the bounding box with respect to the enveloping grid cell.
- bh, bw correspond to the height and the width of the bounding box with respect to the enveloping grid cell.
- c1 and c2 correspond to the two classes Player and Ball. We can have as many classes as your use case requires.
To understand, let’s pay closer attention to the player on the bottom right.
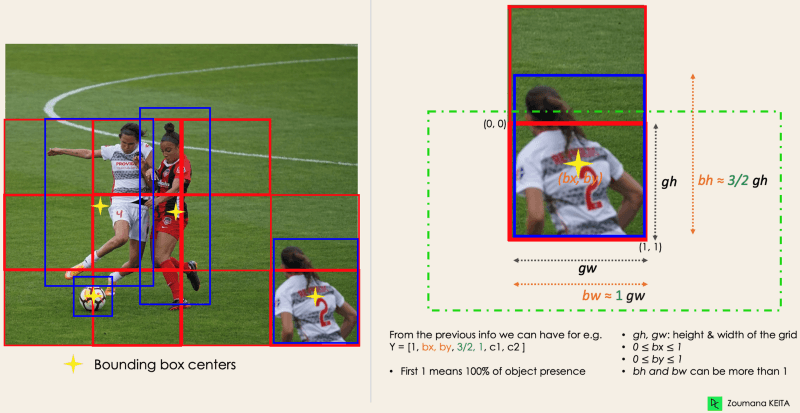 Image by Author
3- Intersection Over Unions or IOU
Most of the time, a single object in an image can have multiple grid box candidates for prediction, even though not all of them are relevant. The goal of the IOU (a value between 0 and 1) is to discard such grid boxes to only keep those that are relevant. Here is the logic behind it:
- The user defines its IOU selection threshold, which can be, for instance, 0.5.
- Then YOLO computes the IOU of each grid cell which is the Intersection area divided by the Union Area.
- Finally, it ignores the prediction of the grid cells having an IOU ≤ threshold and considers those with an IOU > threshold.
Below is an illustration of applying the grid selection process to the bottom left object. We can observe that the object originally had two grid candidates, then only “Grid 2” was selected at the end.
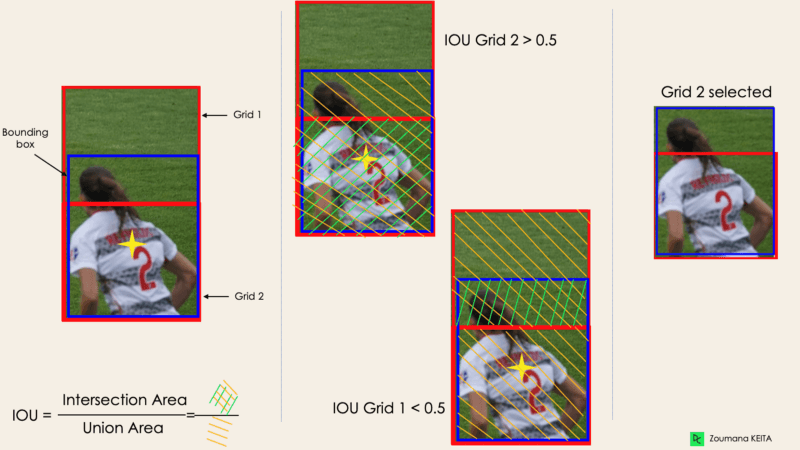
Image by Author
4- Non-Max Suppression or NMS
Setting a threshold for the IOU is not always enough because an object can have multiple boxes with IOU beyond the threshold, and leaving all those boxes might include noise. Here is where we can use NMS to keep only the boxes with the highest probability score of detection.
YOLO Applications
YOLO object detection has different applications in our day-to-day life. In this section, we will cover some of them in the following domains: healthcare, agriculture, security surveillance, and self-driving cars.
1- Application in industries
Object detection has been introduced in many practical industries such as healthcare and agriculture. Let’s understand each one with specific examples.
Healthcare
Specifically in surgery, it can be challenging to localize organs in real-time, due to biological diversity from one patient to another. Kidney Recognition in CT used YOLOv3 to facilitate localizing kidneys in 2D and 3D from computerized tomography (CT) scans.
The Biomedical Image Analysis in Python course can help you learn the fundamentals of exploring, manipulating, and measuring biomedical image data using Python.
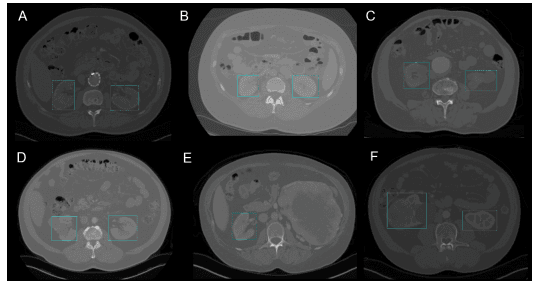
2D Kidney detection by YOLOv3 (Image from Kidney Recognition in CT using YOLOv3)
Agriculture
Artificial Intelligence and robotics are playing a major role in modern agriculture. Harvesting robots are vision-based robots that were introduced to replace the manual picking of fruits and vegetables. One of the best models in this field uses YOLO. In Tomato detection based on modified YOLOv3 framework, the authors describe how they used YOLO to identify the types of fruits and vegetables for efficient harvest.
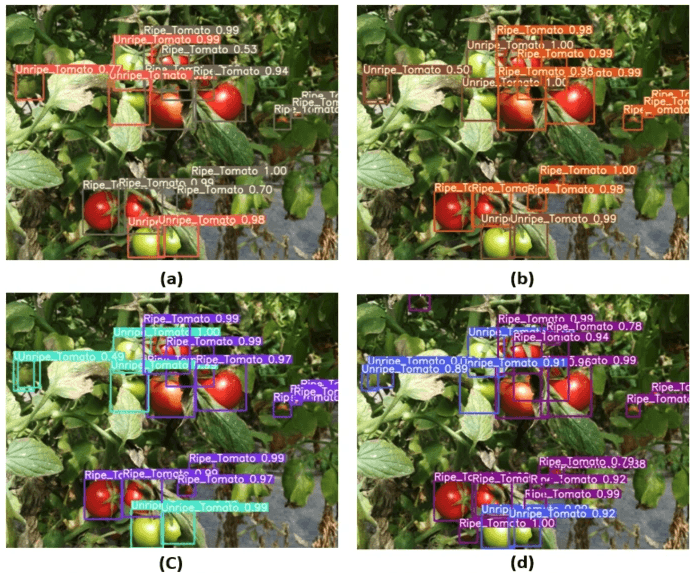
Image from Tomato detection based on modified YOLOv3 framework (source)
2- Security surveillance
Even though object detection is mostly used in security surveillance, this is not the only application. YOLOv3 has been used during covid19 pandemic to estimate social distance violations between people.
You can further your reading on this topic from A deep-learning-based social distance monitoring framework for COVID-19.
3- Self-driving cars
Real-time object detection is part of the DNA of autonomous vehicle systems. This integration is vital for autonomous vehicles because they need to properly identify the correct lanes and all the surrounding objects and pedestrians to increase road safety. The real-time aspect of YOLO makes it a better candidate compared to simple image segmentation approaches.
YOLO, YOLOv2, YOLO9000, YOLOv3, YOLOv4, YOLOR, YOLOX, YOLOv5, YOLOv6, YOLOv7 and Differences
Since the first release of YOLO in 2015, it has evolved a lot with different versions. In this section, we will understand the differences between each of these versions.
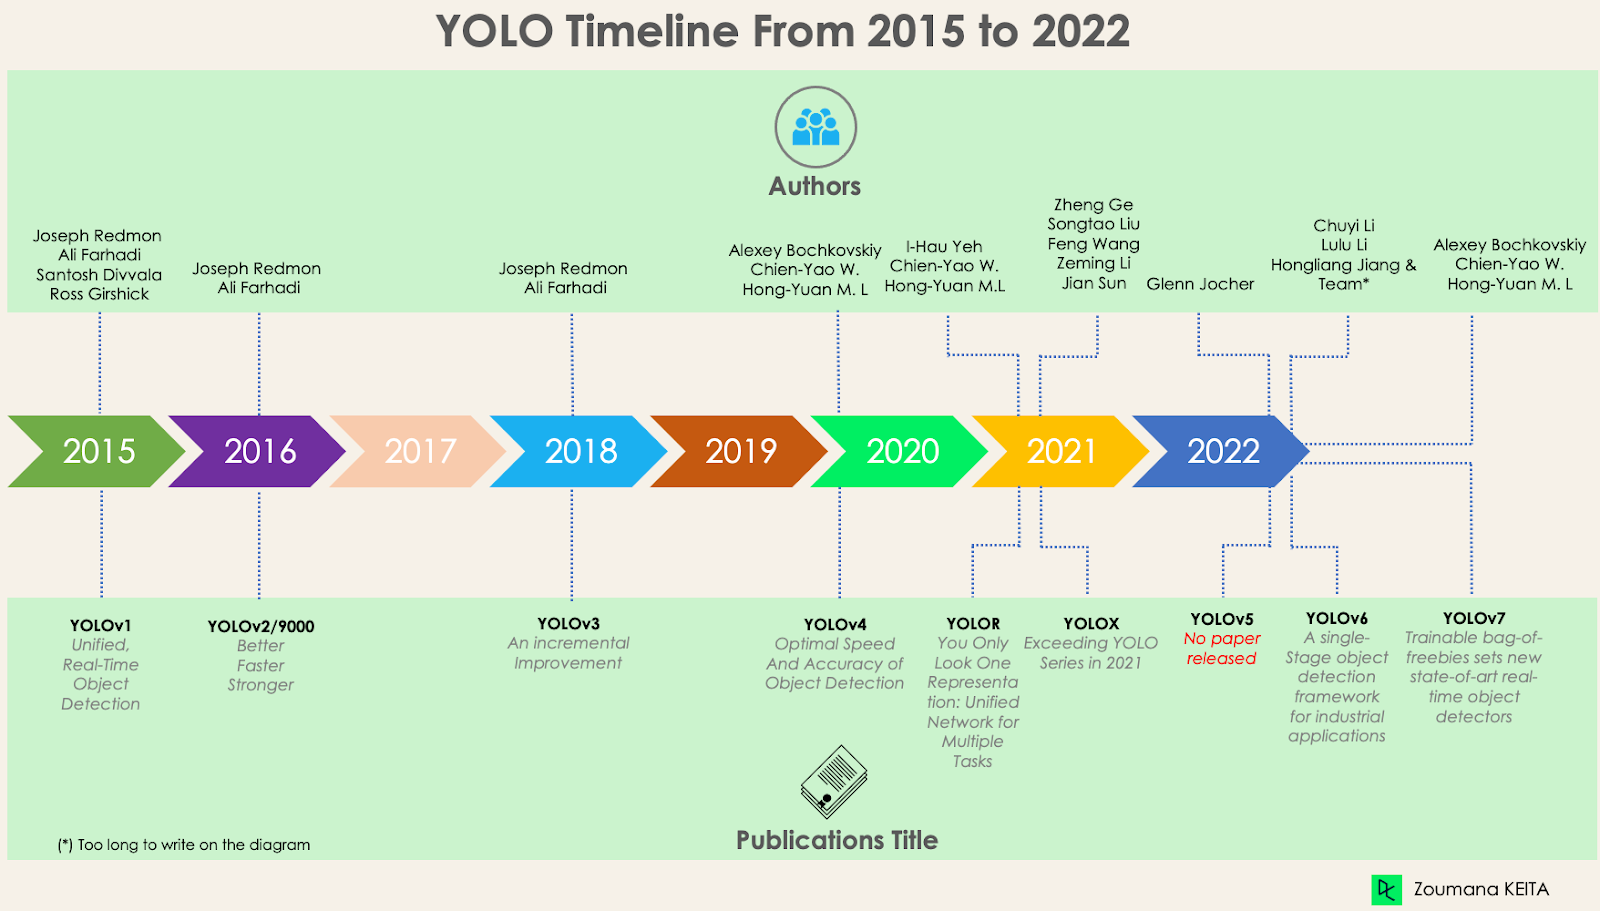
YOLO or YOLOv1, the starting point
This first version of YOLO was a game changer for object detection, because of its ability to quickly and efficiently recognize objects.
However, like many other solutions, the first version of YOLO has its own limitations:
- It struggles to detect smaller images within a group of images, such as a group of persons in a stadium. This is because each grid in YOLO architecture is designed for single object detection.
- Then, YOLO is unable to successfully detect new or unusual shapes.
- Finally, the loss function used to approximate the detection performance treats errors the same for both small and large bounding boxes, which in fact creates incorrect localizations.
YOLOv2 or YOLO9000
YOLOv2 was created in 2016 with the idea of making the YOLO model better, faster and stronger.
The improvement includes but is not limited to the use of Darknet-19 as new architecture, batch normalization, higher resolution of inputs, convolution layers with anchors, dimensionality clustering, and (5) Fine-grained features.
1- Batch normalization
Adding a batch normalization layer improved the performance by 2% mAP. This batch normalization included a regularization effect, preventing overfitting.
2- Higher input resolution
YOLOv2 directly uses a higher resolution 448×448 input instead of 224×224, which makes the model adjust its filter to perform better on higher resolution images. This approach increased the accuracy by 4% mAP, after being trained for 10 epochs on the ImageNet data.
3- Convolution layers using anchor boxes
Instead of predicting the exact coordinate of bounding boxes of the objects as YOLOv1 operates, YOLOv2 simplifies the problem by replacing the fully connected layers with anchors boxes. This approach slightly decreased the accuracy, but improved the model recall by 7%, which gives more room for improvement.
4- Dimensionality clustering
The previously mentioned anchor boxes are automatically found by YOLOv2 using k-means dimensionality clustering with k=5 instead of performing a manual selection. This novel approach provided a good tradeoff between the recall and the precision of the model.
For a better understanding of the k-means dimensionality clustering, take a look at our K-Means Clustering in Python with scikit-learn and K-Means Clustering in R tutorials. They dive into the concept of k-means clustering using Python and R.
5- Fine-grained features
YOLOv2 predictions generate 13×13 feature maps, which is of course enough for large object detection. But for much finer objects detection, the architecture can be modified by turning the 26 × 26 × 512 feature map into a 13 × 13 × 2048 feature map, concatenated with the original features. This approach improved the model performance by 1%.
YOLOv3 — An incremental improvement
An incremental improvement has been performed on the YOLOv2 to create YOLOv3.
The change mainly includes a new network architecture: Darknet-53. This is a 106 neural network, with upsampling networks and residual blocks. It is much bigger, faster, and more accurate compared to Darknet-19, which is the backbone of YOLOv2. This new architecture has been beneficial on many levels:
1- Better bounding box prediction
A logistic regression model is used by YOLOv3 to predict the objectness score for each bounding box.
2- More accurate class predictions
Instead of using softmax as performed in YOLOv2, independent logistic classifiers have been introduced to accurately predict the class of the bounding boxes. This is even useful when facing more complex domains with overlapping labels (e.g. Person → Soccer Player). Using a softmax would constrain each box to have only one class, which is not always true.
3- More accurate prediction at different scales
YOLOv3 performs three predictions at different scales for each location within the input image to help with the upsampling from the previous layers. This strategy allows getting fine-grained and more meaningful semantic information for a better quality output image.
YOLOv4 — Optimal Speed and Accuracy of Object Detection
This version of YOLO has an Optimal Speed and Accuracy of Object Detection compared to all the previous versions and other state-of-the-art object detectors.
The image below shows the YOLOv4 outperforming YOLOv3 and FPS in speed by 10% and 12% respectively.
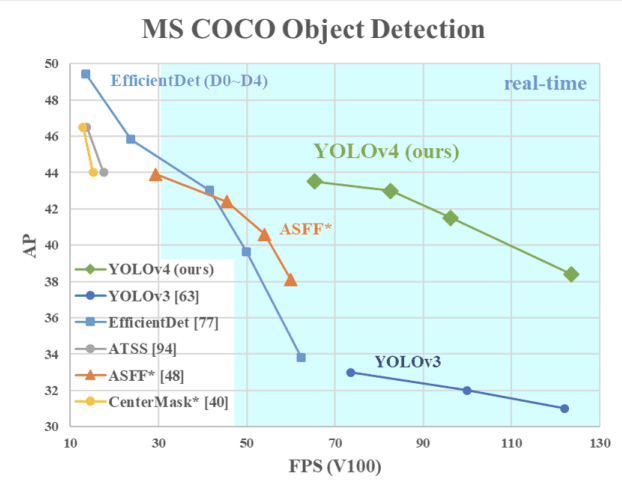
YOLOv4 Speed compared to YOLOv3 and other state-of-the-art object detectors (source)
YOLOv4 is specifically designed for production systems and optimized for parallel computations.
The backbone of YOLOv4’s architecture is CSPDarknet53, a network containing 29 convolution layers with 3 × 3 filters and approximately 27.6 million parameters.
This architecture, compared to YOLOv3, adds the following information for better object detection:
- Spatial Pyramid Pooling (SPP) block significantly increases the receptive field, segregates the most relevant context features, and does not affect the network speed.
- Instead of the Feature Pyramid Network (FPN) used in YOLOv3, YOLOv4 uses PANet for parameter aggregation from different detection levels.
- Data augmentation uses the mosaic technique that combines four training images in addition to a self-adversarial training approach.
- Perform optimal hyper-parameter selection using genetic algorithms.
YOLOR — You Only Look One Representation
As a Unified Network for Multiple Tasks, YOLOR is based on the unified network which is a combination of explicit and implicit knowledge approaches.
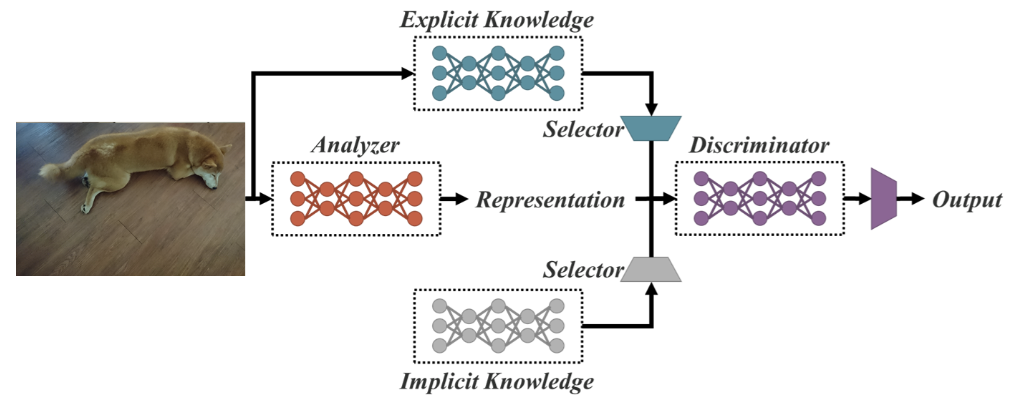
Unified network architecture (source)
Explicit knowledge is normal or conscious learning. Implicit learning on the other hand is one performed subconsciously (from experience).
Combining these two technics, YOLOR is able to create a more robust architecture based on three processes: (1) feature alignment, (2) prediction alignment for object detection, and (3) canonical representation for multi-task learning
1- Prediction alignment
This approach introduces an implicit representation into the feature map of every feature pyramid network (FPN), which improves the precision by about 0.5%.
2- Prediction refinement for object detection
The model predictions are refined by adding implicit representation to the output layers of the network.
3- Canonical representation for multi-task learning
Performing multi-task training requires the execution of the joint optimization on the loss function shared across all the tasks. This process can decrease the overall performance of the model, and this issue can be mitigated with the integration of the canonical representation during the model training.
From the following graphic, we can observe that YOLOR achieved on the MS COCO data state-of-the-art inference speed compared to other models.
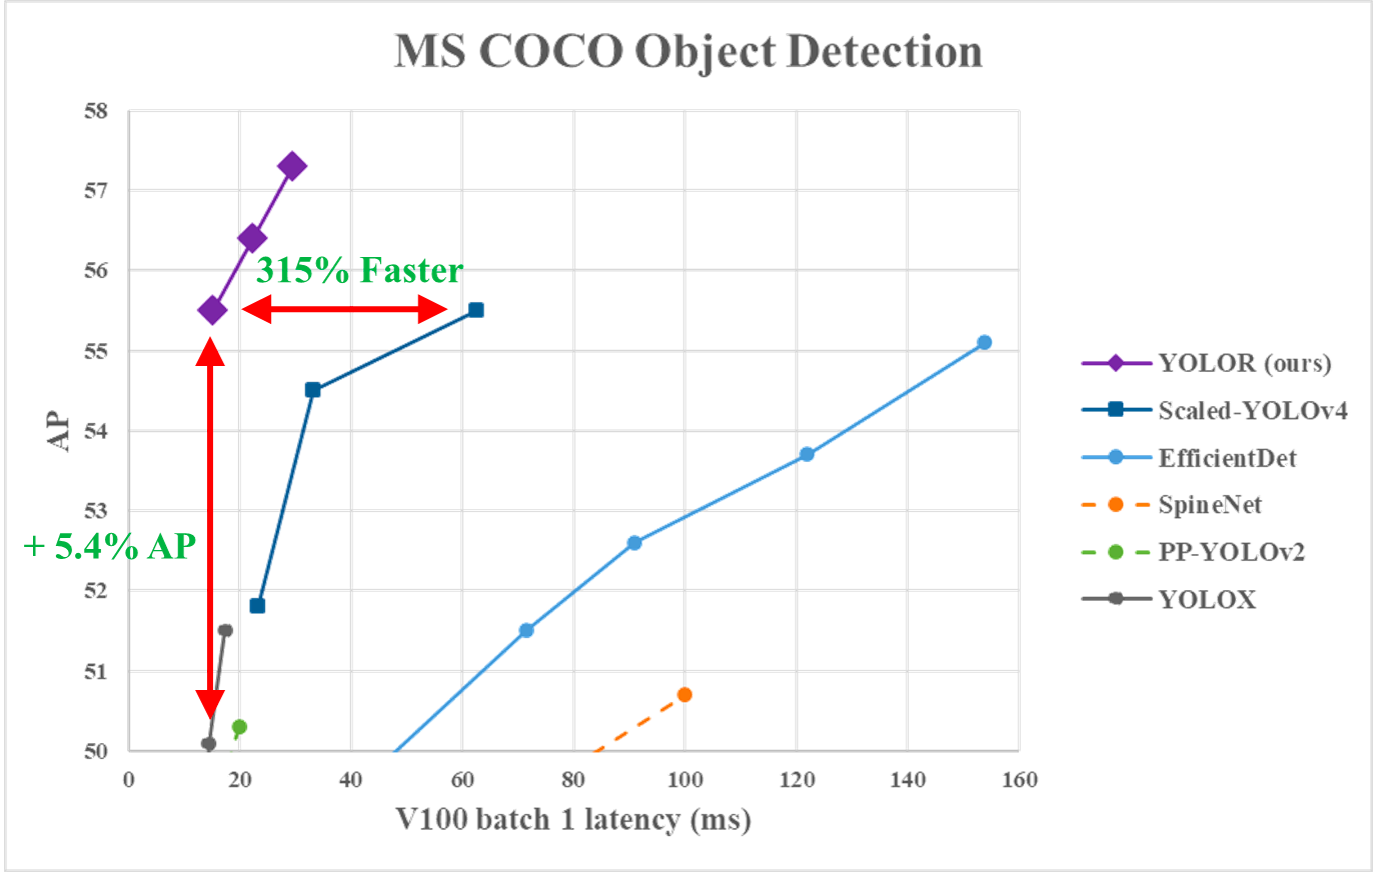
YOLOR performance vs. YOLOv4 and other models (source)
YOLOX — Exceeding YOLO Series in 2021
This uses a baseline that is a modified version of YOLOv3, with Darknet-53 as its backbone.
Published in the paper Exceeding YOLO Series in 2021, YOLOX brings to the table the following four key characteristics to create a better model compared to the older versions.
1- An efficient decoupled head
The coupled head used in the previous YOLO versions is shown to reduce the models’ performance. YOLOX uses a decoupled instead, which allows separating classification and localization tasks, thus increasing the performance of the model.
2- Robust data augmentation
Integration of Mosaic and MixUp into the data augmentation approach considerably increased YOLOX’s performance.
3- An anchor-free system
Anchor-based algorithms perform clustering under the hood, which increases the inference time. Removing the anchor mechanism in YOLOX reduced the number of predictions per image, and significantly improved inference time.
4- SimOTA for label assignment
Instead of using the intersection of union (IoU) approach, the author introduced SimOTA, a more robust label assignment strategy that achieves state-of-the-art results by not only reducing the training time but also avoiding extra hyperparameter issues. In addition to that, it improved the detection mAP by 3%.
YOLOv5
YOLOv5, compared to other versions, does not have a published research paper, and it is the first version of YOLO to be implemented in Pytorch, rather than Darknet.
Released by Glenn Jocher in June 2020, YOLOv5, similarly to YOLOv4, uses CSPDarknet53 as the backbone of its architecture. The release includes five different model sizes: YOLOv5s (smallest), YOLOv5m, YOLOv5l, and YOLOv5x (largest).
One of the major improvements in YOLOv5 architecture is the integration of the Focus layer, represented by a single layer, which is created by replacing the first three layers of YOLOv3. This integration reduced the number of layers, and number of parameters and also increased both forward and backward speed without any major impact on the mAP.
The following illustration compares the training time between YOLOv4 and YOLOv5s.
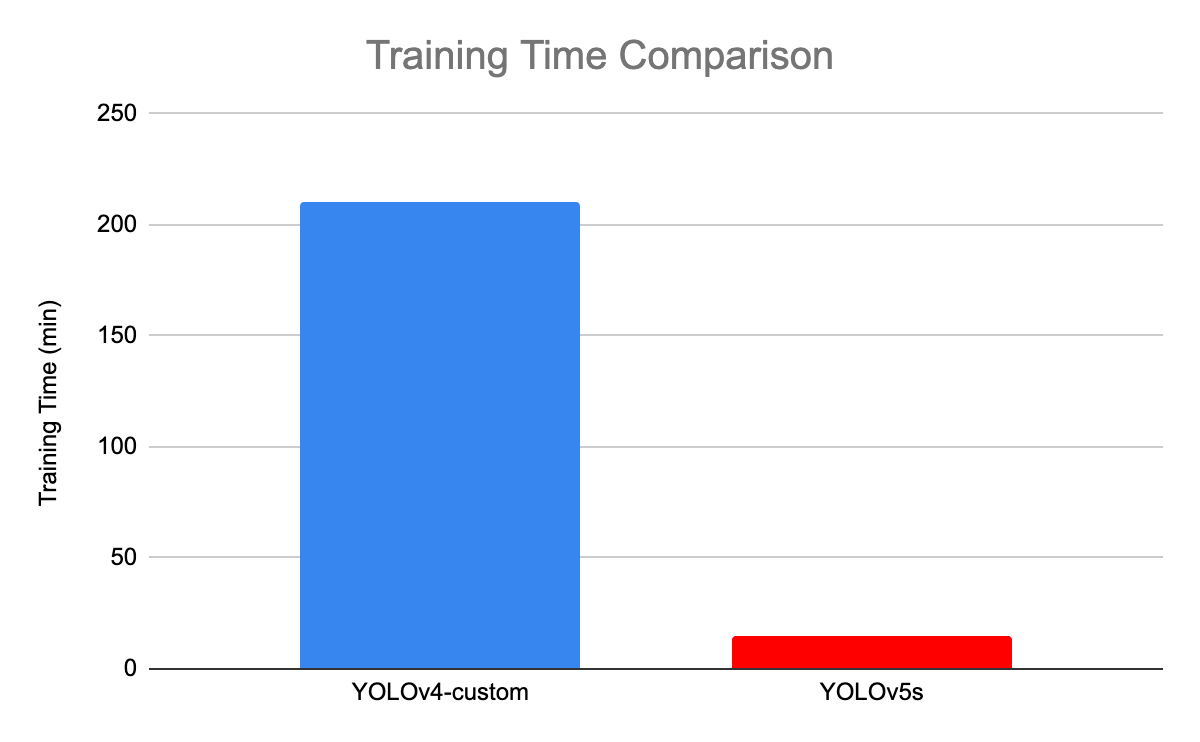
Training time comparison between YOLOv4 and YOLOv5 (source)
YOLOv6 — A Single-Stage Object Detection Framework for Industrial Applications
Dedicated to industrial applications with hardware-friendly efficient design and high performance, the YOLOv6 (MT-YOLOv6) framework was released by Meituan, a Chinese e-commerce company.
Written in Pytorch, this new version was not part of the official YOLO but still got the name YOLOv6 because its backbone was inspired by the original one-stage YOLO architecture.
YOLOv6 introduced three significant improvements to the previous YOLOv5: a hardware-friendly backbone and neck design, an efficient decoupled head, and a more effective training strategy.
YOLOv6 provides outstanding results compared to the previous YOLO versions in terms of accuracy and speed on the COCO dataset as illustrated below.
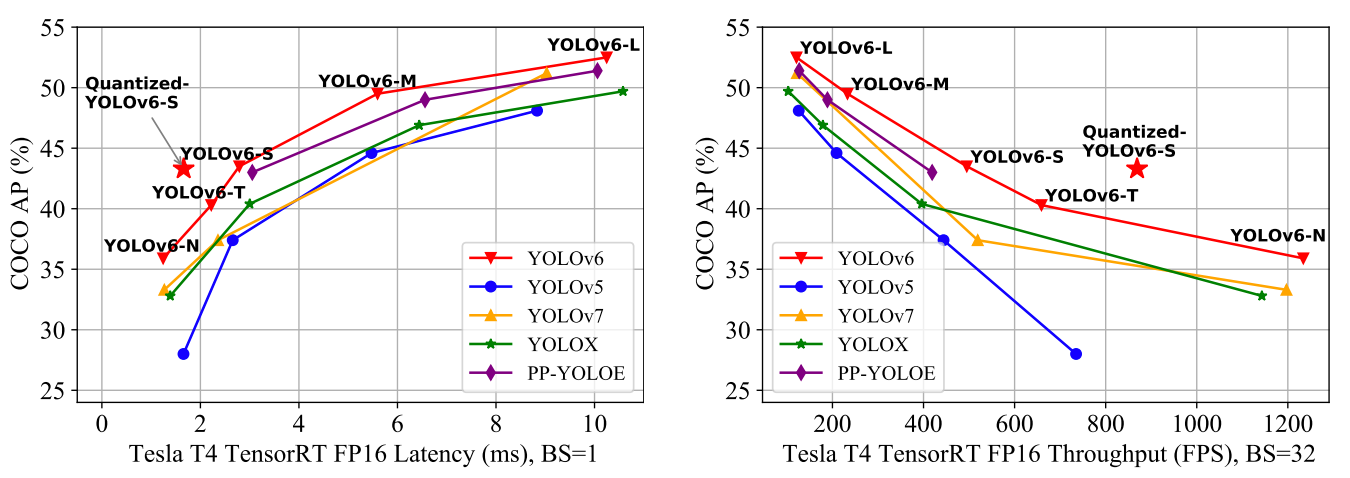
Comparison of state-of-the-art efficient object detectors. All models are tested with TensorRT 7 except that the quantized model is with TensorRT 8 (source)
- YOLOv6-N achieved 35.9% AP on the COCO dataset at a throughput of 1234 (throughputs) FPS on an NVIDIA Tesla T4 GPU.
- YOLOv6-S reached a new state-of-the-art 43.3% AP at 869 FPS.
- YOLOv6-M and YOLOv6-L also achieved better accuracy performance respectively at 49.5% and 52.3% with the same inference speed.
All these characteristics make YOLOv5, the right algorithm for industrial applications.
YOLOv7 — Trainable bag-of-freebies sets new state-of-the-art for real-time object detectors
YOLOv7 was released in July 2022 in the paper Trained bag-of-freebies sets new state-of-the-art for real-time object detectors. This version is making a significant move in the field of object detection, and it surpassed all the previous models in terms of accuracy and speed.
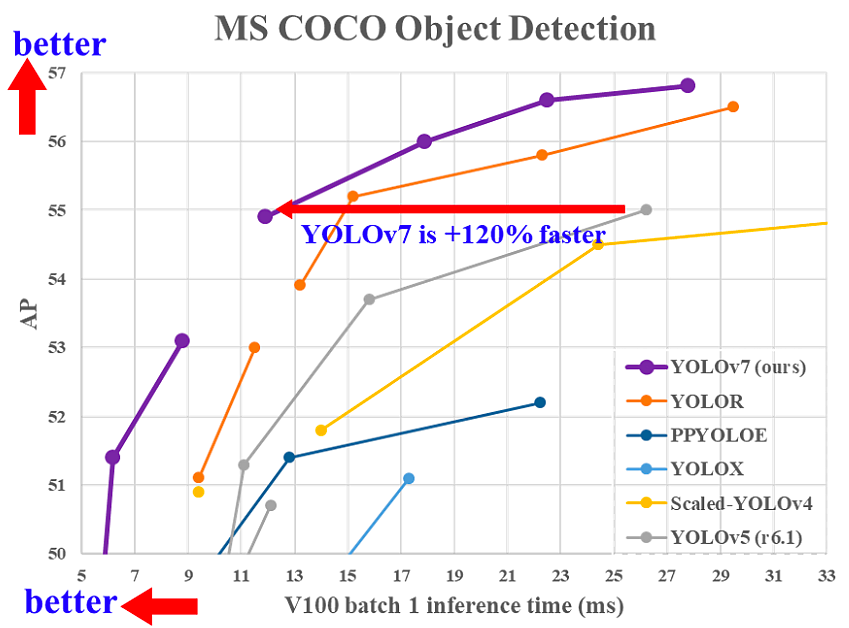
Comparison of YOLOv7 inference time with other real-time object detectors (source)
YOLOv7 has made a major change in its (1) architecture and (2) at the Trainable bag-of-freebies level:
1- Architectural level
YOLOv7 reformed its architecture by integrating the Extended Efficient Layer Aggregation Network (E-ELAN) which allows the model to learn more diverse features for better learning.
In addition, YOLOv7 scales its architecture by concatenating the architecture of the models it is derived from such as YOLOv4, Scaled YOLOv4, and YOLO-R. This allows the model to meet the needs of different inference speeds.
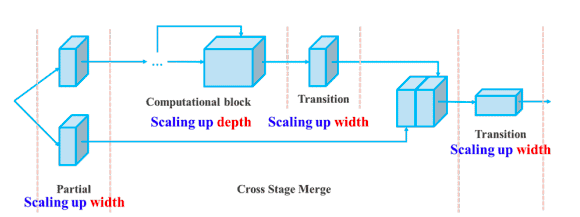
Compound scaling up depth and width for concatenation-based model (source)
2- Trainable bag-of-freebies
The term bag-of-freebies refers to improving the model’s accuracy without increasing the training cost, and this is the reason why YOLOv7 increased not only the inference speed but also the detection accuracy.
Conclusion
This article has covered the benefit of YOLO compared to other state-of-the-art object detection algorithms, and its evolution from 2015 to 2020 with a highlight of its benefits.
Given the rapid advancement of YOLO, there is no doubt that it will remain the leader in the field of object detection for a very long time.
The next step of this article will be the application of the YOLO algorithm to real-world cases. Until then, our Introduction to Deep Learning in Python course can help you learn the fundamentals of neural networks and how to build deep learning models using Keras 2.0 in Python.
Why the YOLO algorithm is important
This phenomenon seeks to answer two basic questions:
- What is the object? This question seeks to identify the object in a specific image.
- Where is it? This question seeks to establish the exact location of the object within the image.
YOLO algorithm is important because of the following reasons:
- Speed: This algorithm improves the speed of detection because it can predict objects in real-time.
- High accuracy: YOLO is a predictive technique that provides accurate results with minimal background errors.
- Learning capabilities: The algorithm has excellent learning capabilities that enable it to learn the representations of objects and apply them in object detection.
How the YOLO algorithm works
YOLO algorithm works using the following three techniques:
- Residual blocks
- Bounding box regression
- Intersection Over Union (IOU)
Residual blocks
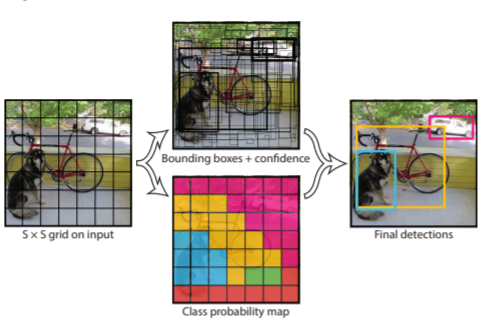
First, the image is divided into various grids. Each grid has a dimension of S x S. The following image shows how an input image is divided into grids.

In the image above, there are many grid cells of equal dimension. Every grid cell will detect objects that appear within them. For example, if an object center appears within a certain grid cell, then this cell will be responsible for detecting it.
Bounding box regression
A bounding box is an outline that highlights an object in an image.
Every bounding box in the image consists of the following attributes:
- Width (bw)
- Height (bh)
- Class (for example, person, car, traffic light, etc.)- This is represented by the letter c.
- Bounding box center (bx,by)
The following image shows an example of a bounding box. The bounding box has been represented by a yellow outline.

YOLO uses a single bounding box regression to predict the height, width, center, and class of objects. In the image above, represents the probability of an object appearing in the bounding box.
Intersection over union (IOU)
Intersection over union (IOU) is a phenomenon in object detection that describes how boxes overlap. YOLO uses IOU to provide an output box that surrounds the objects perfectly.
Each grid cell is responsible for predicting the bounding boxes and their confidence scores. The IOU is equal to 1 if the predicted bounding box is the same as the real box. This mechanism eliminates bounding boxes that are not equal to the real box.
The following image provides a simple example of how IOU works.

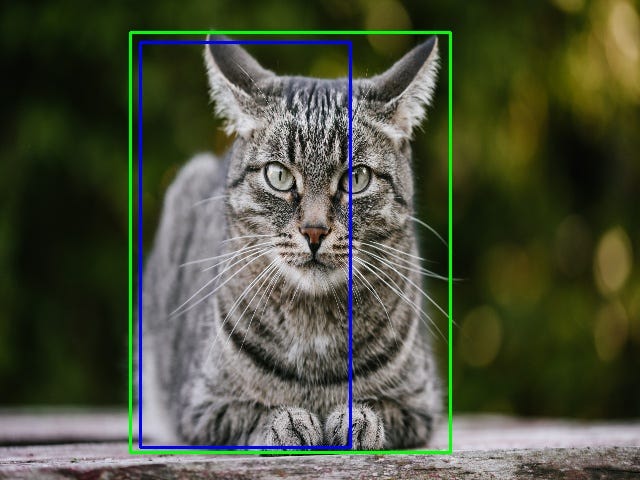
In the image above, there are two bounding boxes, one in green and the other one in blue. The blue box is the predicted box while the green box is the real box. YOLO ensures that the two bounding boxes are equal.
Combination of the three techniques
The following image shows how the three techniques are applied to produce the final detection results.

First, the image is divided into grid cells. Each grid cell forecasts B bounding boxes and provides their confidence scores. The cells predict the class probabilities to establish the class of each object.
For example, we can notice at least three classes of objects: a car, a dog, and a bicycle. All the predictions are made simultaneously using a single convolutional neural network.
Intersection over union ensures that the predicted bounding boxes are equal to the real boxes of the objects. This phenomenon eliminates unnecessary bounding boxes that do not meet the characteristics of the objects (like height and width). The final detection will consist of unique bounding boxes that fit the objects perfectly.
For example, the car is surrounded by the pink bounding box while the bicycle is surrounded by the yellow bounding box. The dog has been highlighted using the blue bounding box.
Applications of YOLO
YOLO algorithm can be applied in the following fields:
- Autonomous driving: YOLO algorithm can be used in autonomous cars to detect objects around cars such as vehicles, people, and parking signals. Object detection in autonomous cars is done to avoid collision since no human driver is controlling the car.
- Wildlife: This algorithm is used to detect various types of animals in forests. This type of detection is used by wildlife rangers and journalists to identify animals in videos (both recorded and real-time) and images. Some of the animals that can be detected include giraffes, elephants, and bears.
- Security: YOLO can also be used in security systems to enforce security in an area. Let’s assume that people have been restricted from passing through a certain area for security reasons. If someone passes through the restricted area, the YOLO algorithm will detect him/her, which will require the security personnel to take further action.
YOLO: Real-Time Object Detection
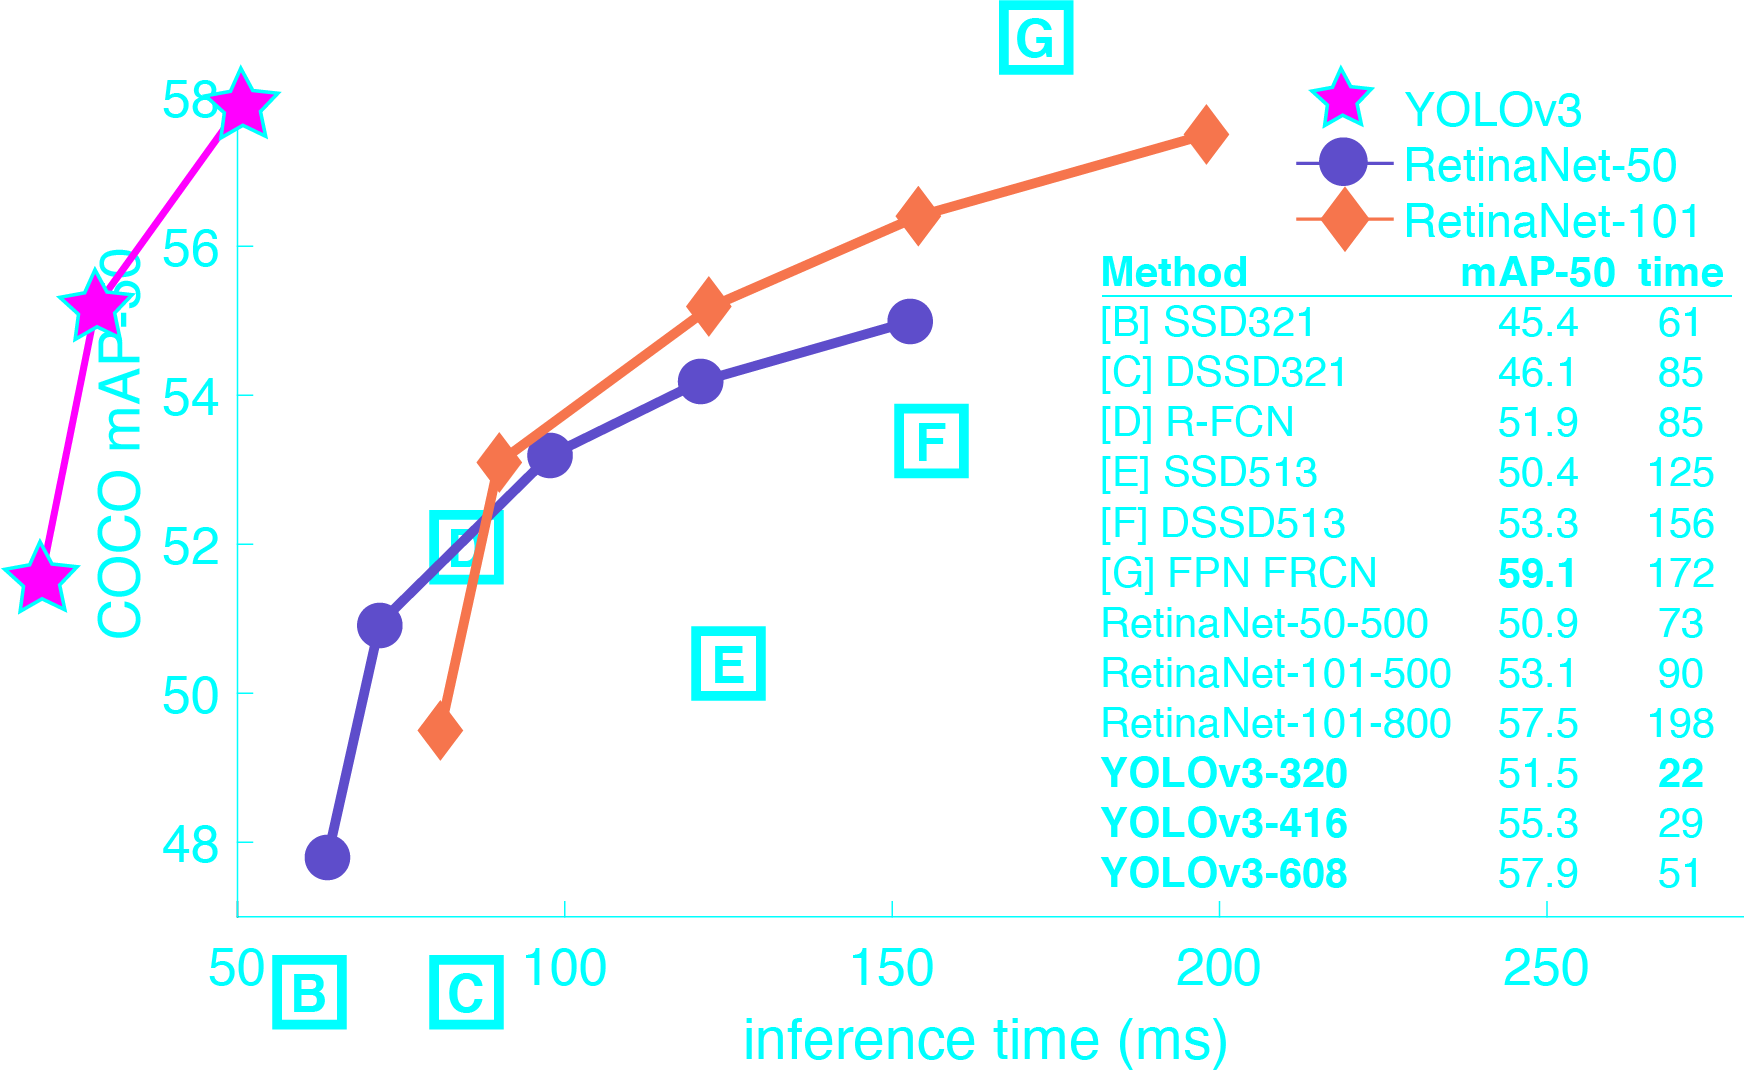
You only look once (YOLO) is a state-of-the-art, real-time object detection system. On a Pascal Titan X it processes images at 30 FPS and has a mAP of 57.9% on COCO test-dev.
Comparison to Other Detectors
YOLOv3 is extremely fast and accurate. In mAP measured at .5 IOU YOLOv3 is on par with Focal Loss but about 4x faster. Moreover, you can easily tradeoff between speed and accuracy simply by changing the size of the model, no retraining required!
Performance on the COCO Dataset
| Model | Train | Test | mAP | FLOPS | FPS | Cfg | Weights |
|---|---|---|---|---|---|---|---|
| SSD300 | COCO trainval | test-dev | 41.2 | – | 46 | link | |
| SSD500 | COCO trainval | test-dev | 46.5 | – | 19 | link | |
| YOLOv2 608×608 | COCO trainval | test-dev | 48.1 | 62.94 Bn | 40 | cfg | weights |
| Tiny YOLO | COCO trainval | test-dev | 23.7 | 5.41 Bn | 244 | cfg | weights |
|
|
|||||||
| SSD321 | COCO trainval | test-dev | 45.4 | – | 16 | link | |
| DSSD321 | COCO trainval | test-dev | 46.1 | – | 12 | link | |
| R-FCN | COCO trainval | test-dev | 51.9 | – | 12 | link | |
| SSD513 | COCO trainval | test-dev | 50.4 | – | 8 | link | |
| DSSD513 | COCO trainval | test-dev | 53.3 | – | 6 | link | |
| FPN FRCN | COCO trainval | test-dev | 59.1 | – | 6 | link | |
| Retinanet-50-500 | COCO trainval | test-dev | 50.9 | – | 14 | link | |
| Retinanet-101-500 | COCO trainval | test-dev | 53.1 | – | 11 | link | |
| Retinanet-101-800 | COCO trainval | test-dev | 57.5 | – | 5 | link | |
| YOLOv3-320 | COCO trainval | test-dev | 51.5 | 38.97 Bn | 45 | cfg | weights |
| YOLOv3-416 | COCO trainval | test-dev | 55.3 | 65.86 Bn | 35 | cfg | weights |
| YOLOv3-608 | COCO trainval | test-dev | 57.9 | 140.69 Bn | 20 | cfg | weights |
| YOLOv3-tiny | COCO trainval | test-dev | 33.1 | 5.56 Bn | 220 | cfg | weights |
| YOLOv3-spp | COCO trainval | test-dev | 60.6 | 141.45 Bn | 20 | cfg | weights |
How It Works
Prior detection systems repurpose classifiers or localizers to perform detection. They apply the model to an image at multiple locations and scales. High scoring regions of the image are considered detections.
We use a totally different approach. We apply a single neural network to the full image. This network divides the image into regions and predicts bounding boxes and probabilities for each region. These bounding boxes are weighted by the predicted probabilities.

Our model has several advantages over classifier-based systems. It looks at the whole image at test time so its predictions are informed by global context in the image. It also makes predictions with a single network evaluation unlike systems like R-CNN which require thousands for a single image. This makes it extremely fast, more than 1000x faster than R-CNN and 100x faster than Fast R-CNN. See our paper for more details on the full system.
What’s New in Version 3?
YOLOv3 uses a few tricks to improve training and increase performance, including: multi-scale predictions, a better backbone classifier, and more. The full details are in our paper!
Detection Using A Pre-Trained Model
This post will guide you through detecting objects with the YOLO system using a pre-trained model. If you don’t already have Darknet installed, you should do that first. Or instead of reading all that just run:
git clone https://github.com/pjreddie/darknet
cd darknet
make
Easy!
You already have the config file for YOLO in the cfg/ subdirectory. You will have to download the pre-trained weight file here (237 MB). Or just run this:
wget https://pjreddie.com/media/files/yolov3.weights
Then run the detector!
./darknet detect cfg/yolov3.cfg yolov3.weights data/dog.jpg
You will see some output like this:
layer     filters    size              input                output
    0 conv     32  3 x 3 / 1   416 x 416 x   3   ->   416 x 416 x  32  0.299 BFLOPs
    1 conv     64  3 x 3 / 2   416 x 416 x  32   ->   208 x 208 x  64  1.595 BFLOPs
    .......
  105 conv    255  1 x 1 / 1    52 x  52 x 256   ->    52 x  52 x 255  0.353 BFLOPs
  106 detection
truth_thresh: Using default '1.000000'
Loading weights from yolov3.weights...Done!
data/dog.jpg: Predicted in 0.029329 seconds.
dog: 99%
truck: 93%
bicycle: 99%
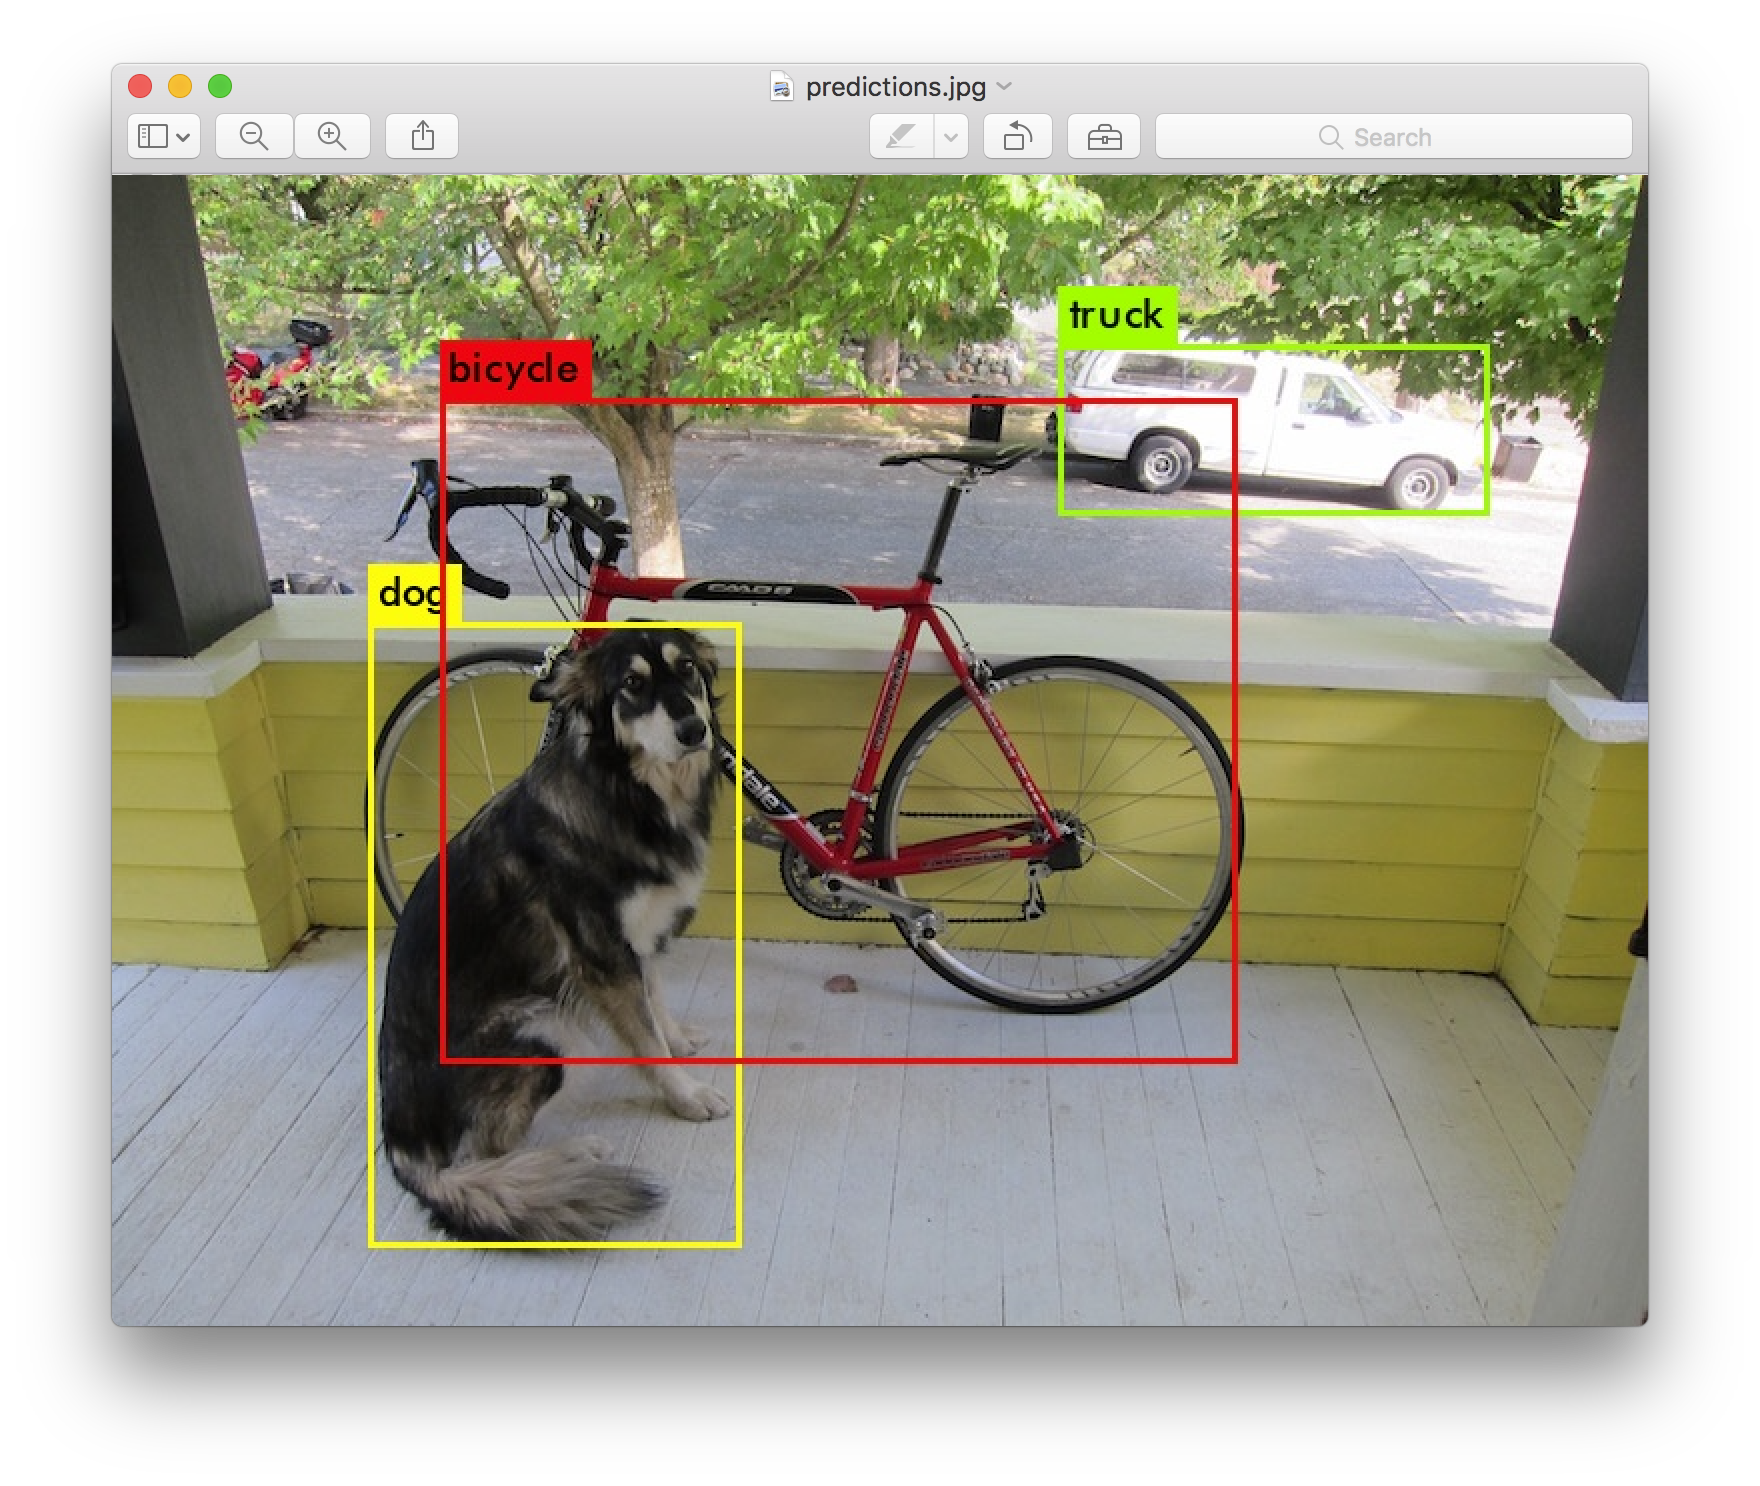
Darknet prints out the objects it detected, its confidence, and how long it took to find them. We didn’t compile Darknet with OpenCV so it can’t display the detections directly. Instead, it saves them in predictions.png. You can open it to see the detected objects. Since we are using Darknet on the CPU it takes around 6-12 seconds per image. If we use the GPU version it would be much faster.
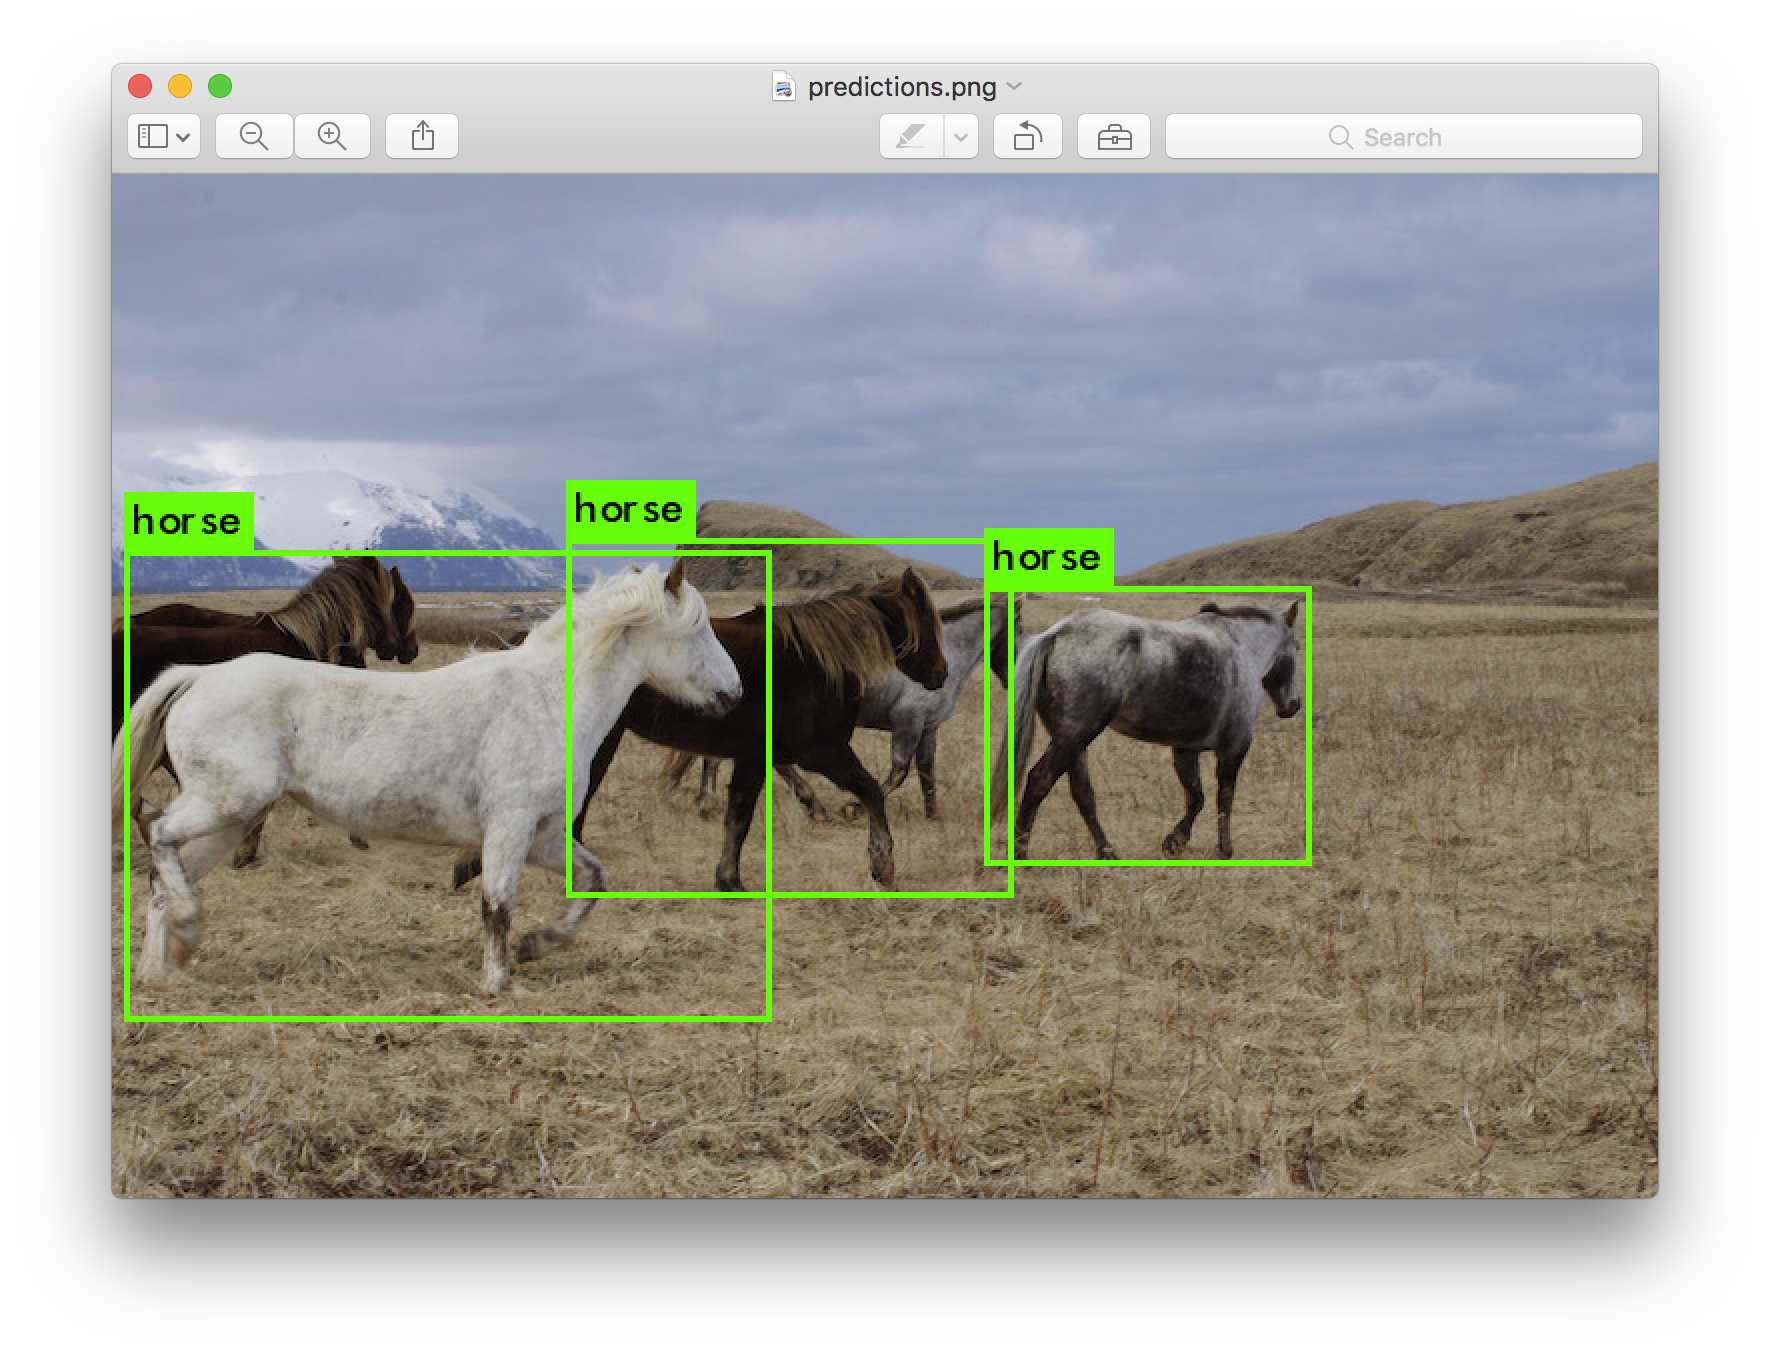
I’ve included some example images to try in case you need inspiration. Try data/eagle.jpg, data/dog.jpg, data/person.jpg, or data/horses.jpg!
The detect command is shorthand for a more general version of the command. It is equivalent to the command:
./darknet detector test cfg/coco.data cfg/yolov3.cfg yolov3.weights data/dog.jpg
You don’t need to know this if all you want to do is run detection on one image but it’s useful to know if you want to do other things like run on a webcam (which you will see later on).
Multiple Images
Instead of supplying an image on the command line, you can leave it blank to try multiple images in a row. Instead you will see a prompt when the config and weights are done loading:
./darknet detect cfg/yolov3.cfg yolov3.weights
layer     filters    size              input                output
    0 conv     32  3 x 3 / 1   416 x 416 x   3   ->   416 x 416 x  32  0.299 BFLOPs
    1 conv     64  3 x 3 / 2   416 x 416 x  32   ->   208 x 208 x  64  1.595 BFLOPs
    .......
  104 conv    256  3 x 3 / 1    52 x  52 x 128   ->    52 x  52 x 256  1.595 BFLOPs
  105 conv    255  1 x 1 / 1    52 x  52 x 256   ->    52 x  52 x 255  0.353 BFLOPs
  106 detection
Loading weights from yolov3.weights...Done!
Enter Image Path:
Enter an image path like data/horses.jpg to have it predict boxes for that image.
Once it is done it will prompt you for more paths to try different images. Use Ctrl-C to exit the program once you are done.
Changing The Detection Threshold
By default, YOLO only displays objects detected with a confidence of .25 or higher. You can change this by passing the -thresh <val> flag to the yolo command. For example, to display all detection you can set the threshold to 0:
./darknet detect cfg/yolov3.cfg yolov3.weights data/dog.jpg -thresh 0
Which produces:
![][all]
So that’s obviously not super useful but you can set it to different values to control what gets thresholded by the model.
Tiny YOLOv3
We have a very small model as well for constrained environments, yolov3-tiny. To use this model, first download the weights:
wget https://pjreddie.com/media/files/yolov3-tiny.weights
Then run the detector with the tiny config file and weights:
./darknet detect cfg/yolov3-tiny.cfg yolov3-tiny.weights data/dog.jpg
Real-Time Detection on a Webcam
Running YOLO on test data isn’t very interesting if you can’t see the result. Instead of running it on a bunch of images let’s run it on the input from a webcam!
To run this demo you will need to compile Darknet with CUDA and OpenCV. Then run the command:
./darknet detector demo cfg/coco.data cfg/yolov3.cfg yolov3.weights
YOLO will display the current FPS and predicted classes as well as the image with bounding boxes drawn on top of it.
You will need a webcam connected to the computer that OpenCV can connect to or it won’t work. If you have multiple webcams connected and want to select which one to use you can pass the flag -c <num> to pick (OpenCV uses webcam 0 by default).
You can also run it on a video file if OpenCV can read the video:
./darknet detector demo cfg/coco.data cfg/yolov3.cfg yolov3.weights <video file>
That’s how we made the YouTube video above.
Training YOLO on VOC
You can train YOLO from scratch if you want to play with different training regimes, hyper-parameters, or datasets. Here’s how to get it working on the Pascal VOC dataset.
Get The Pascal VOC Data
To train YOLO you will need all of the VOC data from 2007 to 2012. You can find links to the data here. To get all the data, make a directory to store it all and from that directory run:
wget https://pjreddie.com/media/files/VOCtrainval_11-May-2012.tar
wget https://pjreddie.com/media/files/VOCtrainval_06-Nov-2007.tar
wget https://pjreddie.com/media/files/VOCtest_06-Nov-2007.tar
tar xf VOCtrainval_11-May-2012.tar
tar xf VOCtrainval_06-Nov-2007.tar
tar xf VOCtest_06-Nov-2007.tar
There will now be a VOCdevkit/ subdirectory with all the VOC training data in it.
Generate Labels for VOC
Now we need to generate the label files that Darknet uses. Darknet wants a .txt file for each image with a line for each ground truth object in the image that looks like:
<object-class> <x> <y> <width> <height>
Where x, y, width, and height are relative to the image’s width and height. To generate these file we will run the voc_label.py script in Darknet’s scripts/ directory. Let’s just download it again because we are lazy.
wget https://pjreddie.com/media/files/voc_label.py
python voc_label.py
After a few minutes, this script will generate all of the requisite files. Mostly it generates a lot of label files in VOCdevkit/VOC2007/labels/ and VOCdevkit/VOC2012/labels/. In your directory you should see:
ls
2007_test.txt   VOCdevkit
2007_train.txt  voc_label.py
2007_val.txt    VOCtest_06-Nov-2007.tar
2012_train.txt  VOCtrainval_06-Nov-2007.tar
2012_val.txt    VOCtrainval_11-May-2012.tar
The text files like 2007_train.txt list the image files for that year and image set. Darknet needs one text file with all of the images you want to train on. In this example, let’s train with everything except the 2007 test set so that we can test our model. Run:
cat 2007_train.txt 2007_val.txt 2012_*.txt > train.txt
Now we have all the 2007 trainval and the 2012 trainval set in one big list. That’s all we have to do for data setup!
Modify Cfg for Pascal Data
Now go to your Darknet directory. We have to change the cfg/voc.data config file to point to your data:
  1 classes= 20
  2 train  = <path-to-voc>/train.txt
  3 valid  = <path-to-voc>2007_test.txt
  4 names = data/voc.names
  5 backup = backup
You should replace <path-to-voc> with the directory where you put the VOC data.
Download Pretrained Convolutional Weights
For training we use convolutional weights that are pre-trained on Imagenet. We use weights from the darknet53 model. You can just download the weights for the convolutional layers here (76 MB).
wget https://pjreddie.com/media/files/darknet53.conv.74
Train The Model
Now we can train! Run the command:
./darknet detector train cfg/voc.data cfg/yolov3-voc.cfg darknet53.conv.74
Training YOLO on COCO
You can train YOLO from scratch if you want to play with different training regimes, hyper-parameters, or datasets. Here’s how to get it working on the COCO dataset.
Get The COCO Data
To train YOLO you will need all of the COCO data and labels. The script scripts/get_coco_dataset.sh will do this for you. Figure out where you want to put the COCO data and download it, for example:
cp scripts/get_coco_dataset.sh data
cd data
bash get_coco_dataset.sh
Now you should have all the data and the labels generated for Darknet.
Modify cfg for COCO
Now go to your Darknet directory. We have to change the cfg/coco.data config file to point to your data:
  1 classes= 80
  2 train  = <path-to-coco>/trainvalno5k.txt
  3 valid  = <path-to-coco>/5k.txt
  4 names = data/coco.names
  5 backup = backup
You should replace <path-to-coco> with the directory where you put the COCO data.
You should also modify your model cfg for training instead of testing. cfg/yolo.cfg should look like this:
[net]
# Testing
# batch=1
# subdivisions=1
# Training
batch=64
subdivisions=8
....
Train The Model
Now we can train! Run the command:
./darknet detector train cfg/coco.data cfg/yolov3.cfg darknet53.conv.74
If you want to use multiple gpus run:
./darknet detector train cfg/coco.data cfg/yolov3.cfg darknet53.conv.74 -gpus 0,1,2,3
If you want to stop and restart training from a checkpoint:
./darknet detector train cfg/coco.data cfg/yolov3.cfg backup/yolov3.backup -gpus 0,1,2,3
YOLOv3 on the Open Images dataset
wget https://pjreddie.com/media/files/yolov3-openimages.weights

./darknet detector test cfg/openimages.data cfg/yolov3-openimages.cfg yolov3-openimages.weights
What Happened to the Old YOLO Site?
If you are using YOLO version 2 you can still find the site here: https://pjreddie.com/darknet/yolov2/
Cite
If you use YOLOv3 in your work please cite our paper!
@article{yolov3,
  title={YOLOv3: An Incremental Improvement},
  author={Redmon, Joseph and Farhadi, Ali},
  journal = {arXiv},
  year={2018}
}