How to Install Node-Red to Home Assistant – Using Node-Red for Complex Home Automations
Node-RED is a flow-based, low-code development tool for visual programming, originally developed by IBM for wiring together hardware devices, APIs and online services as part of the Internet of things. Node-RED provides a web browser-based flow editor, which can be used to create JavaScript functions.
This guide will show you how to install Node-Red to Home Assistant and take you through a basic flow.
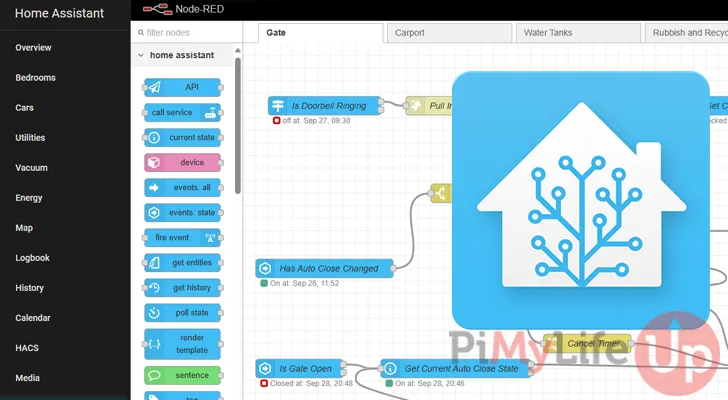
Node-Red is a low-code development tool for building simple to complex automation flows. The software runs within a web browser and works great within Home Assistant. The software is relatively easy to learn and allows easy viewing of complex logic flows.
Using Node-Red gives you an excellent visual overview of automation flows, making it much easier to understand, edit, and create. You can build flows that control automatic gates, lights, water pumps, and more.
If you haven’t already, we reco
This tutorial will explain how to install Node-Red to Home Assistant. We also go through the basics of setting up an automation flow. Both of these topics give you a decent insight into how you can get the most out of the software.
Installing Node-Red
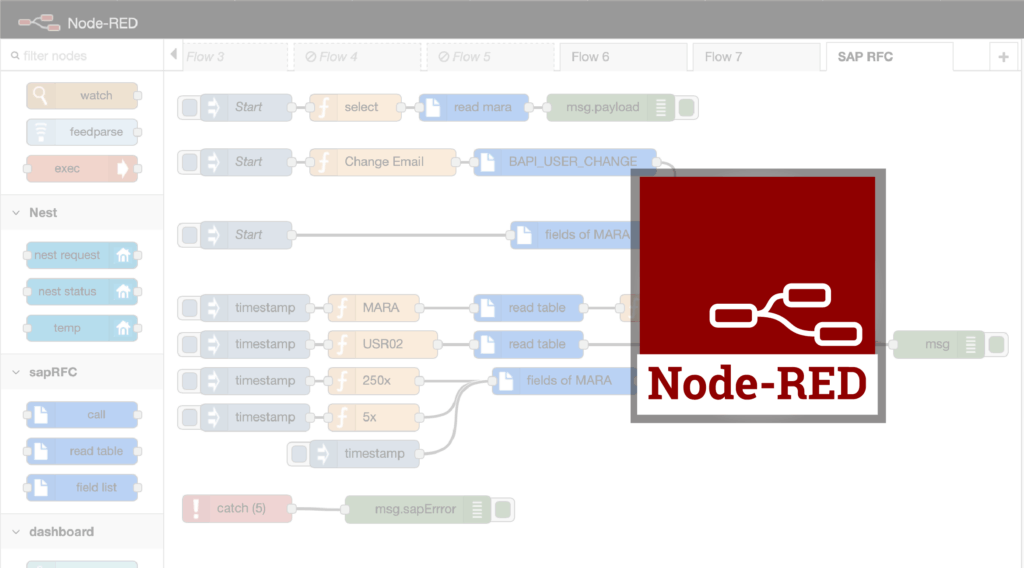
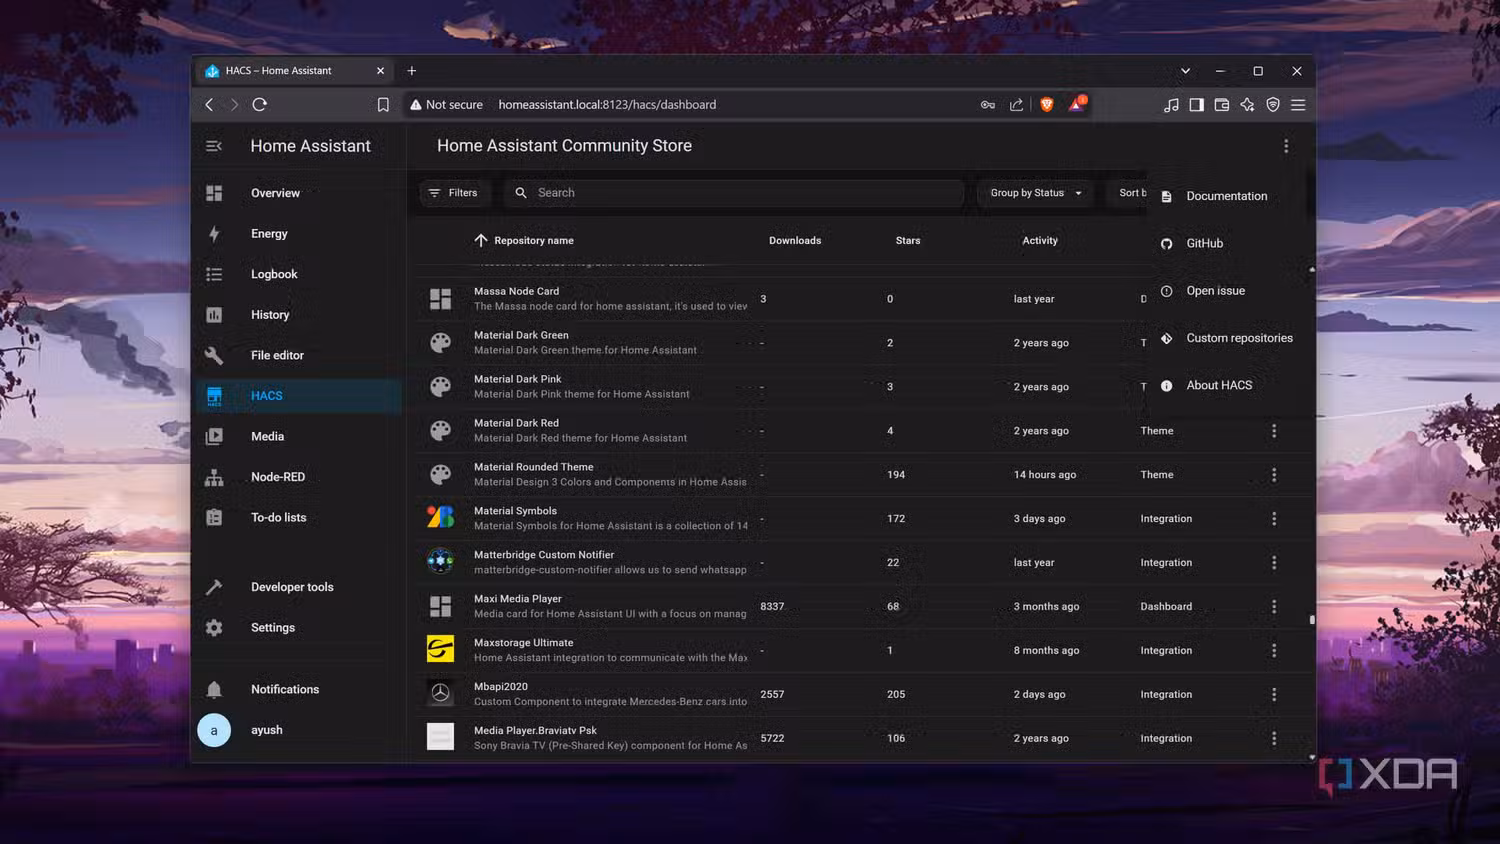
Node-RED: Low-code programming for event-driven applications
The installation of Node Red is very straightforward, but there are a few requirements for a smooth installation process.
To install Node-Red within Home Assistant, you must run a version that supports add-ons such as supervised or the operating system. Alternatively, you can set up Node-Red as a separate docker and connect it to Home Assistant.
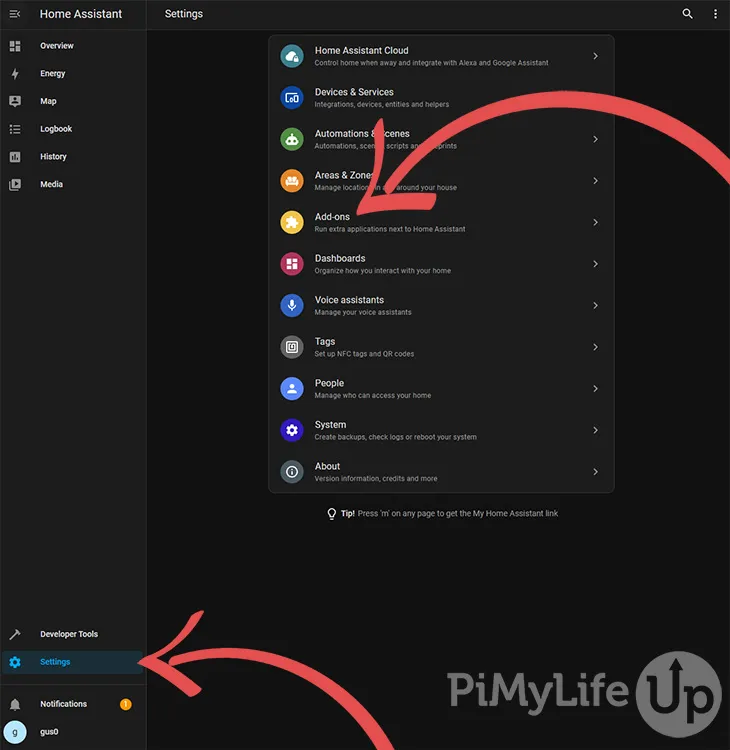
1. Within the Home Assistant web interface, click on the settings tab and then click on add-ons.
2. Click on add-store in the bottom right corner of the screen.

3. Using the search box, search for Node Red. Alternatively, you can scroll through the page until you find the Node-Red add-on.

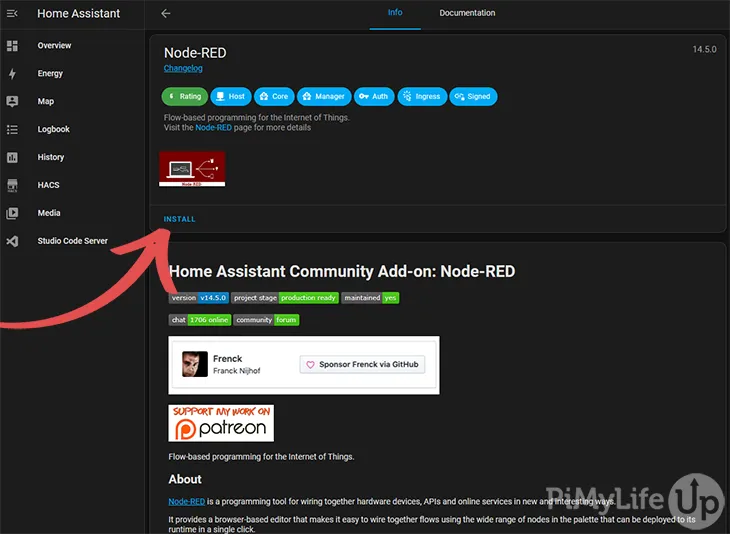
4. The page you should now see will contain all the details about the add-on. You can check through all the details if you want to know what you are about to install. Once you are ready to install, click Install.
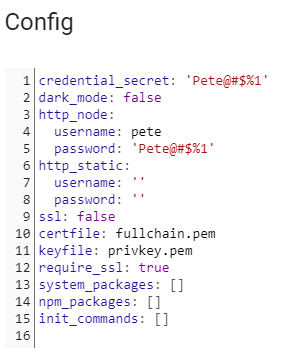
5. Now, navigate to the configuration tab. In this tab, locate the credential_secret field and enter a strong password. Make sure you save this password, as you may need it in the future. I use 1Password for storing passwords, but other software such as Bitwarden or Nordpass (Affiliate Link) would also be solid choices.
You will also need to disable SSL if it is not enabled on your Home Assistant installation. To disable SSL, click the SSL button so it is greyed out. If you leave it on and Home Assistant does not support SSL, Node-Red will fail to start.
Once you are done, click on save.

6. After you have saved the credential secret and disabled SSL, return to the info tab. On this page, click on “Start“. Node-Red should start without issue. If it is not starting, navigate to the log tab and look through the logs for errors.

7. If you click on Node-Red in the sidebar or “Open Web UI” on the add-on page, it will take you to the Node-Red application. You can now start writing your flows to automate your Home Assistant setup.

Creating your First Node-Red Flow
Node-Red can be a little daunting at first, but once you understand the basics, it is a powerful tool that allows you to handle complex and simple automations.
In this short tutorial, we will go through the basics of creating a flow that uses a Home Assistant node.
The following steps will take you through how to send a notification whenever the temperature of our weather station exceeds 15°C.
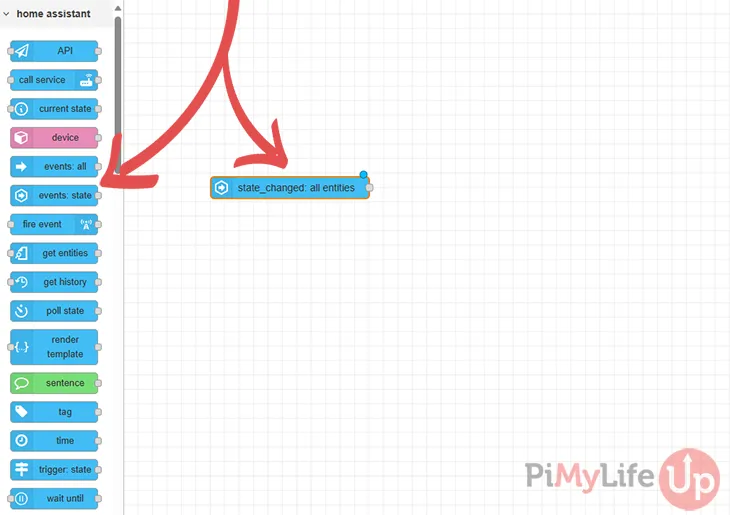
1. The first node we will use is the “Events: State” node. Drag this node onto the grid
Next, double-click on the node to open the options available. Fill in each of the relevant properties. Below is what I filled in.
- Name: Check Temperature
- Server: Home Assistant
- Entity: Outdoor Temperature
- If State: >= 15 (Greater or equal to 15)
- For: 1 Minute
- State type: Number
I also do not have any checkboxes ticked for “Ignore State Change Event When“.

2. Next, drag and drop a debug node. These nodes will output data that can help diagnose and fix issues with your flows.

On each node, there are dots. These dots represent different functions. For example, our Check Temperature node has two dots. One is for when our logic is false, and the other for when it is true.
We click and drag our true node and connect it to the debug node.

The flow will run when you click deploy in the top right-hand corner.
In this example, if the temperature exceeds 15°C, the debug node will output after 1 minute. If it is not higher than 15°C, nothing will output.

3. Next, we will want to notify our users that the temperature is too high. To do this, drag a “Call Service” node onto the grid. Connect the true output to the input on the “Call Service” Node.

Now, double-click on the call service node to edit it. Fill in each of the relevant properties. Below is what I filled in.
- Name: Enter the name that you want the node to be referred to.
- Server: You shouldn’t need to update this as it should be Home Assistant.
- Domain: You will need to set this to notify.
- Service: Choose a device that you wish to notify. Choosing the notify option will notify all possible users.
- Data: This is where you need to specify the notification details. At the bottom of the properties is an example. Clicking “Load Example Data” will pre-populate the data field, which you can easily edit.
Below is an example of my entry into the data field.
{
   "message":"Temperature is too High!",
   "title":"The temperature is higher than 15°C."
}Copy
4. To avoid too many notifications, you may want to place a delay node. This node will allow a single notification to be sent for a specified time. To do this, drag and drop a delay node in between our check temperature and notify gus nodes.

Double-click on the delay node and update the settings to the following.
- Action: Rate Limit and All Messages.
- Rate: 1 msg(s) per 15 minutes.
- Change Queue Intermediate Messages to Drop Intermediate Messages
- Name: Rate Limit
These properties will allow a single message every fifteen minutes. Any messages that try to be sent in the meantime will be dropped.

5. You should now have a basic flow that will notify users whenever the temperature goes above 15°C for over a minute. Feel free to change and alter this flow for other purposes.
You can remove the debug node if you are finished debugging. Alternatively, you can click the green square next to the node to deactivate it.

Conclusion
I hope you now have Node-Red installed and configured on your Home Assistant installation. Our basic flow introduced some basics of using the software to run automations. Once you understand the basics, you can create some cool automations using the data from some of the sensors and devices in your home.
We are constantly working on more Home Assistant tutorials, so if there is anything that you would like to see, please let us know. I recommend checking out some of the other tutorials for great ideas on what you can do with this amazing software.
If you encounter any problems or have any suggestions, please do not hesitate to leave a comment down below. source
Node-RED, the visual programming tool for Internet of Things
From the beginning of programming, one of the industry’s main challenges has been to facilitate the applications development to simplify the integration between the hardware devices, the software and us, the humans. Thanks to Node-RED we are much closer of this goal. Programming, without programming.
What is Node-RED and what is it for?
Node-RED is an open-source development tool based on visual programming that was created by IBM to connect hardware devices, APIs and online services.
Node-RED is a solid tool, easy to learn, and it does not require any programming knowledge. It has been consolidated as one of the main applications for real-time data management and transformation for IoT and Industry 4.0 solutions.
Node-RED allows to graphically connect predefined blocks, called nodes, to develop a concrete task. The nodes connection, usually a combination of input nodes, processing nodes and output nodes, when wired together, make up a flow.
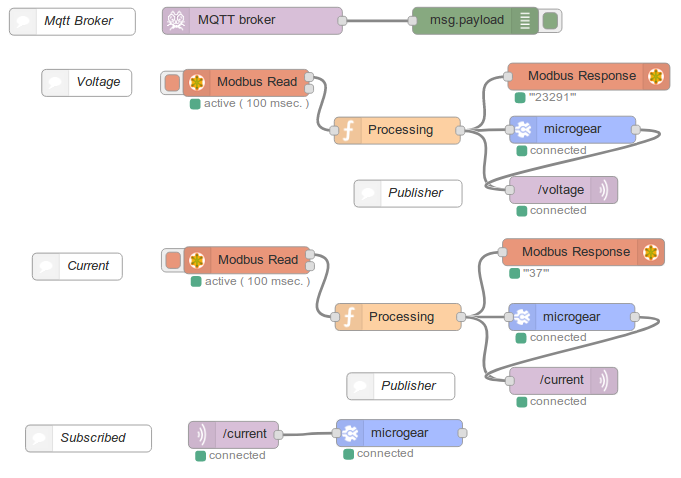
Among all the available nodes we can find standard protocols as MQTT, REST, Modbus, OPC-UA, Bacnet, Websocket; and third party API integrations as Microsoft Azure, Amazon Web Services, Twitter, Facebook and many more.
Where can I install Node-RED?
Node-RED is built on Node.js, taking full advantage of its power and assuring scalability, liability and low hardware requirements. These features allow to run Node-RED in personal computers, cloud servers and low-cost embedded hardware.
If you want to take your first steps in Node-RED you just need to click here to access to all the documentation. Follow step by step how to install the tool on your computer, your cloud services regular provider or your embedded device eManager.
Nodes library
The nature of the tool, being open source, and the facility to develop new nodes, come together into a nodes library which grows each day with new community contributions.
Nowadays we can find more than 2500 available nodes in the Node-RED official library, including Smart Home integrations, converters between IoT protocols, geolocation functions, OAuth2 authentication and many more.
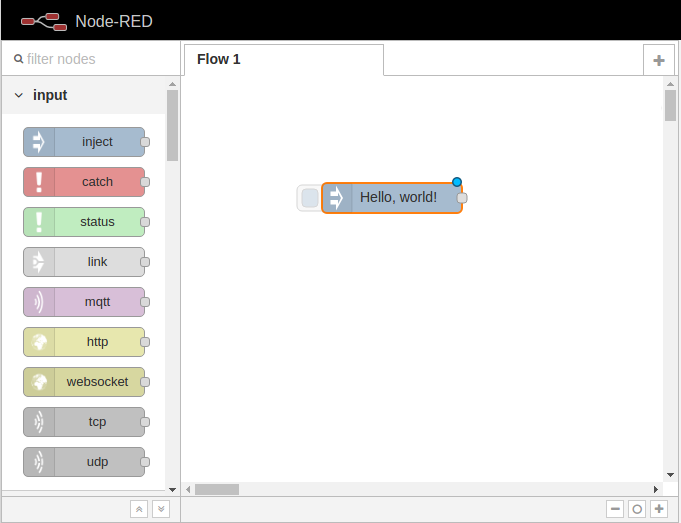
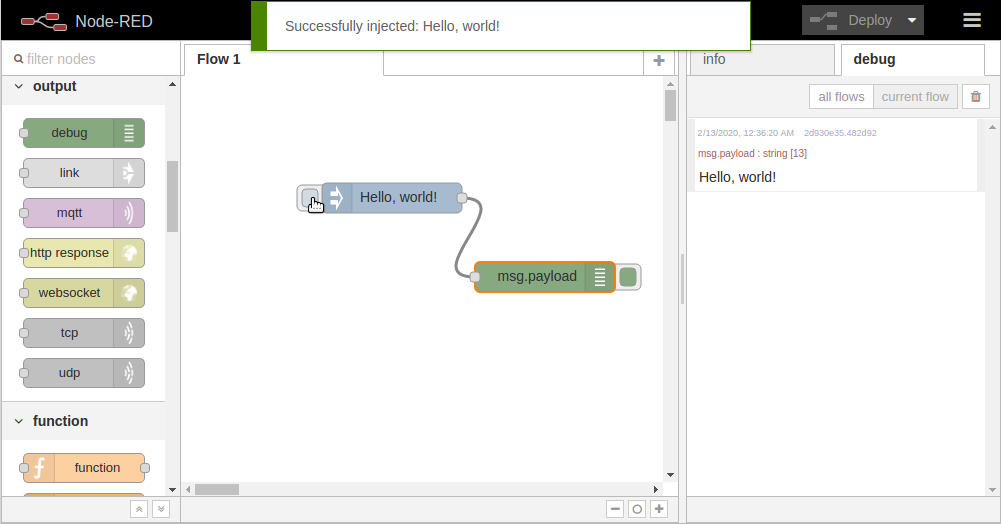
Hello world in Node-RED
To conclude this article there is no better way than taking your first steps on Node-RED generating the classic Hello world. Below, we show step by step the process to achieve it:
Message creation with Inject node
- If you are running Node-RED on your computer, you can access http://127.0.0.1:1880 or whatever address or hostname you’re using
- If it is our first time in Node-RED, we will see a flow named Flow 1
- On the node palette on the left side of the Node-RED, we will select the Inject node and will drag it onto our flow
- In order to edit the node we will double click on it. After that, we will select string on the Payload field and we will write Hello world!
- Once we finish the previous steps, we click Done
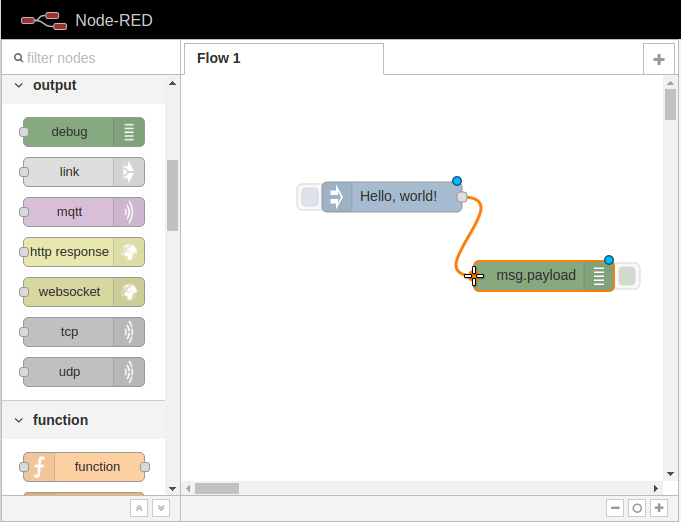
Printing our message
- In order to add a destination for our message we will select the Debug node. We will click and drag it onto our flow. It’s very important to place it on the right-hand side of the Inject node
- To connect both nodes we just need to click the Inject node’s output and drag it to the Debug node’s input. A wire that links both nodes will be created
- Debug node will automatically print the message to the console window as we will see in the next step
Deployment
- In order to start our application you must click on Deploy button
- Now click the Debug tab in the right-hand side of the editor window
- Finally, to launch our message you will click on the blue button coming out from the left-hand side of the Inject node
- “Hello world” will appear on the Debug screen. Welcome to Node-RED!
As PickData, we firmly believe in solutions like Node-RED, because those allow you to focus on what really matters, bring our added value to the solutions and skip losing time between ins and outs of the usual programming. source
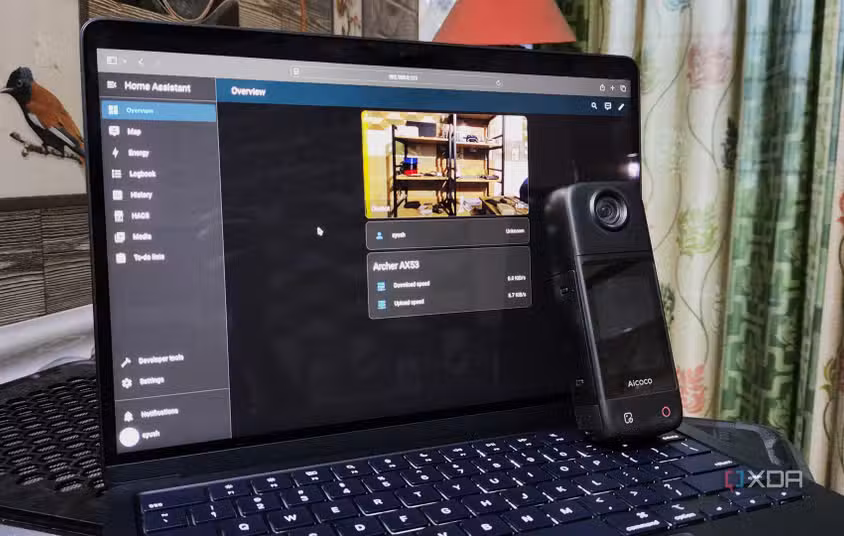
Node-RED has replaced my complex Home Assistant automations, and it does them so much better

For YAML experts, you can even design long scripts to automate your smart home. But once you get into complicated workflows involving multiple sensors, actuators, and if-else statements, HASS starts to become rather unintuitive. While I still rely on Home Assistant for quick automations, Node-RED is my preferred platform for creating extended automation workflows spanning several smart devices in my living space.
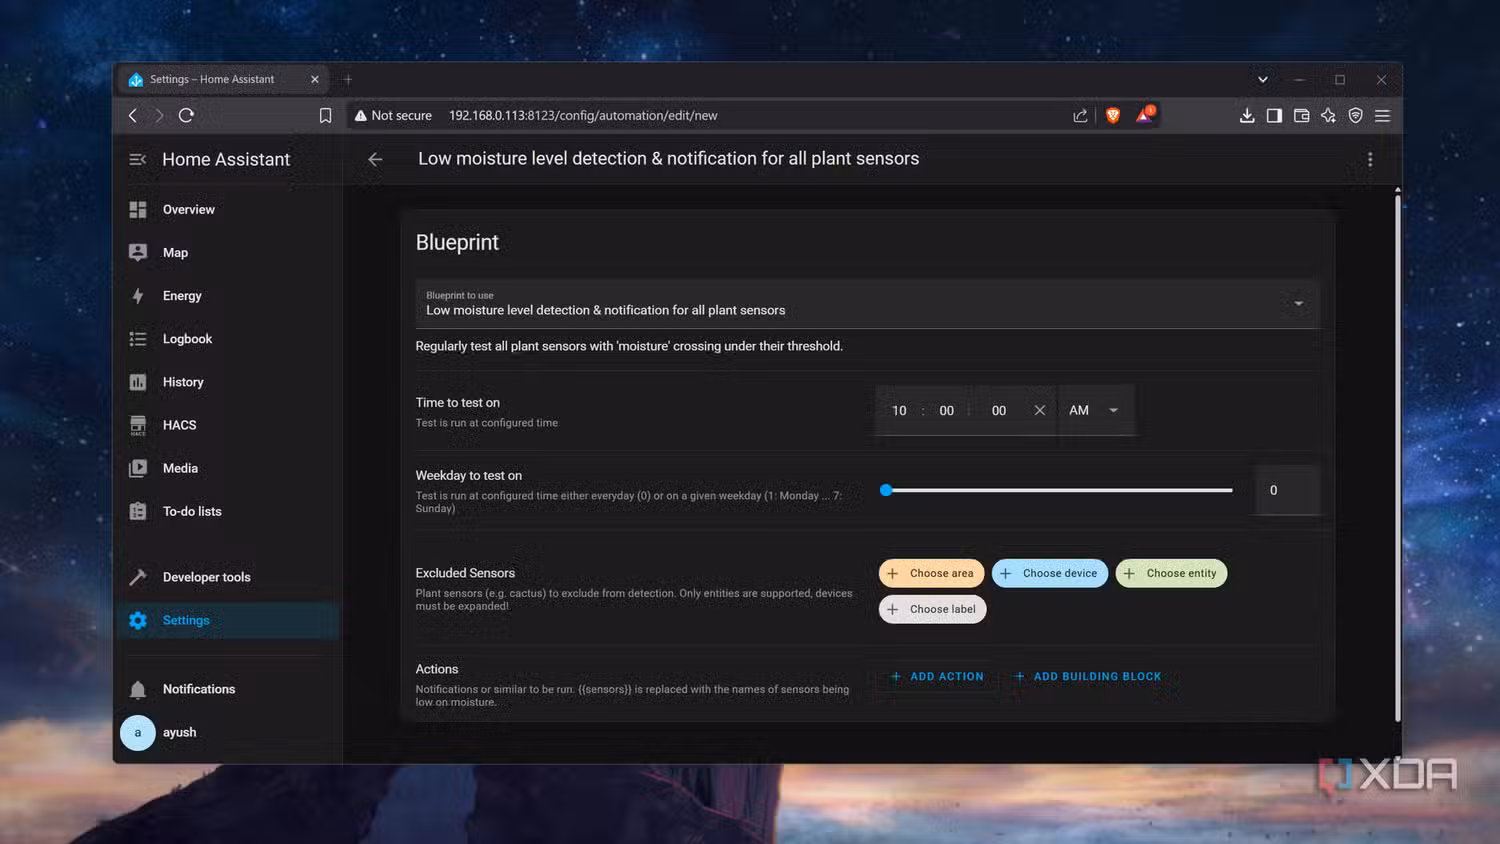
There’s nothing you can’t pull off with Home Assistant blueprints
It pairs well with my Home Assistant devices
But HASS isn’t the only data server for my Node-RED instance
I consider Home Assistant the centerpiece of my rat’s nest of an apartment and have mapped most smart devices, IoT gadgets, and even home lab equipment (via HACS integrations) to my HASS hub. As such, it acts as a data-gathering terminal in addition to its role as a control center.
Since my Node-RED instance is connected to my HASS server, it can directly grab statistics from my devices and push any message payloads I define in my custom workflows. I use a standalone Node-RED container instead of running it on top of Home Assistant, so I don’t have to rely on just HASS for my smart home automation.
Amazing for automation chains
The node-based workflow makes everything easier

Upon first glance, a Node-RED canvas filled to the brim with node chains, functions, and variables can seem intimidating. However, the ability to represent every device as a node makes it easy to organize everything, and I can import multiple IoT products inside a single workflow.
On Home Assistant, I’d have to cycle between the Entities, Helpers, Scripts, and Events tabs every time I want to create a multi-device automation chain. Besides the added advantage of accessing my smart devices from a single page, Node-RED lets me reuse the function nodes as many times as I want, which is a godsend for projects requiring complex if-else logic with branching instructions.
No more YAML shenanigans


Although YAML syntax is nowhere near as complex as a mainstream programming language’s coding rules, it’s a pain to design complicated workflows with it. Home Assistant makes YAML scripting somewhat easy with the Developer Tools tab, but it’s far from the most intuitive option, especially since I can just use Node-RED.
Solid troubleshooting provisions
Finally, Node-RED makes finding errors in my workflow a cinch. It’s a lot easier to detect errors in a Node-RED-based flow than a huge YAML file, where I can have several indentation errors because of accidentally pressing the Spacebar or Enter keys. In contrast, my mistakes are infinitely easier to catch on Node-RED’s canvas, as I can see how the different gadgets affect each other.
That said, HASS is better for simple automation projects


However, if you’re looking to build something as convoluted as a surveillance system that automatically turns on the lights and sets the right thermostat temperature when it detects your presence, it’s a good idea to go with Node-RED as your automation platform. source
Home Assistant with Node-Red
Home Assistant is an open source home automation platform that can monitor and control smart home devices and it integrates with many of other common systems.

Home Assistant installation is targeted for Raspberry Pi’s but other hardware options are available.
I was very impressed how easy it was to install Home Assistant and get a basic home integration system up and running.
There is a huge number of integration solutions (1500+) that connect to most of the mainstream products. However if you want to do some custom Arduino or Raspberry Pi connections there isn’t an easy “out of the box” solution. To solve this requirement Home Assistant has included Node-Red as an add-on.
Node-RED is a visual programming tool for wiring together hardware devices, APIs and online services.
I found that getting the Node-Red integration was a little tricky. This blog will show how to get Node-Red integration working and it includes a simple simulator circuit.
Getting Started
The installation instructions are very straightforward. I would recommend using a wired connection for your Raspberry Pi. A wireless network connection is 100% possible but it is not in the base installation directions.
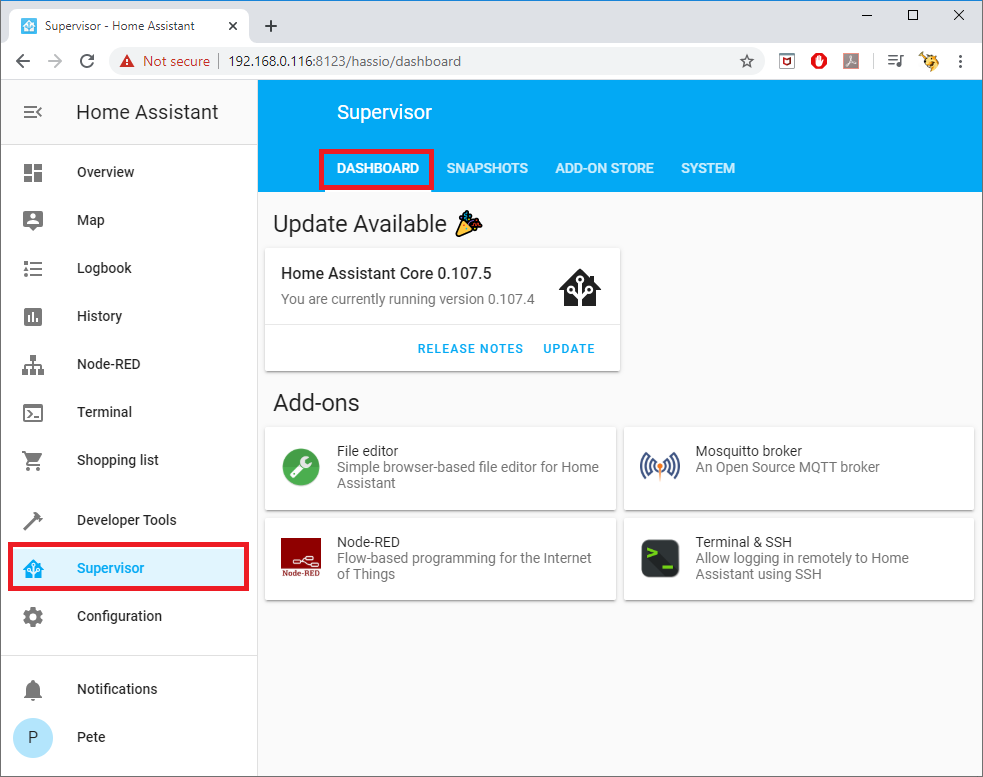
After the basic installation is complete, add-ons can be installed under the Supervisor->Dashboard. I would recommend installing “File editor” and “Terminal & SSH” add-ons along with Node-Red.
I found that the Node-Red installed without any problems but it required some configuration changes before it would run.
In the Node Red add-on you will need to add a credential_secret and a password.
If Node-Red doesn’t start look at the log for errors (it’s at the bottom of the same page).

The base Node-Red installation has a very good selection of pre-installed nodes. If you wish to add more nodes see the “Manage Pallet” option that is accessed from the top right options icon.
At this stage Node-Red is somewhat standalone and it is not fully integrated with Home Assistant.
Integrating Node-Red with Home Assistant
The directions and files for Node-Red integration can be downloaded to your PC.
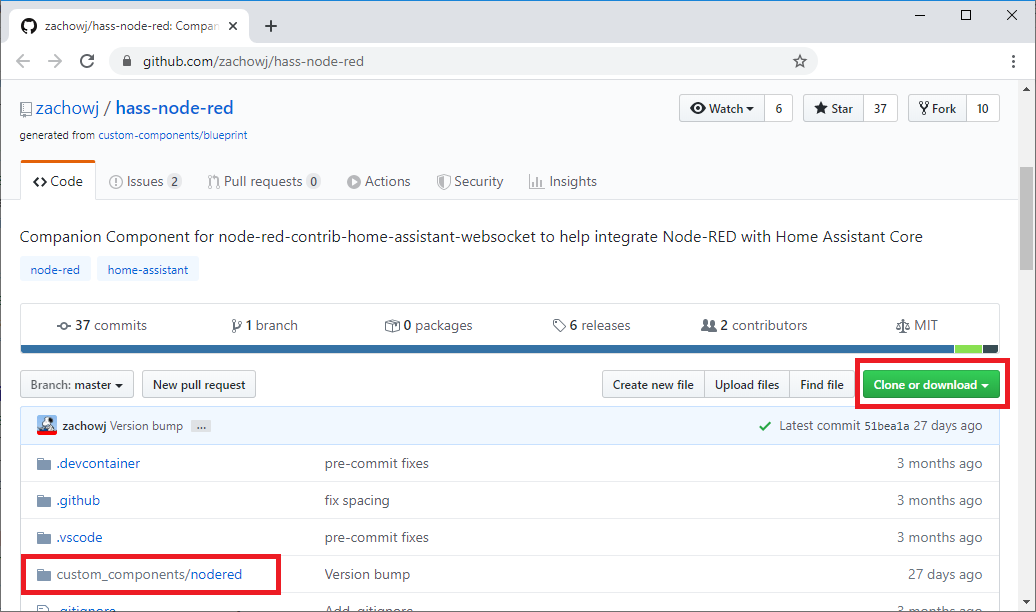
Specifically you want to custom_components/nodered directory and files, which will need to be moved to the Raspberry Pi. The Home Assistant “File editor” add-on can be used to create Pi directories and move files from your PC.
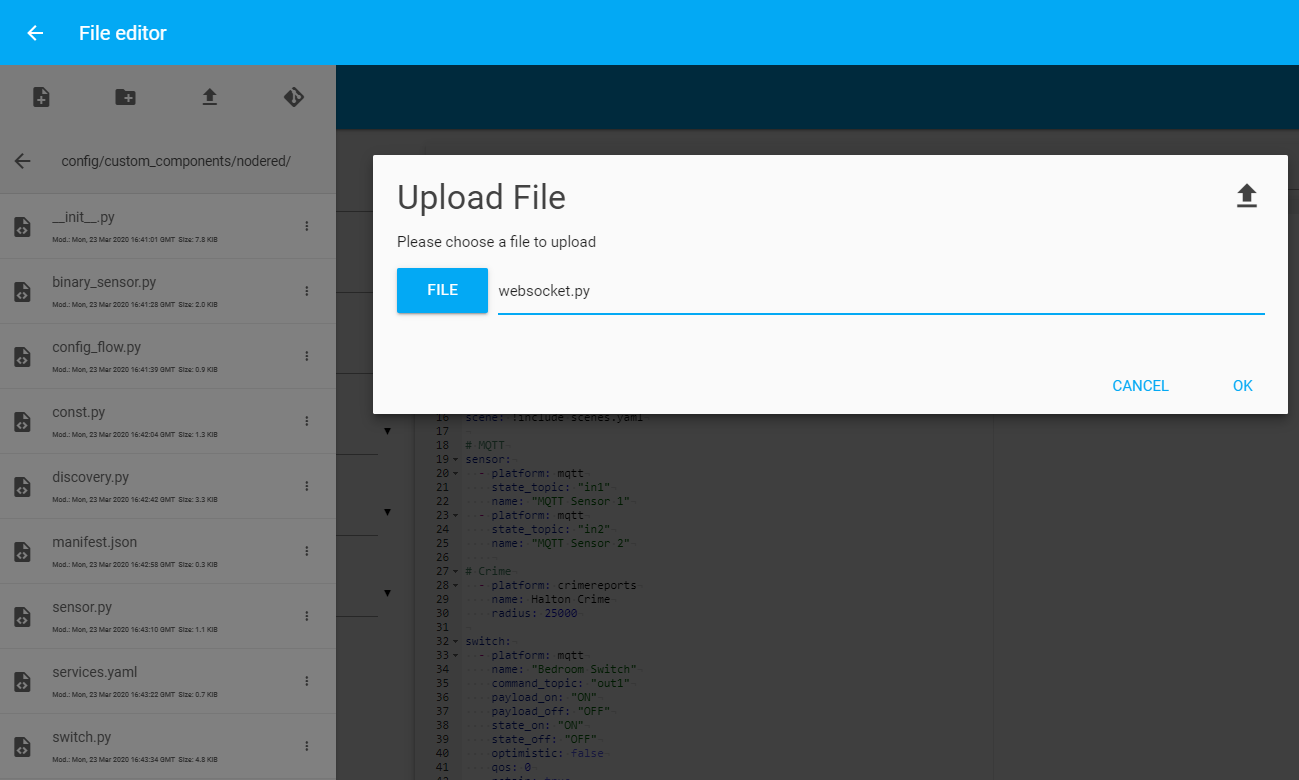
The following directories and file should now exist:
/root/config/custom_components/nodered/__init__.py
/root/config/custom_components/nodered/__pycache__
/root/config/custom_components/nodered/binary_sensor.py
/root/config/custom_components/nodered/config_flow.py
/root/config/custom_components/nodered/const.py
/root/config/custom_components/nodered/discovery.py
/root/config/custom_components/nodered/manifest.json
/root/config/custom_components/nodered/save.txt
/root/config/custom_components/nodered/sensor.py
/root/config/custom_components/nodered/services.yaml
/root/config/custom_components/nodered/switch.py
/root/config/custom_components/nodered/websocket.py

/root/config/custom_components/nodered/.translations/en.json
Once this is complete Home Assistant will need to be restarted.
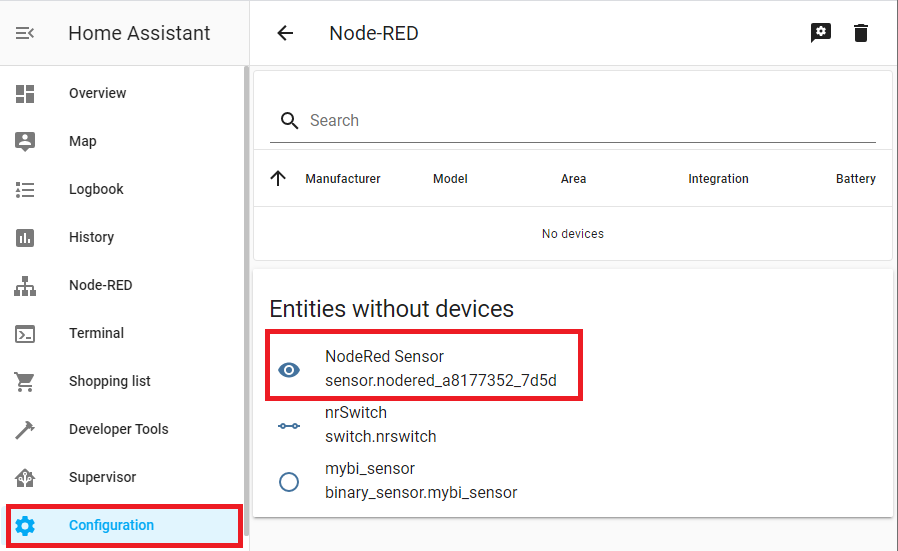
Including Node-Red Integrations
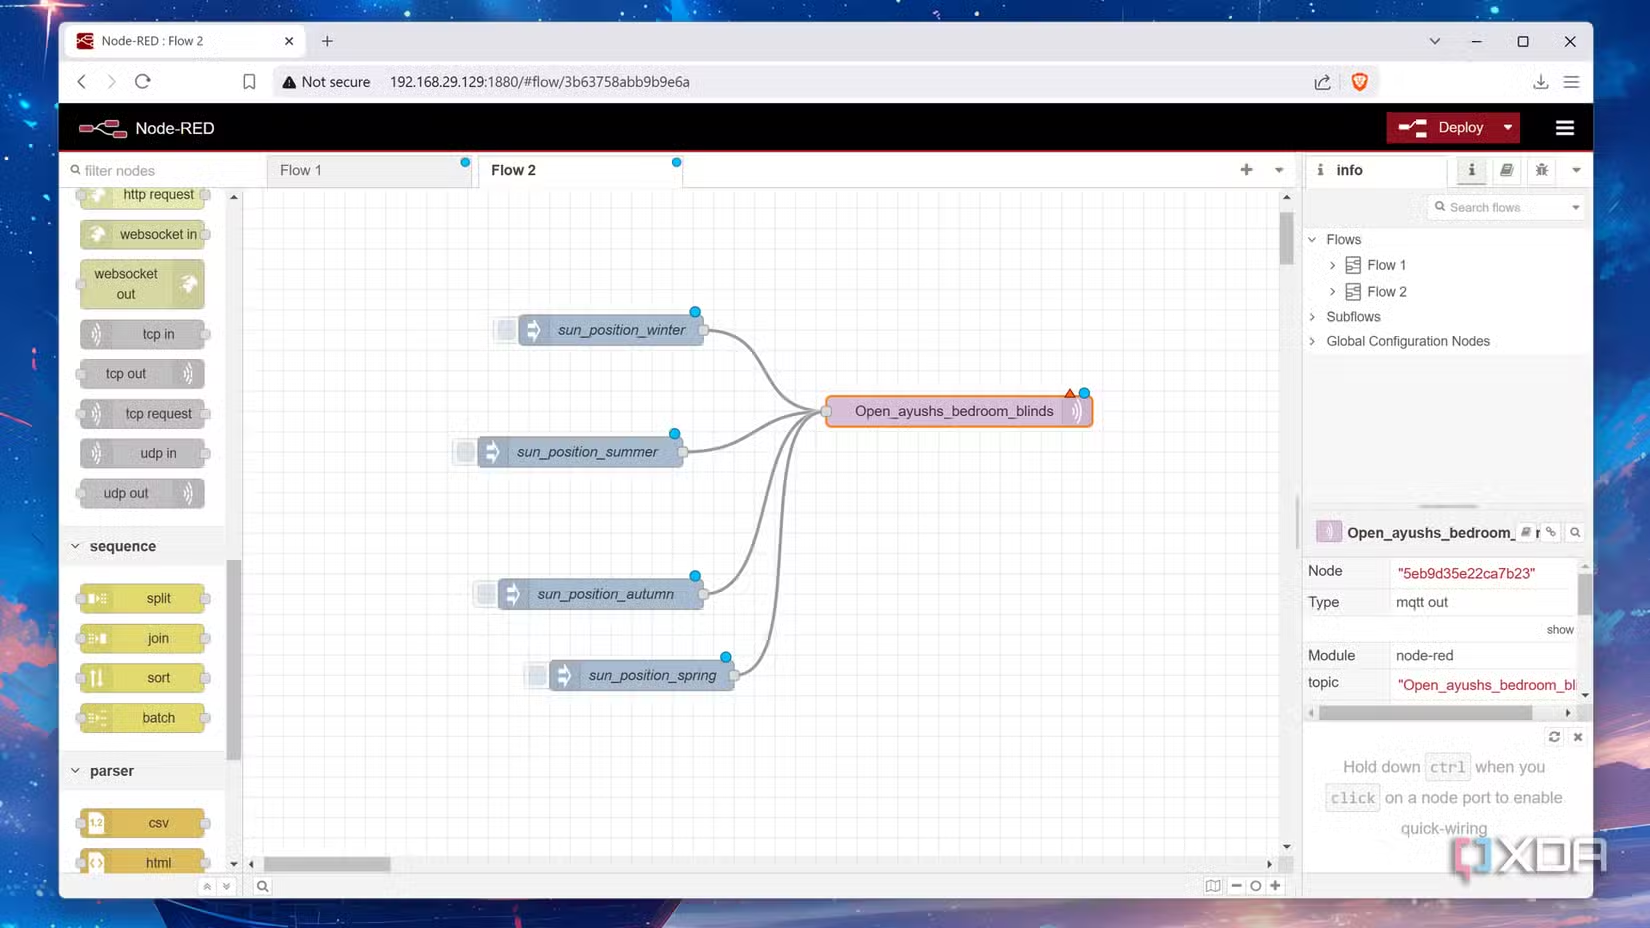
The next step is to create sensors and switches in Node-Red that can be accessed in Home Assistant. Below is a simple circuit that sends a random number (0-100) to a HA entity.
This logic uses a Big Timer node, that generates a pulse every minute from the middle output pin. An injector node allow you to force a new value. A random node will output a new random number whenever the Big Timer or Inject nodes are triggered.
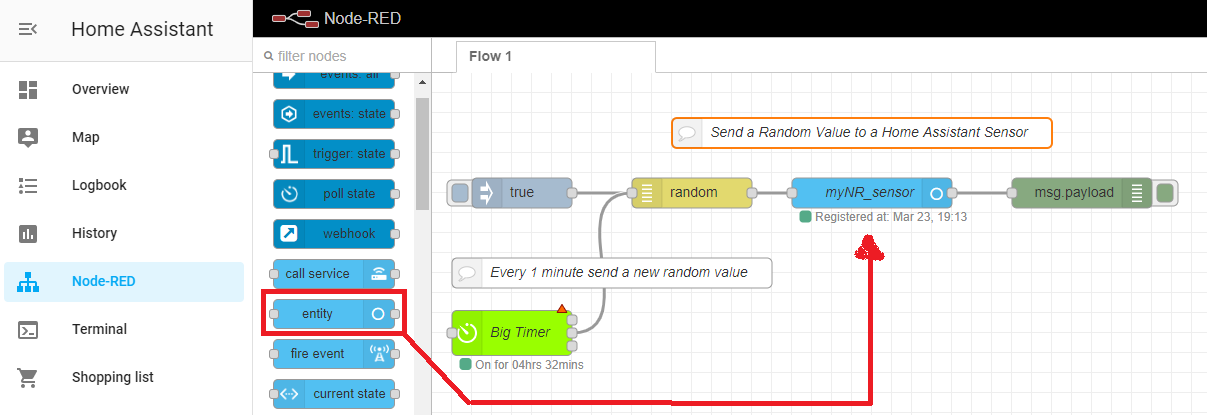
Double-click on the HA entity to configure the HA server and other properties.
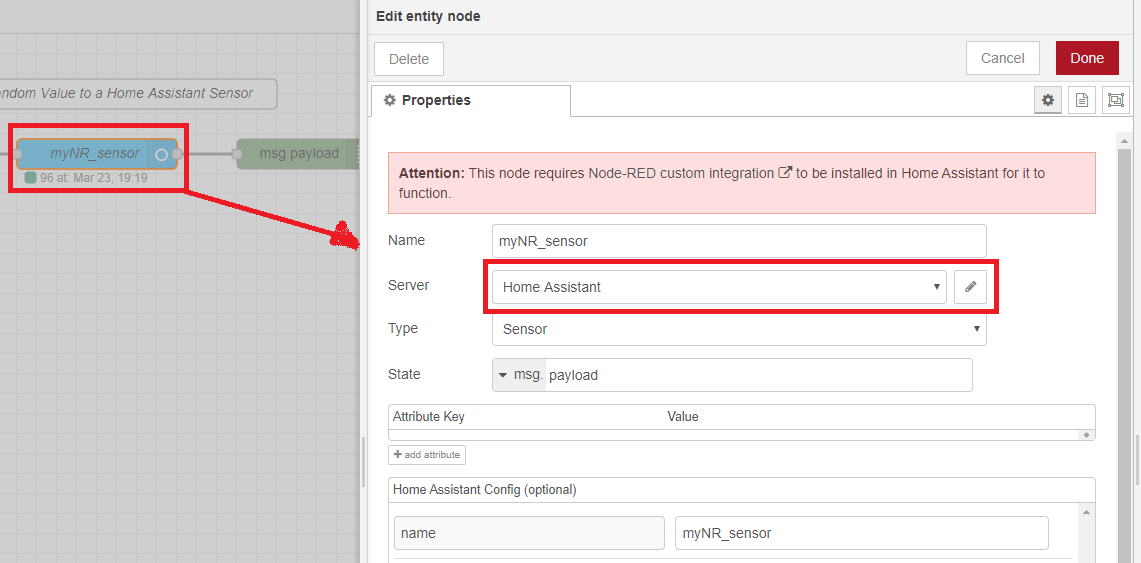
Once the logic is complete click the “Deploy” button to make the logic active.
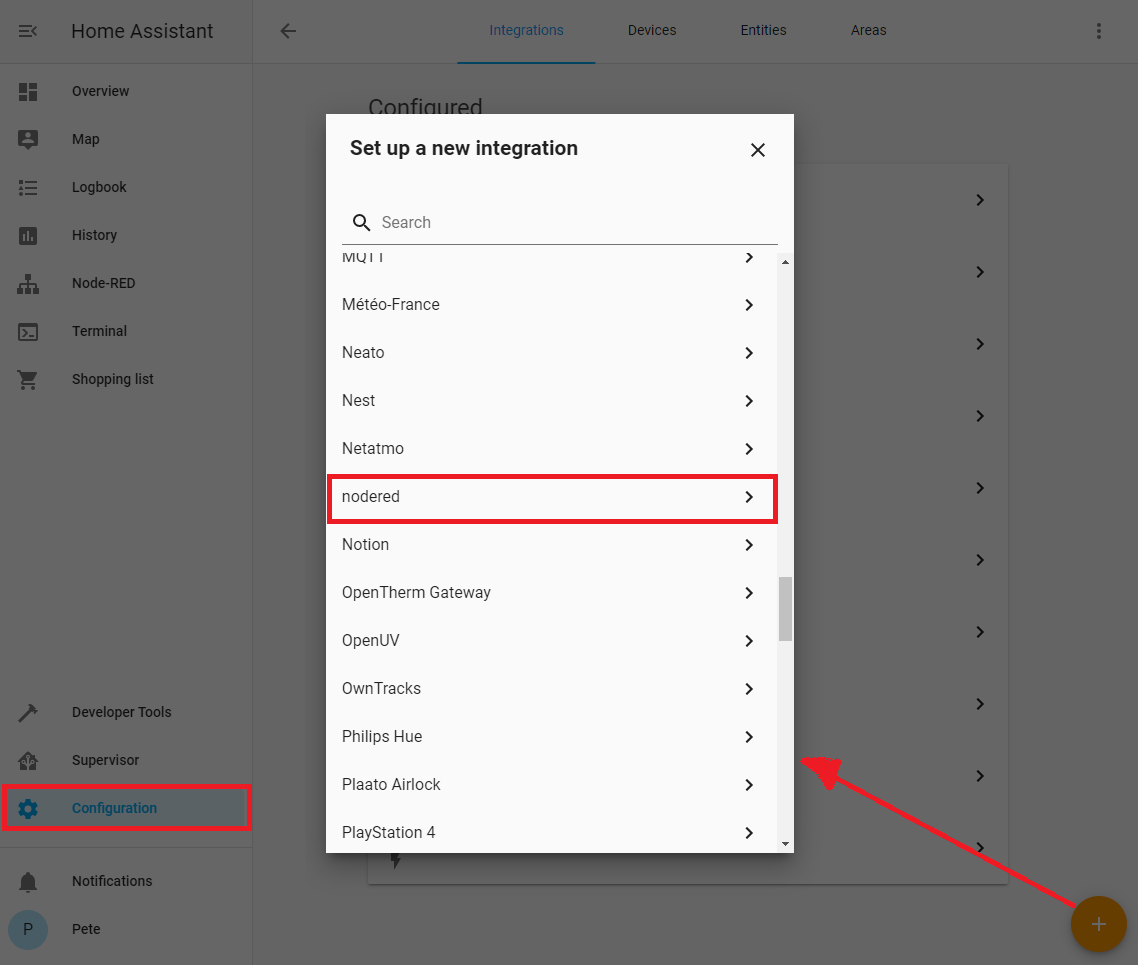
Node-Red integration is enabled by adding it in the Configuration->Integration page.
Overview Dashboard with Node-Red Data
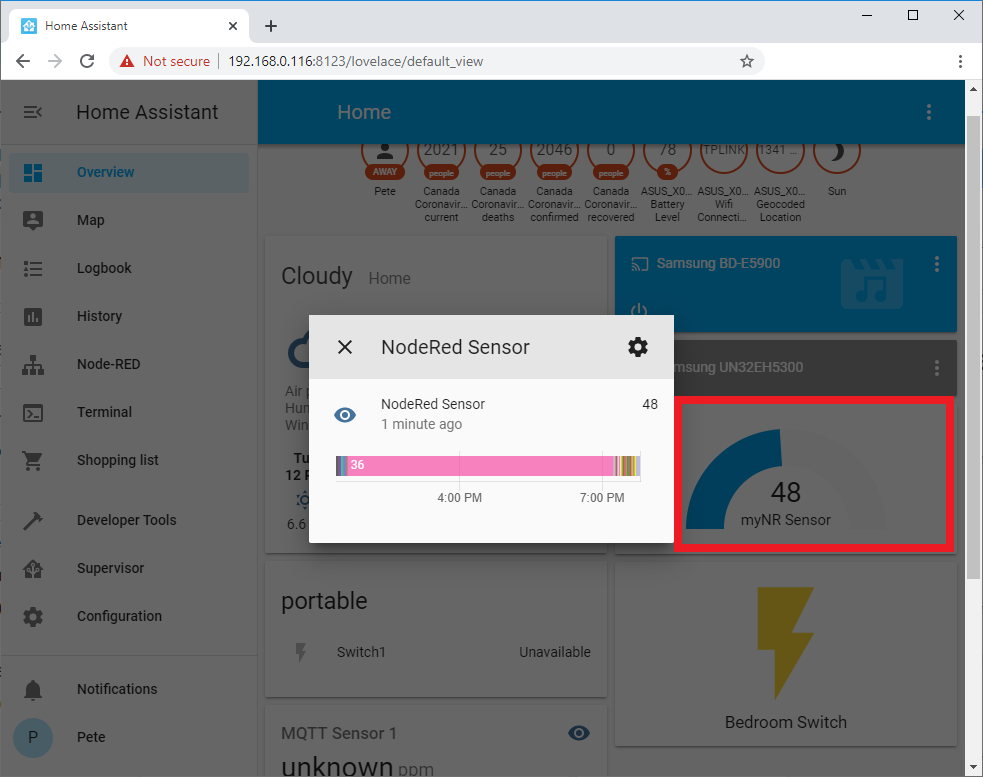
The final step is to modify the Overview Dashboard to include the Node-Red Entity.
For this example I added a gauge component using the Orange-Plus at the bottom right of this Configure UI page.
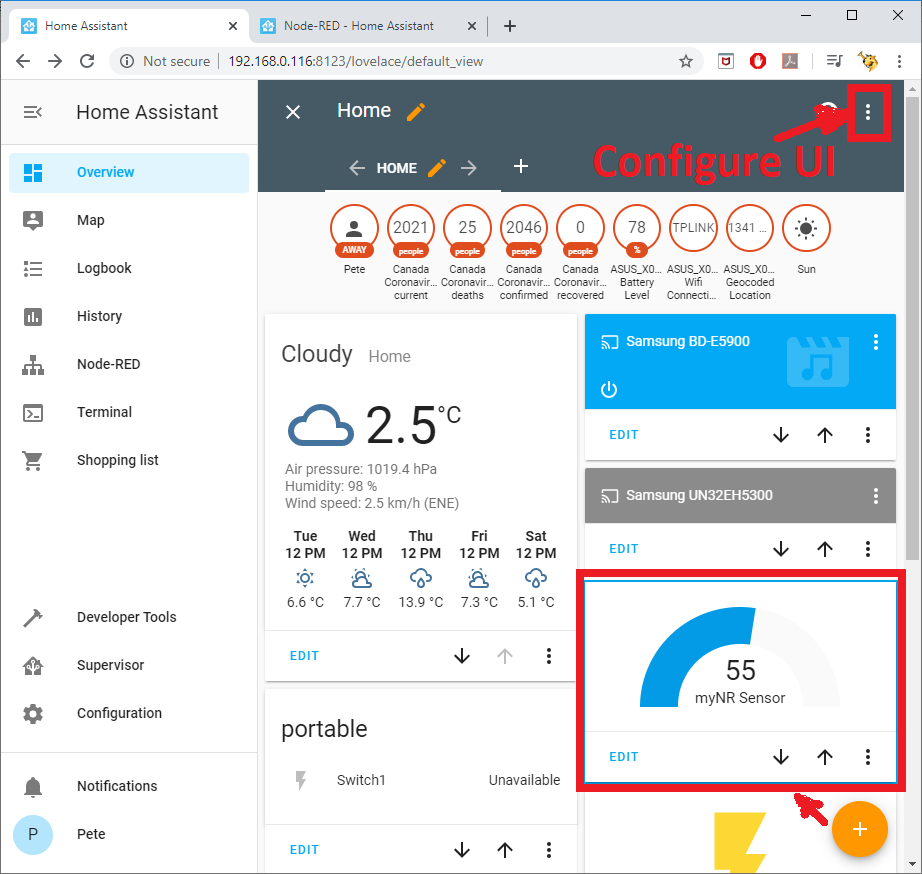
On the live Overview page it is possible to click on the gauge card and get more information about this sensor.
Final Thoughts
Home Assistant is a very well structured home automation solution that offers a number of excellent approaches to bring in data.
Node-Red is a very flexible programming environment that help expands connectivity to Arduino, Raspberry Pi and other 3rd party services that are not in the base Home Assistant software.