Mon. Jul 1st, 2024

Cleanest Version of Windows – How to Customize a Windows ISO

Creating a Bloatfree Version of Windows

follow this guide in the video below

here are the resources you will need to visit

https://schneegans.de/

Unattended XML genrator which is where the specific routine XML genrator is located  this is a HIGHLY CUSTOMIZED generator capable of creating the leanest version of windows.

There is no chance of virus, you can read the XML changes in the XML files which are readable by NOTEPAD app and you can see all the options that winodows ISO will use to automate its own removal. Since you get the ISO from Microsoft and the software allows the addion of XML unattended automation you can assure all changes to the core ISO are down by you and allowed by Microsoft

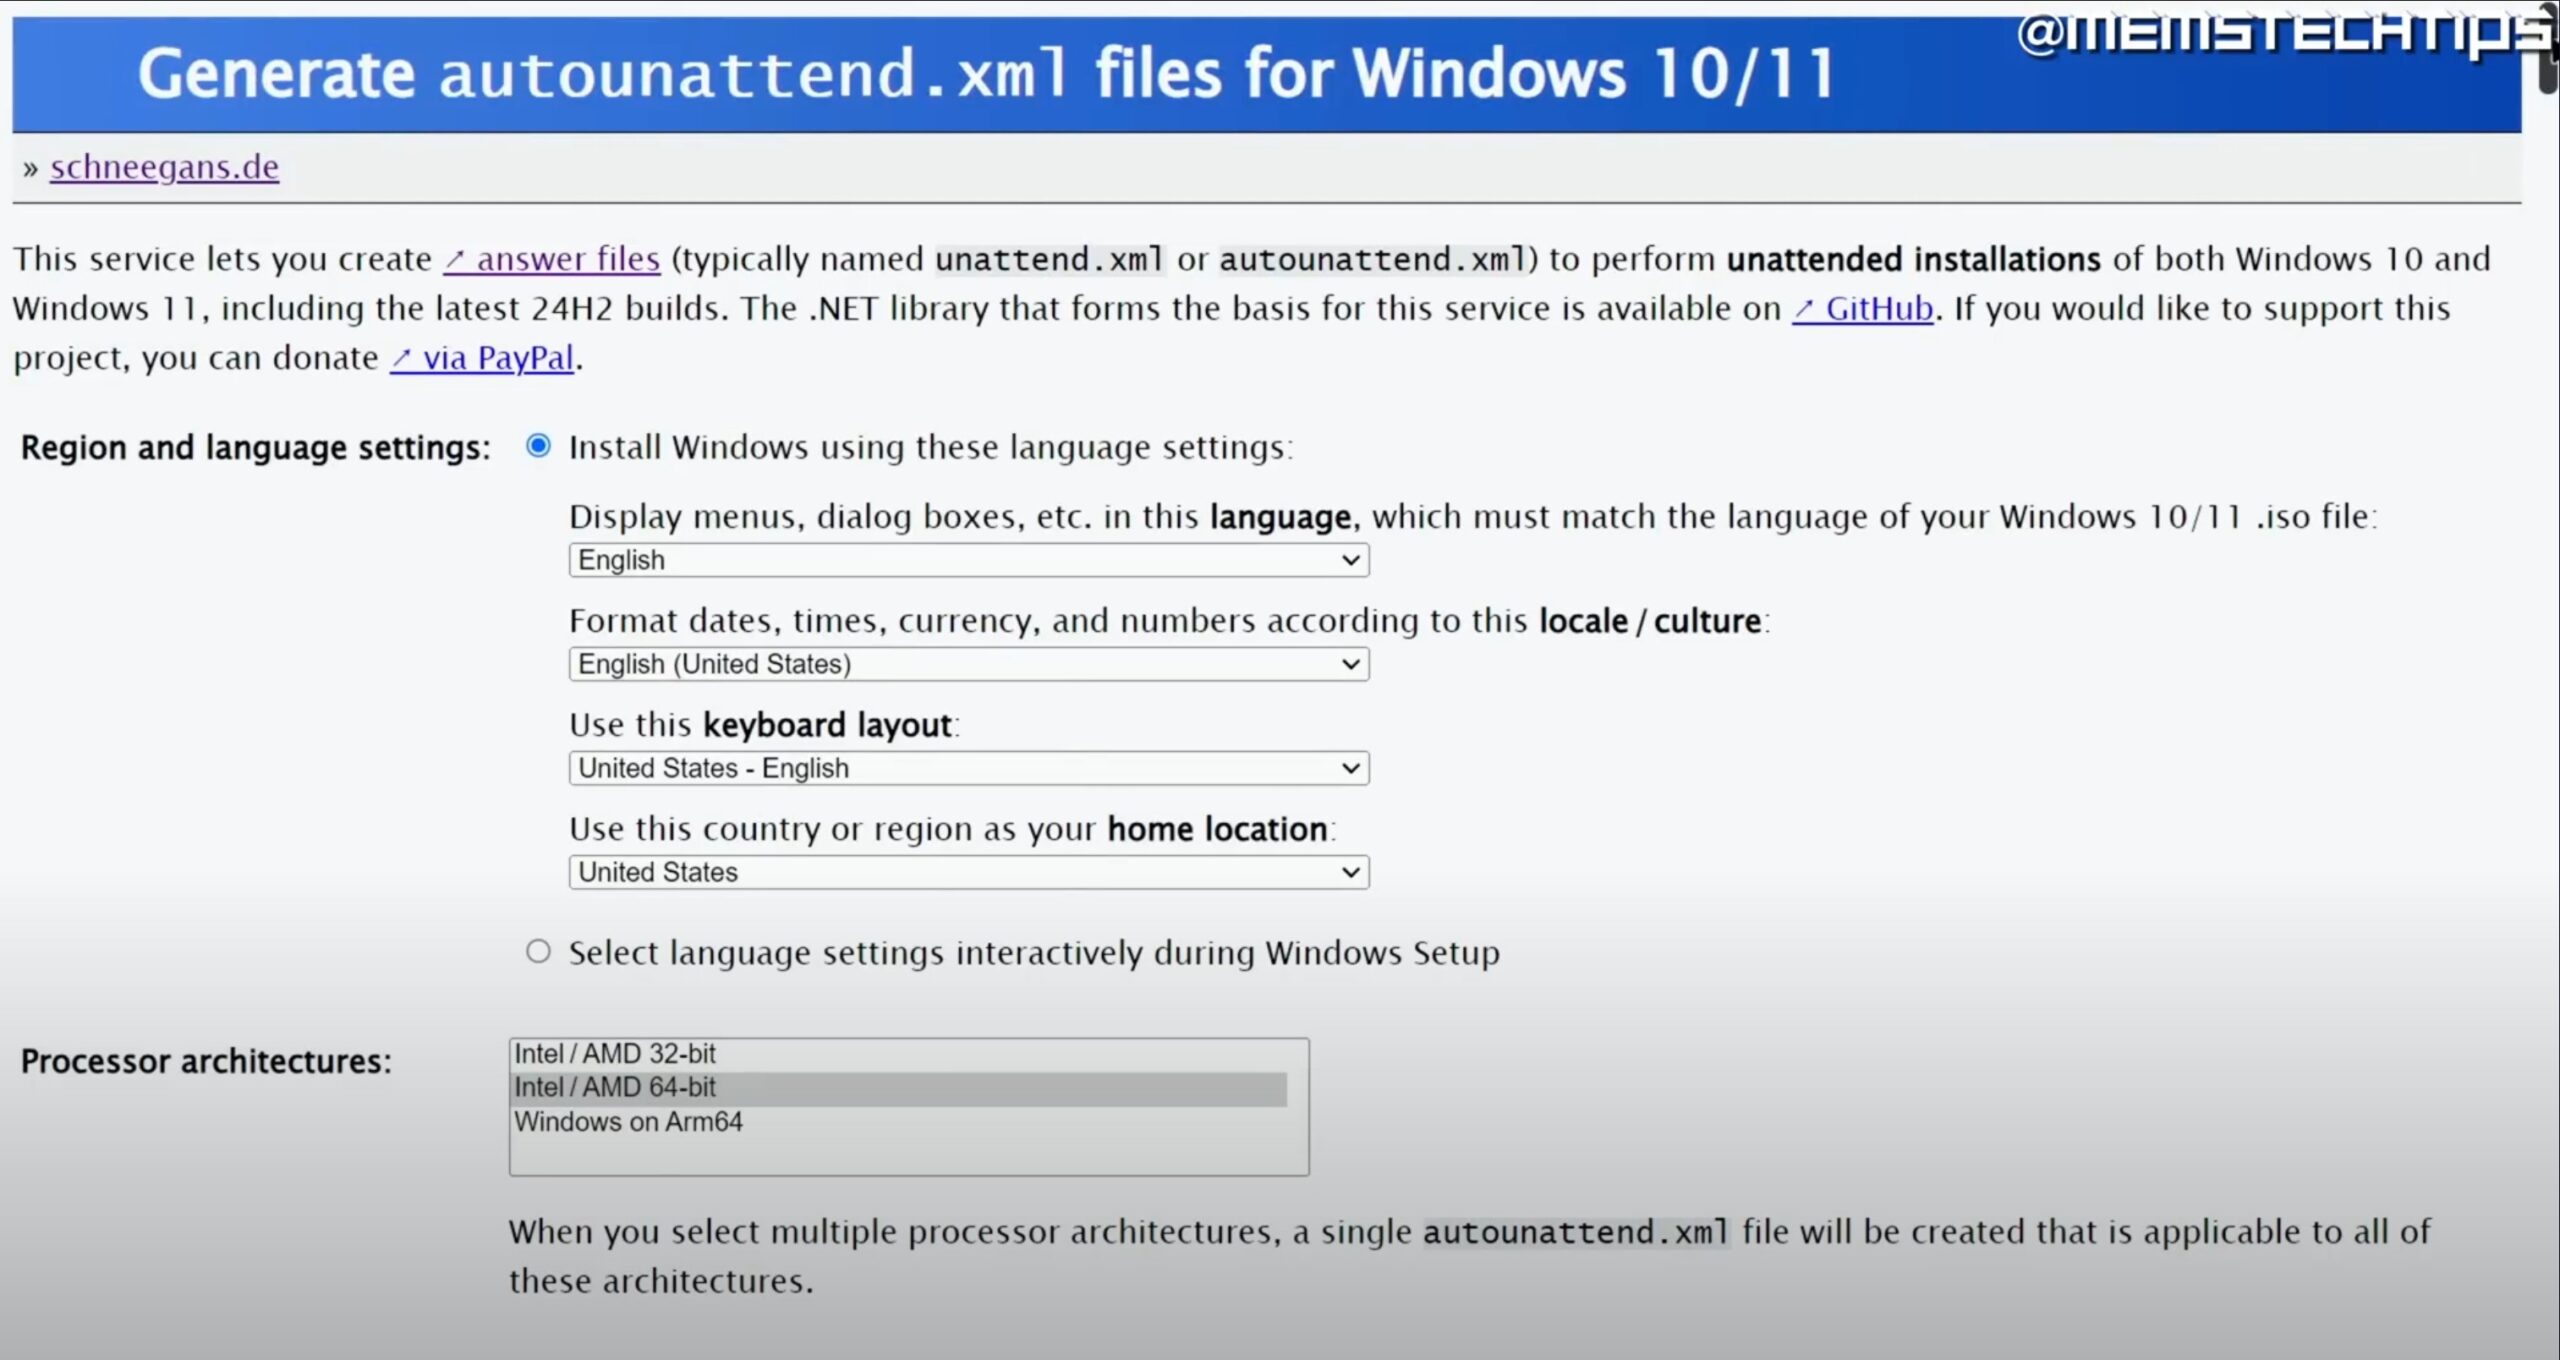
Generate autounattend.xml files for Windows 10/11

https://schneegans.de/windows/unattend-generator/

Download Windows 10

https://www.microsoft.com/en-us/software-download/windows10

Download Windows 11

https://www.microsoft.com/software-download/windows11


Answer files (unattend.xml)

Answer files (or Unattend files) can be used to modify Windows settings in your images during Setup. You can also create settings that trigger scripts in your images that run after the first user creates their account and picks their default language.

Windows Setup will automatically search for answer files in certain locations, or you can specify an unattend file to use by using the /unattend: option when running Windows Setup (setup.exe).

Windows settings overview

While you can set many Windows settings in audit mode, some settings can only be set by using an answer file or Windows Configuration Designer, such as adding manufacturer’s support information. A full list of answer file settings (also known as Unattend settings) is in the Unattended Windows Setup Reference.

Enterprises can control other settings by using Group Policy. For more info, see Group Policy.

Answer file settings

You can specify which configuration pass to add new settings. Each configuration pass represents an installation phase where settings can be configured:

  • 1 windowsPE: These settings are used by the Windows Setup installation program. If you’re modifying existing images, you can usually ignore these settings.
  • 2 offlineServicing: These settings are applied to offline images where you apply an Unattend file with DISM using the Apply-Unattend option. When you apply an Unattend file with DISM to an offline image, only the settings in this configuration pass are processed.
  • 4 specialize: Most settings should be added here. These settings are triggered both at the beginning of audit mode and at the beginning of OOBE. If you need to make multiple updates or test settings, generalize the device again and add another batch of settings in the Specialize Configuration pass.
  • 6 auditUser: Runs as soon as you start audit mode.

    This is a great time to run a system test script – we’ll add Microsoft-Windows-Deployment\RunAsynchronousCommand as our example. To learn more, see Add a Custom Script to Windows Setup.

  • 7 oobeSystem: Use sparingly. Most of these settings run after the user completes OOBE. The exception is the Microsoft-Windows-Deployment\Reseal\Mode = Audit setting, which we’ll use to bypass OOBE and boot the PC into audit mode.

    If your script relies on knowing which language the user selects during OOBE, you’d add it to the oobeSystem pass.

  • To learn more, see Windows Setup Configuration Passes.

 Note

These settings could be lost if the user resets their PC with the built-in recovery tools. To see how to make sure these settings stay on the device during a reset, see Sample scripts: Keeping Windows settings through a recovery.

Create and modify an answer file

This section walks through how to create and modify an Unattend file using tools available in the Windows Assessment and Deployment Kit. When creating an Unattend file for your deployment, you can configure different or additional settings than what is described below.

Step 1: Create a catalog file

  1. Start Windows System Image Manager.
  2. Click File > Select Windows Image.
  3. In Select a Windows Image, browse to and select the image file (D:\install.wim). Next, select an edition of Windows, for example, Windows 10 Pro, and click OK. Click Yes to create the catalog file. Windows SIM creates the file based on the image file, and saves it to the same folder as the image file. This process can take several minutes.

    The catalog file appears in the Windows Image pane. Windows SIM lists the configurable components and packages in that image.

     Tip

    If Windows SIM does not create the catalog file, try the following steps:

    • To create a catalog file for either 32-bit or Arm-based devices, use a 32-bit device.
    • Make sure the Windows base-image file (\Sources\Install.wim) is in a folder that has read-write privileges, such as a USB flash drive or on your hard drive.

Step 2: Create an answer file

  • Click File > New Answer File.

    The new answer file appears in the Answer File pane.

     Note

    If you open an existing answer file, you might be prompted to associate the answer file with the image. Click Yes.

Step 3: Add new answer file settings

  1. Add OEM info:
    1. In the Windows Image pane, expand Components, right-click amd64_Microsoft-Windows-Shell-Setup_(version), and then select Add Setting to Pass 4 specialize.
    2. In the Answer File pane, select Components\4 specialize\amd64_Microsoft-Windows-Shell-Setup_neutral\OEMInformation.
    3. In the OEMInformation Properties pane, in the Settings section, select:
      • Manufacturer=Fabrikam
      • Model=Notebook Model 1
      • Logo=C:\Fabrikam\Fabrikam.bmp
    4. Create a 32-bit color graphic/logo with a maximum size of 120×120 pixels and save it as D:\AnswerFiles\Fabrikam.bmp file on your local PC.

      We’ll copy the logo into the Windows image in a few steps.

  2. Set the device to automatically boot to audit mode:
    1. In the Windows Image pane, expand Components, right-click amd64_Microsoft-Windows-Deployment_(version), and then select Add Setting to Pass 7 oobeSystem.
    2. In the Answer File pane, select Components\7 oobeSystem\amd64_Microsoft-Windows-Deployment_neutral\Reseal.
    3. In the Reseal Properties pane, in the Settings section, select Mode=Audit.
  3. Prepare a script to run after Audit mode begins.
    1. In the Windows Image pane, right-click amd64_ Microsoft-Windows-Deployment_(version) and then click Add Setting to Pass 6 auditUser.
    2. In the Answer File pane, expand Components\6 auditUser\amd64_Microsoft-Windows-Deployment_neutral\RunAsynchronous. Right-click RunAsynchronousCommand Properties and click Insert New AsynchronousCommand.
    3. In the AsynchronousCommand Properties pane, in the Settings section, add the following values:
      • Path = C:\Fabrikam\SampleCommand.cmd
      • Description = Sample command to run a system diagnostic check.
      • Order = 1 (Determines the order that commands are run, starting with 1.)
  4. Add a registry key. In this example, we add a REG_SZ key called ABCD into HKLM\Software\Sample with a value of 10. This command will call CMD /c REG ADD, just as if you were creating a registry key from the Command prompt.

    Add RunAsynchronousCommands for each registry key to add. (Right-click RunAsynchronousCommand Properties and click Insert New AsynchronousCommand).

    Windows Command Prompt

    Path = CMD /c REG ADD HKEY_LOCAL_MACHINE\Software\Sample /v 10 /t REG_SZ ABCD
    Description = Adds a OEM registry key
    Order = 2
    RequiredUserInput = false
    

See the Unattended Windows Setup Reference for a full list of configuration options.

Step 4: Save the answer file

  • Save the answer file, for example: D:\AnswerFiles\BootToAudit-x64.xml.

     Note

    Windows SIM will not allow you to save the answer file into the mounted image folders.

Step 5: Create a script

Since we specified a script to run in Step 3.3, let’s create that script now.

  • Copy the following sample script into Notepad, and save it as D:\AnswerFiles\SampleCommand.cmd.
    Windows Command Prompt

    @rem Scan the integrity of system files 
    @rem (Required after removing the base English language from an image)
    sfc.exe /scannow
    
    @rem Check to see if your drivers are digitally signed, and send output to a log file.
    md C:\Fabrikam
    C:\Windows\System32\dxdiag /t C:\Fabrikam\DxDiag-TestLogFiles.txt
    

Add the answer file and script to the image

Step 6: Mount an image and add the answer file

  1. Use DISM to mount a Windows image. To learn how to mount an image, see Mount and modify a Windows image using DISM
  2. Copy the answer file into the image into the \Windows\Panther folder, and name it unattend.xml. The Panther folder is one of the folders where Windows searches for an answer file. Create the folder if it doesn’t exist. If there’s an existing answer file, replace it or use Windows System Image Manager to edit/combine settings if necessary.
    Windows Command Prompt

    MkDir c:\mount\windows\Windows\Panther
    Copy D:\AnswerFiles\BootToAudit-x64.xml  C:\mount\windows\Windows\Panther\unattend.xml
    MkDir c:\mount\windows\Fabrikam
    Copy D:\AnswerFiles\Fabrikam.bmp    C:\mount\windows\Fabrikam\Fabrikam.bmp
    Copy D:\AnswerFiles\SampleCommand.cmd    C:\mount\windows\Fabrikam\SampleCommand.cmd
    
  3. Unmount the image, committing the changes. For example:
    Windows Command Prompt

    Dism /Unmount-Image /MountDir:"C:\mount\windows" /Commit
    

    where C is the drive letter of the drive that contains the mounted image.

    This process may take several minutes.

When you apply your image, Windows will process your unattend file and will configure your settings based on what you specified in the unattend. source


Below you will find several answer files that can be used to install Windows 11. Each answer file serves a different purpose as described below. Note that these can be used to bypass the normal system requirements for installation of Windows 11. If you want Windows to perform the usual system requirements checks, that section can be easily removed. All of these answer files will install the Windows Professional Edition. You can change the key in an answer file if you want to change it from Pro to Home or another edition. Those answer files that specify locality data are configured to install Windows English language editions for use in the United States and set a time zone of US Central Time. Again, you can alter these if you like.

If you have any special requests for customized answer files, let me know and I’ll be happy to help.

Preceding each answer file is a description of what that answer file does and anything that you may want to pay attention to regarding usage of that answer file.

The answer files are listed in order from those that do the least (simply bypassing Win 11 requirements) to those that do the most (full unattended installation).

TIP: For all answer files except the Autounattend_Bypass.xml, if you change the key in the answer file to a Windows Home Edition key, you will end up with a local account called “WinAdmin” so these answer files can be used to install Windows Home with a Local Account which is not normally possible during a manual installation.

Using the Answer Files to Install Windows…

… on a Physical Machine

Create your thumb drive for installing Windows in the same manner that you always do. Copy the answer file that you want to use onto the root of the thumb drive and rename it to “autounattend.xml”.

… in a VM (Method 1 – Easy Method)

Place the answer file that you wish to use in a folder all by itself and rename it to autounattend.xml.

Create an ISO image from the contents of that folder using any software that you like – just make sure that the answer file is at the root of the drive, not in a folder. If you use the OSCDIMG utility that is installed with the Windows ADK, use the syntax as in the example below.

Code:
OSCDIMG.EXE -o -m -h -k -u2 -udfver102 -L"Vol_Name" "Source" "Destination"

Be aware that there is no space after the “-L”.

Vol_Name is the Volume name that would show up when the ISO image is mounted. You can use “” to indicate no volume name or omit the -L”Vol_Name” since this is optional.

Source is the entire path to the folder where you saved answer file.

Destination is the full destination path including the filename of the ISO image you are creating.

Example:

Code:
OSCDIMG.EXE -o -m -h -k -u2 -udfver102 -L"My Answer File" "C:\Answer File" "%UserProfile%\Desktop\My Answer File.ISO"

When you install Windows, simply attach this ISO image as a second drive. This works because Windows setup will search the root of all drives it has access to for an answer file.

… in a VM (Method 2 – More Difficult)

This method is slightly more difficult because you will need to re-create your Windows ISO image making sure to properly make it a bootable image.

Copy the contents of your Windows ISO image file to a folder. In this example, I will assume C:\ISO_Files.

Copy the answer file that you wish to use to that folder and rename it to autounattend.xml.

Re-create your ISO image. If you are using the OSCDIMG tool that is installed with the Windows ADK, use the syntax as in the example below. BE CAREFUL! This command has spots where you might expect to see a space, but none exists.

Replace the 3 occurrences of c:\iso_files with the correct path to where your files are located. Also, replace the c:\Win11.iso at the end of command with the correct path and name for the output file that you want to save. If a path contains spaces, enclose it in double quotes.

Code:
oscdimg.exe -m -o -u2 -udfver102 -bootdata:2#p0,e,bc:\iso_files\boot\etfsboot.com#pEF,e,bc:\iso_files\efi\microsoft\boot\efisys.bin c:\iso_files c:\Win11.iso

Autounattend_Bypass.xml – Using this answer file with Windows 11 will bypass the checks for supported CPU, TPM, Secure Boot, memory and storage space requirements. Note that this answer file does NOT automate installation. The only thing that it does is bypass those checks. This can be used on both BIOS and UEFI based systems. You will still need to respond to the prompts and provide the information requested by setup just as with any standard installation of Windows.

EDIT: Below code edited on April 12, 2022. In order for this to work, you still need to specify a product key in the answer file and I was missing that in this sample. In this sample I am now using a Windows 10/11 Pro key.

Code:
<?xml version="1.0" encoding="utf-8"?>
<unattend xmlns="urn:schemas-microsoft-com:unattend">
    <settings pass="windowsPE">
        <component name="Microsoft-Windows-Setup" processorArchitecture="amd64" publicKeyToken="31bf3856ad364e35" language="neutral" versionScope="nonSxS" xmlns:wcm="http://schemas.microsoft.com/WMIConfig/2002/State" xmlns:xsi="http://www.w3.org/2001/XMLSchema-instance">
            <UserData>
                <ProductKey>
                    <Key>VK7JG-NPHTM-C97JM-9MPGT-3V66T</Key>
                </ProductKey>
                <AcceptEula>true</AcceptEula>
            </UserData>
            <RunSynchronous>
                <RunSynchronousCommand wcm:action="add">
                    <Order>1</Order>
                    <Path>reg add HKLM\System\Setup\LabConfig /v BypassTPMCheck /t reg_dword /d 0x00000001 /f</Path>
                </RunSynchronousCommand>
                <RunSynchronousCommand wcm:action="add">
                    <Order>2</Order>
                    <Path>reg add HKLM\System\Setup\LabConfig /v BypassSecureBootCheck /t reg_dword /d 0x00000001 /f</Path>
                </RunSynchronousCommand>
                <RunSynchronousCommand wcm:action="add">
                    <Order>3</Order>
                    <Path>reg add HKLM\System\Setup\LabConfig /v BypassRAMCheck /t reg_dword /d 0x00000001 /f</Path>
                </RunSynchronousCommand>
                <RunSynchronousCommand wcm:action="add">
                    <Order>5</Order>
                    <Path>reg add HKLM\System\Setup\LabConfig /v BypassCPUCheck /t reg_dword /d 0x00000001 /f</Path>
                </RunSynchronousCommand>
                <RunSynchronousCommand wcm:action="add">
                    <Order>4</Order>
                    <Path>reg add HKLM\System\Setup\LabConfig /v BypassStorageCheck /t reg_dword /d 0x00000001 /f</Path>
                </RunSynchronousCommand>
            </RunSynchronous>
        </component>
    </settings>
    <cpi:offlineImage cpi:source="catalog://godzilla/data/windows/windows tools and deployment apps/assets and tools for deployment/win 11 pro 21h2 catalog file/install_windows 10 pro.clg" xmlns:cpi="urn:schemas-microsoft-com:cpi" />
</unattend>

Autounattend_Bypass_No_Location.xml – Installs Windows on either a BIOS or UEFI based system. It will bypass the checks for supported CPU, TPM, Secure Boot, memory and storage space requirements. The installation will be completely unattended EXCEPT that the user will need to specify onto what disk Windows should be installed. This is perfect for systems where you are not certain of the disk number that you will install onto in advance. Another advantage of this is that Windows will install the recovery partition last which follows the latest recommendation from Microsoft which would not happen if you specified the disk to install to in your answer file. Creates an Administrator level user named “WinAdmin” with no password.

Code:
<?xml version="1.0" encoding="utf-8"?>
<unattend xmlns="urn:schemas-microsoft-com:unattend">
    <settings pass="windowsPE">
        <component name="Microsoft-Windows-International-Core-WinPE" processorArchitecture="amd64" publicKeyToken="31bf3856ad364e35" language="neutral" versionScope="nonSxS" xmlns:wcm="http://schemas.microsoft.com/WMIConfig/2002/State" xmlns:xsi="http://www.w3.org/2001/XMLSchema-instance">
            <SetupUILanguage>
                <UILanguage>en-US</UILanguage>
            </SetupUILanguage>
            <InputLocale>en-US</InputLocale>
            <SystemLocale>en-US</SystemLocale>
            <UILanguage>en-US</UILanguage>
            <UILanguageFallback>en-US</UILanguageFallback>
            <UserLocale>en-US</UserLocale>
        </component>
        <component name="Microsoft-Windows-Setup" processorArchitecture="amd64" publicKeyToken="31bf3856ad364e35" language="neutral" versionScope="nonSxS" xmlns:wcm="http://schemas.microsoft.com/WMIConfig/2002/State" xmlns:xsi="http://www.w3.org/2001/XMLSchema-instance">
            <RunSynchronous>
                <RunSynchronousCommand wcm:action="add">
                    <Order>1</Order>
                    <Path>reg add HKLM\System\Setup\LabConfig /v BypassTPMCheck /t reg_dword /d 0x00000001 /f</Path>
                </RunSynchronousCommand>
                <RunSynchronousCommand wcm:action="add">
                    <Order>2</Order>
                    <Path>reg add HKLM\System\Setup\LabConfig /v BypassSecureBootCheck /t reg_dword /d 0x00000001 /f</Path>
                </RunSynchronousCommand>
                <RunSynchronousCommand wcm:action="add">
                    <Order>3</Order>
                    <Path>reg add HKLM\System\Setup\LabConfig /v BypassRAMCheck /t reg_dword /d 0x00000001 /f</Path>
                </RunSynchronousCommand>
                <RunSynchronousCommand wcm:action="add">
                    <Order>5</Order>
                    <Path>reg add HKLM\System\Setup\LabConfig /v BypassCPUCheck /t reg_dword /d 0x00000001 /f</Path>
                </RunSynchronousCommand>
                <RunSynchronousCommand wcm:action="add">
                    <Order>4</Order>
                    <Path>reg add HKLM\System\Setup\LabConfig /v BypassStorageCheck /t reg_dword /d 0x00000001 /f</Path>
                </RunSynchronousCommand>
            </RunSynchronous>
            <UserData>
                <ProductKey>
                    <Key>VK7JG-NPHTM-C97JM-9MPGT-3V66T</Key>
                </ProductKey>
                <AcceptEula>true</AcceptEula>
            </UserData>
            <ImageInstall>
                <OSImage>
                    <InstallFrom>
                        <Path>\install.wim</Path>
                    </InstallFrom>
                </OSImage>
            </ImageInstall>
        </component>
    </settings>
    <settings pass="oobeSystem">
        <component name="Microsoft-Windows-International-Core" processorArchitecture="amd64" publicKeyToken="31bf3856ad364e35" language="neutral" versionScope="nonSxS" xmlns:wcm="http://schemas.microsoft.com/WMIConfig/2002/State" xmlns:xsi="http://www.w3.org/2001/XMLSchema-instance">
            <InputLocale>en-US</InputLocale>
            <SystemLocale>en-US</SystemLocale>
            <UILanguage>en-US</UILanguage>
            <UILanguageFallback>en-US</UILanguageFallback>
            <UserLocale>en-US</UserLocale>
        </component>
        <component name="Microsoft-Windows-Shell-Setup" processorArchitecture="amd64" publicKeyToken="31bf3856ad364e35" language="neutral" versionScope="nonSxS" xmlns:wcm="http://schemas.microsoft.com/WMIConfig/2002/State" xmlns:xsi="http://www.w3.org/2001/XMLSchema-instance">
            <OOBE>
                <VMModeOptimizations>
                    <SkipAdministratorProfileRemoval>false</SkipAdministratorProfileRemoval>
                </VMModeOptimizations>
                <HideEULAPage>true</HideEULAPage>
                <HideOEMRegistrationScreen>true</HideOEMRegistrationScreen>
                <HideOnlineAccountScreens>true</HideOnlineAccountScreens>
                <HideWirelessSetupInOOBE>true</HideWirelessSetupInOOBE>
                <ProtectYourPC>1</ProtectYourPC>
                <UnattendEnableRetailDemo>false</UnattendEnableRetailDemo>
            </OOBE>
            <UserAccounts>
                <LocalAccounts>
                    <LocalAccount wcm:action="add">
                        <Password>
                            <Value>UABhAHMAcwB3AG8AcgBkADEAUABhAHMAcwB3AG8AcgBkAA==</Value>
                            <PlainText>false</PlainText>
                        </Password>
                        <DisplayName>Windows Admin</DisplayName>
                        <Group>administrators</Group>
                        <Name>WinAdmin</Name>
                    </LocalAccount>
                </LocalAccounts>
            </UserAccounts>
            <TimeZone>Central Standard Time</TimeZone>
            <AutoLogon>
                <Password>
                    <Value>UABhAHMAcwB3AG8AcgBkADEAUABhAHMAcwB3AG8AcgBkAA==</Value>
                    <PlainText>false</PlainText>
                </Password>
                <Enabled>true</Enabled>
                <LogonCount>1</LogonCount>
                <Username>WinAdmin</Username>
            </AutoLogon>
            <FirstLogonCommands>
                <SynchronousCommand wcm:action="add">
                    <CommandLine>reg add &quot;HKLM\SOFTWARE\Microsoft\Windows NT\CurrentVersion\Winlogon&quot; /v AutoLogonCount /t REG_DWORD /d 0 /f</CommandLine>
                    <Order>1</Order>
                </SynchronousCommand>
            </FirstLogonCommands>
        </component>
    </settings>
    <settings pass="specialize">
        <component name="Microsoft-Windows-Shell-Setup" processorArchitecture="amd64" publicKeyToken="31bf3856ad364e35" language="neutral" versionScope="nonSxS" xmlns:wcm="http://schemas.microsoft.com/WMIConfig/2002/State" xmlns:xsi="http://www.w3.org/2001/XMLSchema-instance">
            <TimeZone>Central Standard Time</TimeZone>
        </component>
    </settings>
    <cpi:offlineImage cpi:source="catalog://godzilla/data/windows/windows tools and deployment apps/assets for deployment/win 11 pro 21h2 catalog file/install_windows 10 pro.clg" xmlns:cpi="urn:schemas-microsoft-com:cpi" />
</unattend>

Autounattend_Bypass_Unattended.xml – Installs Windows 11 Pro on a UEFI based system to disk 0. Creates an Administrator level user named “WinAdmin” with no password. Bypasses the checks for supported CPU, TPM, Secure Boot, memory and strorage space requirements. IMPORTANT: Be aware that this is a 100% fully automated installation. It will wipe out disk 0 and install to it. Make sure that disk 0 is really the corrtect disk! Make sure you don’t accidentally boot a thumb drive or ISO image with this answer file on it because it WILL WIPE DISK 0 WITHOUT WARNING!

Code:
<?xml version="1.0" encoding="utf-8"?>
<unattend xmlns="urn:schemas-microsoft-com:unattend">
<settings pass="windowsPE">
<component name="Microsoft-Windows-International-Core-WinPE" processorArchitecture="amd64" publicKeyToken="31bf3856ad364e35" language="neutral" versionScope="nonSxS" xmlns:wcm="http://schemas.microsoft.com/WMIConfig/2002/State" xmlns:xsi="http://www.w3.org/2001/XMLSchema-instance">
<SetupUILanguage>
<UILanguage>en-US</UILanguage>
</SetupUILanguage>
<InputLocale>en-US</InputLocale>
<SystemLocale>en-US</SystemLocale>
<UILanguage>en-US</UILanguage>
<UILanguageFallback>en-US</UILanguageFallback>
<UserLocale>en-US</UserLocale>
</component>
<component name="Microsoft-Windows-Setup" processorArchitecture="amd64" publicKeyToken="31bf3856ad364e35" language="neutral" versionScope="nonSxS" xmlns:wcm="http://schemas.microsoft.com/WMIConfig/2002/State" xmlns:xsi="http://www.w3.org/2001/XMLSchema-instance">
<RunSynchronous>
<RunSynchronousCommand wcm:action="add">
<Order>1</Order>
<Path>reg add HKLM\System\Setup\LabConfig /v BypassTPMCheck /t reg_dword /d 0x00000001 /f</Path>
</RunSynchronousCommand>
<RunSynchronousCommand wcm:action="add">
<Order>2</Order>
<Path>reg add HKLM\System\Setup\LabConfig /v BypassSecureBootCheck /t reg_dword /d 0x00000001 /f</Path>
</RunSynchronousCommand>
<RunSynchronousCommand wcm:action="add">
<Order>3</Order>
<Path>reg add HKLM\System\Setup\LabConfig /v BypassRAMCheck /t reg_dword /d 0x00000001 /f</Path>
</RunSynchronousCommand>
<RunSynchronousCommand wcm:action="add">
<Order>5</Order>
<Path>reg add HKLM\System\Setup\LabConfig /v BypassCPUCheck /t reg_dword /d 0x00000001 /f</Path>
</RunSynchronousCommand>
<RunSynchronousCommand wcm:action="add">
<Order>4</Order>
<Path>reg add HKLM\System\Setup\LabConfig /v BypassStorageCheck /t reg_dword /d 0x00000001 /f</Path>
</RunSynchronousCommand>
</RunSynchronous>
<DiskConfiguration>
<Disk wcm:action="add">
<CreatePartitions>
<CreatePartition wcm:action="add">
<Order>1</Order>
<Size>500</Size>
<Type>Primary</Type>
</CreatePartition>
<CreatePartition wcm:action="add">
<Order>2</Order>
<Size>260</Size>
<Type>EFI</Type>
</CreatePartition>
<CreatePartition wcm:action="add">
<Order>3</Order>
<Size>128</Size>
<Type>MSR</Type>
</CreatePartition>
<CreatePartition wcm:action="add">
<Extend>true</Extend>
<Order>4</Order>
<Type>Primary</Type>
</CreatePartition>
</CreatePartitions>
<ModifyPartitions>
<ModifyPartition wcm:action="add">
<Format>NTFS</Format>
<Label>WinRE</Label>
<Order>1</Order>
<PartitionID>1</PartitionID>
<TypeID>DE94BBA4-06D1-4D40-A16A-BFD50179D6AC</TypeID>
</ModifyPartition>
<ModifyPartition wcm:action="add">
<Format>FAT32</Format>
<Label>System</Label>
<Order>2</Order>
<PartitionID>2</PartitionID>
</ModifyPartition>
<ModifyPartition wcm:action="add">
<Order>3</Order>
<PartitionID>3</PartitionID>
</ModifyPartition>
<ModifyPartition wcm:action="add">
<Format>NTFS</Format>
<Label>Windows</Label>
<Letter>C</Letter>
<Order>4</Order>
<PartitionID>4</PartitionID>
</ModifyPartition>
</ModifyPartitions>
<DiskID>0</DiskID>
<WillWipeDisk>true</WillWipeDisk>
</Disk>
</DiskConfiguration>
<UserData>
<ProductKey>
<Key>VK7JG-NPHTM-C97JM-9MPGT-3V66T</Key>
</ProductKey>
<AcceptEula>true</AcceptEula>
</UserData>
<ImageInstall>
<OSImage>
<InstallTo>
<DiskID>0</DiskID>
<PartitionID>4</PartitionID>
</InstallTo>
</OSImage>
</ImageInstall>
</component>
</settings>
<settings pass="oobeSystem">
<component name="Microsoft-Windows-International-Core" processorArchitecture="amd64" publicKeyToken="31bf3856ad364e35" language="neutral" versionScope="nonSxS" xmlns:wcm="http://schemas.microsoft.com/WMIConfig/2002/State" xmlns:xsi="http://www.w3.org/2001/XMLSchema-instance">
<InputLocale>en-US</InputLocale>
<SystemLocale>en-US</SystemLocale>
<UILanguage>en-US</UILanguage>
<UILanguageFallback>en-US</UILanguageFallback>
<UserLocale>en-US</UserLocale>
</component>
<component name="Microsoft-Windows-Shell-Setup" processorArchitecture="amd64" publicKeyToken="31bf3856ad364e35" language="neutral" versionScope="nonSxS" xmlns:wcm="http://schemas.microsoft.com/WMIConfig/2002/State" xmlns:xsi="http://www.w3.org/2001/XMLSchema-instance">
<OOBE>
<VMModeOptimizations>
<SkipAdministratorProfileRemoval>false</SkipAdministratorProfileRemoval>
</VMModeOptimizations>
<HideEULAPage>true</HideEULAPage>
<HideOEMRegistrationScreen>true</HideOEMRegistrationScreen>
<HideOnlineAccountScreens>true</HideOnlineAccountScreens>
<HideWirelessSetupInOOBE>true</HideWirelessSetupInOOBE>
<ProtectYourPC>1</ProtectYourPC>
<UnattendEnableRetailDemo>false</UnattendEnableRetailDemo>
</OOBE>
<UserAccounts>
<LocalAccounts>
<LocalAccount wcm:action="add">
<Password>
<Value>UABhAHMAcwB3AG8AcgBkADEAUABhAHMAcwB3AG8AcgBkAA==</Value>
<PlainText>false</PlainText>
</Password>
<DisplayName>Windows Admin</DisplayName>
<Group>administrators</Group>
<Name>WinAdmin</Name>
</LocalAccount>
</LocalAccounts>
</UserAccounts>
<TimeZone>Central Standard Time</TimeZone>
<AutoLogon>
<Password>
<Value>UABhAHMAcwB3AG8AcgBkADEAUABhAHMAcwB3AG8AcgBkAA==</Value>
<PlainText>false</PlainText>
</Password>
<Enabled>true</Enabled>
<LogonCount>1</LogonCount>
<Username>WinAdmin</Username>
</AutoLogon>
<FirstLogonCommands>
<SynchronousCommand wcm:action="add">
<CommandLine>reg add &quot;HKLM\SOFTWARE\Microsoft\Windows NT\CurrentVersion\Winlogon&quot; /v AutoLogonCount /t REG_DWORD /d 0 /f</CommandLine>
<Order>1</Order>
</SynchronousCommand>
</FirstLogonCommands>
</component>
</settings>
<settings pass="specialize">
<component name="Microsoft-Windows-Shell-Setup" processorArchitecture="amd64" publicKeyToken="31bf3856ad364e35" language="neutral" versionScope="nonSxS" xmlns:wcm="http://schemas.microsoft.com/WMIConfig/2002/State" xmlns:xsi="http://www.w3.org/2001/XMLSchema-instance">
<TimeZone>Central Standard Time</TimeZone>
</component>
</settings>
<cpi:offlineImage cpi:source="catalog://godzilla/crucial_nvmewin11/sources/install_windows 10 pro.clg" xmlns:cpi="urn:schemas-microsoft-com:cpi" />
</unattend>
error: Content is protected !!