Hosting Anonymous Website on Tor Network

Introduction: Clearnet vs. Darknet
The Internet is divided — in terms of anonymity — into two nets: Clearnet and Darknet. The main difference between the two nets is traceability. In Clearnet, sources and destinations know about each other; in every communication, the source knows the destination address and the destination knows the source address. This is the Internet as most people know it; whenever you access a website, like www.google.com, www.apple.com, www.amazon.com, etc., your browser knows the exact address (IP) of each of those websites. They are traceable. Similarly, those websites know your IP address and can trace it back as well.
Let’s take the example of www.google.com. When I type this address in my browser, the browser through the OS will resolve this hostname into its corresponding IP address, which is now 172.217.21.68. By performing a geo-location and WHOIS lookups, we can directly know that this IP address is located in Mountain View, California, USA. We can also know that it belongs to Google LLC ISP.
Similarly, Google would know the IP address of the client that is connecting to it. Given the nature of TCP/IP, when a client connects to a server over TCP or UDP protocol, communication takes place between the IP address of the client and that of the server. Thus, the server always knows the IP address of the client, and the client always knows the IP address of the server. Both of them can exactly locate the geographical location — city and country — of the other, in addition to the ISP under which the IP address is assigned.
We know that most of the times clients have private IP addresses (e.g., 192.168.0.5) which are not routable on the Internet. However, the connection will undergo a NAT (Network Address Translation) process at the gateway. However, the IP address of the gateway is public and traceable. The gateway can be under the administration of an organization, such as a business company or even a local ISP. Nonetheless, NAT does not mean anonymity. Its use is to share a public IP address with multiple private systems.
When clients want to hide themselves, that is, when they want to remain anonymous while browsing the Internet, a popular technique is to use a VPN (Virtual Private Network) service. With VPN, the client (e.g., the browser) does not connect directly to the intended server (e.g., www.google.com); rather, it establishes an end-to-end tunnel with a VPN system which may exist anywhere in the world. Then, through that VPN, another connection is made with the intended server. In this case, the server — such as www.google.com — communicates with the VPN system; it only knows the IP address of that VPN system. In other words, the VPN system appears to be the client. The server would have no idea about the real client.
At maximum, VPN provides anonymity for the client who is browsing the Internet. But it will not make the websites anonymous. On the Clearnet, all websites are traceable. What we are interested in here is to make our website itself anonymous. We want a website that people access without knowing its real IP address or its actual location.
Tor: The Onion Router
One of the most popular and widely used Darknets available nowadays is Tor — which stands for The Onion Router. It enables anonymous communication between its participants, and provides confidentiality, privacy, and freedom. Confidentiality is the result of using strong cryptographic protocols such as SSL/TLS; privacy is the anonymity provided by relaying the messages through a chain of multiple routers (relays) where each router can only know about the previous and next ones in the chain but not the whole chain; and freedom is given by allowing people to share and access whatever they want.
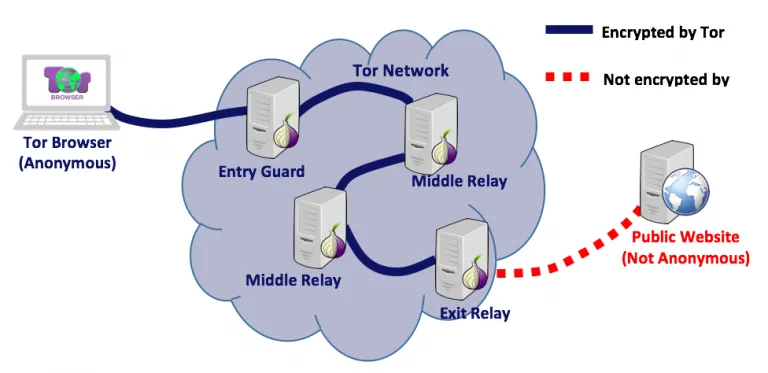
The above diagram shows a typical scenario of a Tor client accessing a public website. The Tor browser connects initially to a Tor relay that is called Entry Guard; it is the first Tor relay in the chain; however, it does not know that it is the first. The Entry Guard has no idea whether the previous system is another relay or a client. The Entry guard connects to another relay called Middle Relay which also connects to another Middle Relay. The last relay in the chain is the Exist Relay which connects to the public website. Each relay knows only the previous system and the next one, but never the whole chain. The public website knows that it is being accessed through Tor, but it has no way to know any system beyond the Exit Relay. From the public website perspective, connection is initiated by the Exit Relay. The following image shows a list of Tor Relays when accessing Google website (clearnet) from the Tor browser:
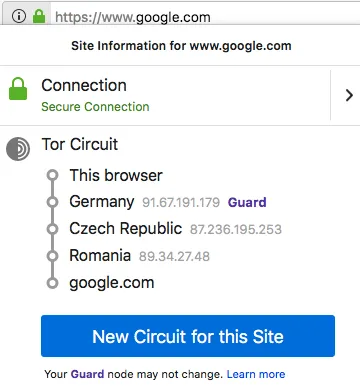
We can see that the connection passes first through the Entry Guard (91.67.191.179) in Germary, then through the Middle Relay (87.236.195.253) in Czech Republic, and finally through the Exit Relay (89.34.27.48) in Romania before it terminates at Google server.
To provide the required anonymity, Tor uses a technology called onion routing. Basically, the Tor browser encapsulates the message — which is to be sent to the remote server — with multiple layers of encryption. Each relay in the Tor chain can decrypt and peel one layer only. The last relay (Exist Relay) removes the last layer and sends the message to the remote server. This process of making multiple layers of encryption is what gave this protocol its name, Onion Routing.
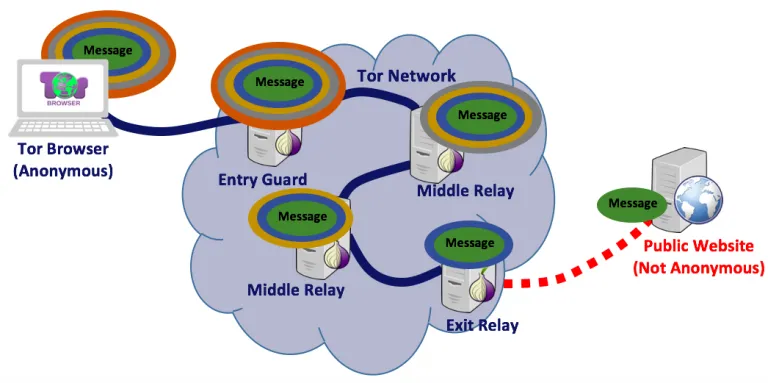
The above diagram shows how the message would flow until it reaches the public website. We can see that the Tor browser adds as many layers as the number of relays in the chain.
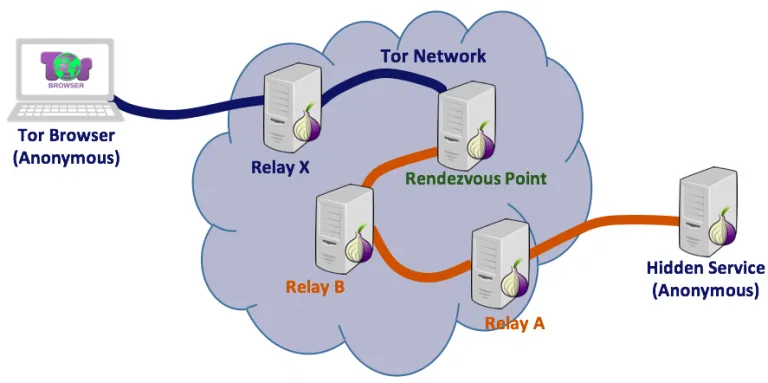
However, when you access a web server that is hidden in the Tor Network, the mechanism of access changes slightly. In short, one Tor Relay server will be chosen as a Rendezvous Point (RP); and then, there will be two chains: one from the Tor client to the RP, and another from the Tor hidden server to the RP. The following diagram shows — from a higher perspective — the Tor provides anonymous access to hidden services:
One last thing we need to know when accessing a hidden service is the Onion Address. Unlike normal websites which we access using their URLs, hidden services are accessed using a special type of addresses called onion addresses. Each Onion Address contains an opaque non-mnemonic string of 16 characters followed by a special TLD (top level domain) address of .onion. All .onion addresses are not part of the typical DNS on the Internet. Here is an example of an Onion Address:
The following image shows a list of servers when accessing an Onion server (DuckDuckGo hidden website):
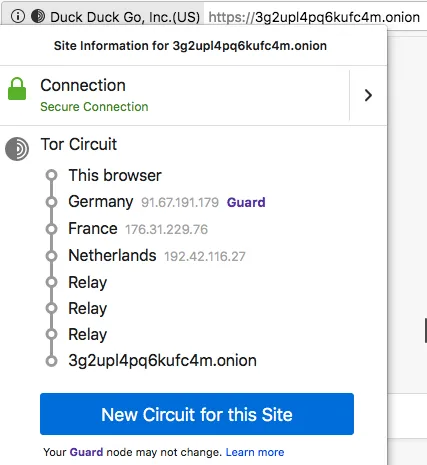
There are two connections here: the first starts from the Tor browser and ends at the Rendezvous Point (192.42.116.27) in Netherlands, and the second starts from the hidden website (the Onion server) and terminates at the Rendezvous Point passing through hidden Relays.
Hosting on Tor
[1] Installing and Configuring Tor
Tor comes in two components: the Tor browser, and the Tor server. The Tor browser is used to access either websites on the Clearnet while maintaining your anonymity, or websites hidden on the Tor network itself. In both cases, you remain anonymous to the website. However, if you want to hide your own website, you will need the Tor server. To install those two components on your Kali Linux system, you will need to issue the following commands:
apt-get update
apt-get install tor
apt-get install torbrowser-launcher
[2] Setting up an HTTP Server
It is time now to configure your web server. You can use any webserver you like. For the sake of this tutorial, however, we will use Apache server on Kali Linux. One important consideration you should be aware of is the fact that your web server must run on localhost only; that is, it must be listening only on 127.0.0.1. The reason this is important is that it guarantees the anonymity we are after. The default behavior of Apache server — once you start it — is to listen on all available interfaces. If you do not change that, your web server may become accessible from Clearnet in addition to the Tor network, and you do not want that. You want your website to be accessible only from Tor. To change this behavior, we will edit the file /etc/apache2/ports.conf:
# edit /etc/apache2/ports.conf
Then, change the IP address 0.0.0.0 to 127.0.0.1 for port 80 and 443 (SSL/TLS) as follows:
Listen 127.0.0.1:80

<IfModule ssl_module>
Listen 127.0.0.1:443
</IfModule>

<IfModule mod_gnutls.c>
Listen 127.0.0.1:443
</IfModule>
Then, save the file ports.conf.
Add the files of your website to the director /var/www/html. For the sake of this tutorial, we will create the file oursite.html which will include the following HTML code:
<html>
	<body>
		<h1><center>This is our Hidden Website</center></h1>
	</body>
</html>
Now, we will save the file oursite.html in /var/www/html. It is time to start Apache:
# /etc/init.d/apache2 restart
We can now verify that our website is accessible on the locahost by accessing it through a normal web browser, e.g., Firefox, with the address

[3] Add the Website to Tor
Now that we have our web server listening on localhost, we can configure our Tor program to designate this server as a Tor hidden service. We do this by editing Tor configuration file /etc/tor/torrc as follows:
############### This section is just for location-hidden services ###

## Once you have configured a hidden service, you can look at the
## contents of the file ".../hidden_service/hostname" for the address
## to tell people.
##
## HiddenServicePort x y:z says to redirect requests on port x to the
## address y:z.

HiddenServiceDir /var/lib/tor/hidden_service/
HiddenServicePort 80 127.0.0.1:80

#HiddenServiceDir /var/lib/tor/other_hidden_service/
#HiddenServicePort 80 127.0.0.1:80
#HiddenServicePort 22 127.0.0.1:22
We need to uncomment the line starting with HiddenServiceDir. We can add as many HiddenServiceDir as we want depending on the number of hidden services we want to host. And then, we need to uncomment the line with the HiddenServicePort directive.
[4] Run Tor Service
After editing the configuration file, we need to run the actual Tor service. It will perform all necessary work to register your website in the Tor network. It will also create private and public keys for encryption and will create an onion address which people are going to use to access your website.
# torNov 13 17:18:09.832 [notice] Tor 0.3.4.8 (git-5da0e95e4871a0a1) running on Linux with Libevent 2.1.8-stable, OpenSSL 1.1.0h, Zlib 1.2.8, Liblzma 5.2.2, and Libzstd 1.3.5.
Nov 13 17:18:09.851 [notice] Tor can’t help you if you use it wrong! Learn how to be safe at https://www.torproject.org/download/download#warning
Nov 13 17:18:09.947 [notice] Read configuration file “/etc/tor/torrc”.
…
…
…
Nov 13 17:18:36.000 [notice] Bootstrapped 90%: Establishing a Tor circuit
Nov 13 17:18:37.000 [notice] Tor has successfully opened a circuit. Looks like client functionality is working.
Nov 13 17:18:37.000 [notice] Bootstrapped 100%: Done
Once it is done, leave the terminal window open. The Tor program will create two files under the directory /var/lib/tor/hidden_services/ and those files are:
- hostname: this file contains the Onion address of your website.
- private_key: this file contains the private key. It should be completely secure.
One important note here is that the private_key file must be kept confidential and secure. Tor generates for your website two keys: public and private. The public key is sent to the actual Tor network and gets stored in a directory database along with many other public keys of other websites. Users wishing to access your website use that public key to make the connection. However, your local Tor service uses the private key to decrypt the traffic.
[5] Accessing the Hidden Website
If you have done everything correctly up to now, you should have your onion address in the file /var/lib/tor/hidden_service/hostname. In our example, we have the following address:
# cd /var/lib/tor/hidden_service/# cat hostname
hq6zcsomi5cmondk.onion
All you need to do now is to open a Tor Browser — from any system on the Internet — and type the above address in the URL bar:
# torbrowser-launcher &
Notice that we also need to enter the html file name — we created earlier — after the address. Thus, our address looks exactly like this:

learn more
The Dark Web Browser: What Is Tor, Is It Safe, and How to Use It
Most Popular and Interesting Dark Web Websites (with Onion Links)
CIA sets up Untraceable Dark Web Website on the Anonymous, Encrypted Tor Network
Hosting Anonymous Website on Tor Network

